Table of Contents
Advertisement
Quick Links
Advertisement
Table of Contents

Summary of Contents for AGKNX ASSY 26-010
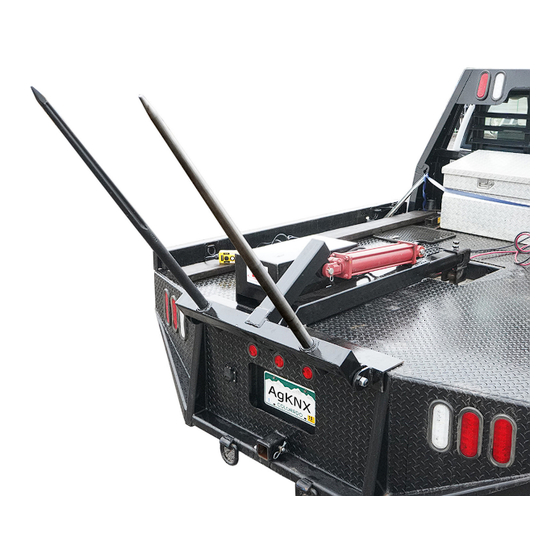
- Page 1 Truck Bed Bale Spear PART# 26-010, ASSY, TRUCK BED BALE SPEAR Operation Manual This safety alert symbol identifies important safety messages in this manual. Failure to follow this important safety information may result in serious injury or death. 29-030...
-
Page 3: Table Of Contents
TABLE OF CONTENTS Intended Use ..............4 Personal Protective Equipment ..........4 General Safety Information..........5 Parts List ................6 Assembly Instructions ............7 Installation Instuctions ............13 Operation Instructions ............13 Maintenance ..............14 Trouble Shooting ..............15 Specifications ..............19 Warranty ................20 Registration ..............21... -
Page 4: Intended Use
The installer assumes responsibilty for property damage or personal injury. Call our customer service department at 303-278-0664,or email at customerservice@agknx.com if you have any questions or concerns about the safe operation of this equipment. -
Page 5: General Safety Information
IMPORTANT SAFETY INFORMATION GENERAL SAFETY Failure to follow warnings, cautions, assembly and operation instructions in the Operation Manual may result in serious injury or death. Read the Operation Manual before installation and operation of this truck bed bale spear. Do not permit children to operate this equipment at any time. Do not permit others that have not read and understood the complete Operation Manual to operate this equipment. -
Page 6: Parts List
IMPORTANT SAFETY INFORMATION PARTS LIST ITEM NO. PART NUMBER DESCRIPTION QTY. 26-004 POWER UNIT, HAY SPEAR 26-005 HAY SPEAR 26-006 LUG, 5/16” STUD, #4 GAUGE WIRE 26-007 200 AMP BREAKER 26-008 POWER CONNECTOR, #4, 176”L 26-009 POWER CONNECTOR, #4, 58”L 26-011 WELDMENT, FRAME, BALE SPEAR 26-021... -
Page 7: Assembly Instructions
ASSEMBLY INSTRUCTIONS STEP 1: Attach the hydraulic cylinder • Remove the pin and clip from the hydraulic cylinder. • Place the hydraulic cylinder on the frame with the hydraulic ports facing the pump mounting frame. STEP 2: Hydraulic cylinder assembly •... - Page 8 ASSEMBLY INSTRUCTIONS STEP 3: Hydraulic power unit assembly • Attach the power unit (P/N: 26-004) to the frame using the M8-1.25x12mm bolts provided. Tighten the bolts using a 5/8" wrench. STEP 4: Connect the power unit to the cylinder • Remove the plastic caps from the hydraulic fittings on the valve.
- Page 9 ASSEMBLY INSTRUCTIONS • Attach the hydraulic hose (P/N: 31-024) from the hydraulic cylinder's extension port to the valve of the power unit. • Make sure the hose doesn't spin and kink when tightening the hydraulic fittings. • Attach the hydraulic hose (P/N: 31-024) from the hydraulic cylinder's retraction port to the valve of the power unit.
- Page 10 ASSEMBLY INSTRUCTIONS STEP 5: Wiring the power unit to the battery • There are two different ways to mount the wires to the vehicle or auxiliary battery. A 200 Amp breaker (P/N: 26-007) is used, it is best used close to the battery. One option is to mount the breaker under the hood of the vehicle or can be attached to the frame of the bale spear.
- Page 11 ASSEMBLY INSTRUCTIONS • Determine the breaker location and the length of positive wire before and after the breaker. Cut the positive (red) wire and attach a wire terminal to both ends. Attach the wire terminals to the breaker. The breaker has markings indicating which stud goes to the battery (BAT LINE) and which goes to the power unit (AUX LINE).
- Page 12 ASSEMBLY INSTRUCTIONS STEP 6: Fill the reservoir with hydraulic fluid Hydraulic recommendation: ISO Viscosity Grade 22-46 cSt @ 40 . Anti-wear, anti-foaming & rust °C hydraulic fluid is recommended inhibitor additives are recommended. ATF can be used for colder climates. ATF Dexron III does not have anti-foaming agents in the fluid. Fluid areation and cavitation can occur.
-
Page 13: Installation Instuctions
INSTALLATION INSTRUCTIONS This bale spear is for use with truck beds that have a 2-5/16" ball mount for gooseneck trailers. It can be used in box truckbeds, or flatbeds with exposed or recessed balls. It can accommodate balls that are 40-54" from the rear of the bed. •... -
Page 14: Maintenance
MAINTENANCE Maintenance: Hydraulic oil change is required after the initial 100 operation hours. Routine oil change should be performed every 3000 hours or 2 years after intial change. Check hydraulic fluid level regularly before operation. Check electrical connections regularly for corrsions on all connections and battery cables. Load test battery often before use. -
Page 15: Trouble Shooting
TROUBLE SHOOTING This information is intend use by a service technician who is familiar with hydraulic components adn understands the requried safety precautions. Tampering or adjusting the relief valve will void warrnaty and could cause catastrophic failure which could result in equipment damage, severe injury or death. Shorting of the electrical system can occur during installation or servicing. - Page 16 TROUBLE SHOOTING SYMPTOMS Possible Cause Correction Notes Low battery / poor ground Load test battery Charge or replace battery Clean contact in hand control Cleaning contacts with abrasive mate- Dirty contacts in hand control with eraser rial will cause frequent failure Check for bent valve stem Replace valve if stem is bent Double check you are getting power...
- Page 17 TROUBLE SHOOTING Possible Possible Cause Correction Notes Dead or low battery Load test battery Charge or replace battery Poor ground Ground battery directly to DC motor Use jumper cables to jump ground only Ensure power is getting to coil, check all electrical connections and check for magnetism Check ground wire or valve stem.
- Page 18 TROUBLE SHOOTING SYMPTOMS Possible Cause Correction Notes Add fluid to reservoir when Low fluid level cylinder is fully retracted Reservoir Before running power, unit ensure all Remove reservoir & tighten or overflows when Loose inlet air bubbles have dissipated to prevent replace inlet tube on pump lowering further aeration of fluid...
-
Page 19: Specifications
SPECIFICATIONS OVERALL DIMENSIONS HYDRAULIC CYLINDER DIAMETER (IN) STROKE (IN) LENGTH (IN) PIN SIZE (IN) HYDRAULIC POWER UNIT PRESSURE MODEL VOLTAGE (V) POWER (KW) OIL TANK (L) (PSI) PAGE 19... -
Page 20: Warranty
AGKNX sole discretion. This warranty inures to the benefit of the original purchaser only, is non- transferable, and has no cash value. Call our customer service department at 303-278-0664 for warranty questions. -
Page 21: Registration
REGISTRATION Acceptance of responsibility: I (purchaser) have read the Operation Manual and Limited Warranty or someone has read and explained all instructions to me. I understand this warranty does not cover any labor and that all disputes will be settled by binding arbitration. Warranty void if any attempt to repair or replace defective parts has been made by unauthorized personnel. - Page 22 REGISTRATION WARRANTY VOID IF REGISTRATION IS NOT POST MAKED WITHIN 15 DAYS OF PURCHASE. Mail to: AGKNX 15000 West 44th Ave, Suite B Golden, CO 80403 Serial #: ________________________________________________________________________________ Purchase Date: __________________________________________________________________________ Purchased From: ________________________________________________________________________ Purchaser: _____________________________________________________________________________ Purchaser’s Address: ____________________________________________________________________...
Need help?
Do you have a question about the ASSY 26-010 and is the answer not in the manual?
Questions and answers