Craftsman WEEDWACKER 316.791080 Operator's Manual
2-cycle gas trimmer
Hide thumbs
Also See for WEEDWACKER 316.791080:
- Operator's manual (32 pages) ,
- Operator's manual (3 pages)
Table of Contents
Advertisement
Available languages
Available languages
Quick Links
Operator's Manual
2-Cycle
WEEDWACKER
Model No. 316.791080
Plug-In Power Start or Power Bit Start Optional!
This unit has an alternative starting method that many people find easier than pulling a rope
(items sold separately). For more information, read this manual, contact a local Craftsman outlet
Sears Brands Management Corporation, Hoffman Estates, IL 60179 U.S.A.
769-05781 P00
®
GAS TRIMMER
®
or go to www.craftsman.com.
Visit our website: www.craftsman.com
CAUTION: Before using this
product, read this manual
and follow all safety rules
and operating instructions.
• SAFETY
• ASSEMBLY
• OPERATION
• MAINTENANCE
• PARTS LIST
• ESPAÑOL, P. 13
01/10
Advertisement
Table of Contents

Related Manuals for Craftsman WEEDWACKER 316.791080


Summary of Contents for Craftsman WEEDWACKER 316.791080
- Page 1 Plug-In Power Start or Power Bit Start Optional! This unit has an alternative starting method that many people find easier than pulling a rope (items sold separately). For more information, read this manual, contact a local Craftsman outlet or go to www.craftsman.com.
-
Page 2: Table Of Contents
RULES FOR SAFE OPERATION CALIFORNIA PROPOSITION 65 WARNING The purpose of safety symbols is to attract your attention to possible dangers. The safety symbols, and their explanations, deserve your careful attention and understanding. The safety warnings do not by themselves WARNING eliminate any danger. -
Page 3: Warranty
CRAFTSMAN FULL WARRANTY If this Craftsman product fails due to a defect in material or workmanship within two years from the date of purchase, return it to any Sears store, Parts & Repair Service Center, or other Craftsman outlet in the United States for free repair (or replacement if repair proves impossible). -
Page 4: Know Your Unit
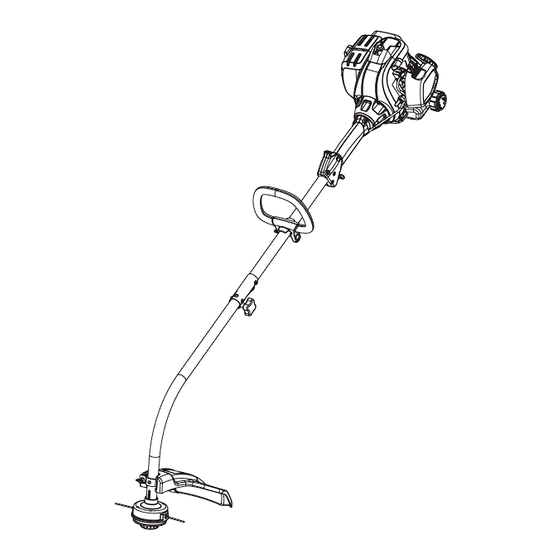
KNOW YOUR UNIT APPLICATIONS As a trimmer: • Cutting grass and light weeds Muffler • Edging Spark Plug • Decorative trimming around trees, fences, etc. Other optional accessories may be used with this unit. Shaft Grip Starter Rope Grip On/Off Control D-Handle Fuel Cap... -
Page 5: Oil And Fuel Information
ASSEMBLY INSTRUCTIONS OIL & FUEL INFORMATION OPERATING THE CONVERTIBLE™ COUPLER SYSTEM OIL AND FUEL MIXING INSTRUCTIONS Old and/or improperly mixed fuel are the main reasons for the unit not WARNING: Before using any attachment, read and understand running properly. Be sure to use fresh, clean unleaded fuel. Follow the the manual that came with the attachment. -
Page 6: Starting/Stopping Instructions
STARTING/STOPPING INSTRUCTIONS STARTING/STOPPING INSTRUCTIONS STARTING INSTRUCTIONS WARNING: Operate this unit only in a well-ventilated outdoor area. Mix gas with oil. See Oil and Fuel Mixing Instructions. Carbon monoxide exhaust fumes can be lethal in a confined area. Fill the fuel tank with the fuel/oil mixture. NOTE: There is no need to turn the unit on. -
Page 7: Maintenance And Repair Instructions
NOTE: Some maintenance procedures may require special tools or skills. If one end of the line through unsure about these procedures take the unit to Craftsman or other one of the two holes in the qualified service dealer. Call 1-800-4-MY-HOME ®... - Page 8 Fig. 24 the unit. Contact a Hold the inner reel in place and install the bump knob by turning Craftsman or other clockwise. Tighten securely. qualified service dealer to make carburetor adjustments.
-
Page 9: Cleaning And Storage
Start (items sold separately). If choosing to start the unit using one of these • Drain fuel from unit. features or have questions, please contact your local Craftsman retailer or • Tighten fuel cap before transporting. call 1-800-4-MY-HOME® for more information and purchasing. You may •... -
Page 10: Troubleshooting Chart
Old or improperly mixed fuel Drain fuel tank and add fresh fuel mixture Improper carburetor adjustment Take to a Craftsman or other qualified service dealer for adjustment ENGINE WILL NOT ACCELERATE Old or improperly mixed fuel Drain fuel tank and add fresh fuel mixture... -
Page 11: Specifications
REPAIR PROTECTION AGREEMENTS Congratulations on making a smart purchase. Your new Craftsman® product is designed and manufactured for years of dependable operation. But like all products, it may require repair from time to time. That’s when having a Repair Protection Agreement can save you money and aggravation. - Page 12 NOTES...
- Page 13 • FUNCIONAMIENTO • MANTENIMIENTO • LISTADO DE PIEZAS PRECAUCION: Lea el manual del operador y siga todas las advertencias e instrucciones de seguridad. Sears Brands Management Corporation, Hoffman Estates, IL 60179 U.S.A. Visite nuestro sitio web: www.craftsman.com 769-05781 P00 01/10...
- Page 14 NORMAS PARA UNA OPERACION SEGURA PROPOSICIÓN 65 DE CALIFORNIA Los símbolos de seguridad se utilizan para llamar su atención sobre posibles peligros. Los símbolos de seguridad y sus explicaciones merecen toda su atención y comprensión. Los símbolos de seguridad no eliminan ningún peligro ADVERTENCIA por sí...
- Page 15 Lista de Piezas de este manual del operador y distribuidos por una toma de Craftsman o centro de servicio. El uso de cualquier pieza • Ajuste la posición de la D-manija para facilitar el mejor agarre.
- Page 16 GARANTÍA TOTAL DE CRAFTSMAN Si este producto de Craftsman Professional falla debido a un defecto en el material o en la mano de obra dentro de un período de tres años a partir de la fecha de compra, devuélvalo a cualquier tienda o Centro de Servicio de Piezas y Reparaciones Sears u otro establecimiento de Craftsman en los Estados Unidos para que sea reparado sin costo alguno (o ser reemplazado si resulta imposible repararlo).
- Page 17 INSTRUCCIONES DE ENSAMBLE INSTRUCCIONES DE ENSAMBLE INSTALACIÓN Y AJUSTE DE LA MANIJA EN D CÓMO SACAR EL ACCESORIO DE CORTE U OTRO ACCESORIO Empuje la manija D hacia Gire la perilla en sentido Mango del eje Bastidor del eje Acoplador de Botón de desconexión abajo sobre el bastidor del eje antihorario para aflojarla (Fig.
- Page 18 INFORMACION DEL ACEITE Y DEL COMBUSTIBLE INSTRUCCIONES DE ARRANQUE Y APAGADO CARGA DE COMBUSTIBLE EN LA UNIDAD NOTA: La unidad usa INCREDI-PULL™ lo cual reduce considerablemente el esfuerzo requerido para arrancar el motor. Debe halar el cordón de ADVERTENCIA: Saque la tapa del combustible lentamente arranque lo suficiente para oír que el motor trata de arrancar.
- Page 19 Si no está apagar el motor. Para soltar más seguro sobre estos procedimientos, lleve la unidad a Craftsman o línea, golpee suavemente el a otro proveedor de servicio calificado. Para más información,...
- Page 20 INSTRUCCIONES DE MANTENIMIENTO Y REPARACION Verifique el desgaste de los 14. Mientras sostiene el carrete Bobina Ojalillos dientes de posición del interior y la bobina exterior, exterior carrete interior y bobina tome los extremos partidos y Resorte exterior (Fig. 16). Si es tire con firmeza para soltar la necesario, saque la rebaba o línea de las ranuras de...
- Page 21 Si decide arrancar la unidad utilizando uno de estos sistemas de de la cabeza del cilindro girando una llave de casquillo de 5/8 de arranque o tiene alguna pregunta, comuníquese con el distribuidor Craftsman pulgada en sentido antihorario. de su localidad o llame al 1-800-4-MY-HOME ®...
- Page 22 Drene el tanque con combustible / Agregue mezcla de combustible nueva El carburador no está ajustado en forma correcta Tomar a un Craftsman o otro comerciante de servicio cualificado para el ajuste EL MOTOR NO ACELERA El combustible es viejo o está mal mezclado Drene el tanque con combustible / Agregue mezcla de combustible nueva El accesorio de corte está...
- Page 23 CONVENIO DE PROTECCIÓN DE REPARACIÓN Felicidades por haber realizado una compra inteligente. Su nuevo producto Craftsman® está diseñado y fabricado para ofrecerle años de funcionamiento confiable. Pero como todos los productos, es posible que sea necesario repararlo de vez en cuando. Ahí es cuando tener un Convenio de Protección de Reparación puede ahorrarle dinero y problemas.
- Page 24 NOTES...
- Page 25 NOTES...
- Page 26 NOTES...
- Page 27 NOTES...
- Page 28 NOTES...
- Page 29 NOTES...
-
Page 30: Parts List
PARTS LIST REPLACEMENT PARTS - MODEL 316.791080 2-CYCLE GAS TRIMMER Item Part No. Description Item Part No. Description 753-06282 Rear Cover Assembly (includes 2 & 3) 791-181930 Tank Screw 791-181862 Starter Screw 753-05057 Fuel Cap 753-06244 Starter Assembly Guard (includes 2) 791-182366 U-Shaped Nut 753-06245... - Page 31 PARTS LIST REPLACEMENT PARTS - MODEL 316.791080 2-CYCLE GAS TRIMMER Item Part No. Description 753-04234 Throttle Housing Assembly (includes 2-4) 791-182405 Switch 753-04119 Throttle Trigger 791-182690 Throttle Trigger Spring 753-04344 Upper Shaft Housing Assembly 753-05461 D-Handle (includes 7) 791-181587 D-Handle Hardware Assembly 753-1190 Split Boom Coupler (includes 9-12) 791-182057...
- Page 32 Get it fixed, at your home or ours! Your Home For troubleshooting, product manuals and home solutions advice: www.managemyhome.com For repair – in your home – of all major brand appliances, lawn and garden equipment, or heating and cooling systems, no matter who made it, no matter who sold it! For the replacement parts, accessories and owner’s manuals that you need to do-it-yourself.
Need help?
Do you have a question about the WEEDWACKER 316.791080 and is the answer not in the manual?
Questions and answers