Table of Contents
Advertisement
Available languages
Available languages
NASync DXP4800 Network Attached Storage
User Manual | Benutzerhandbuch | 用户手册
The terms HDMI, HDMI High-Definition Multimedia Interface, HDMI trade dress and the HDMI Logos
are trademarks or registered trademarks of HDMI Licensing Administrator, Inc.
Note: Images and information may var y due to product improvements,
please refer to the actual product.
If necessar y, please contact us to obtain the latest version of the manual.
Hinweis: Bilder und Informationen können aufgrund von Produktverbesserungen variieren,
bitte beziehen Sie sich auf das tatsächliche Produkt.
Falls er forderlich, kontaktieren Sie uns bitte,
um die neueste Version der Gebrauchsanweisung zu erhalten.
由于产品 升 级,图 示、 参 数 等 信息 和实 物 略 有差 异, 请以 实 物 为准 。
如 有 需 要, 可 联系 我 们 获 取 最 新 说 明书 。
Advertisement
Table of Contents

Related Manuals for UGREEN NASync DXP4800


Summary of Contents for UGREEN NASync DXP4800
- Page 1 Falls er forderlich, kontaktieren Sie uns bitte, um die neueste Version der Gebrauchsanweisung zu erhalten. NASync DXP4800 Network Attached Storage 由于产品 升 级,图 示、 参 数 等 信息 和实 物 略 有差 异, 请以 实 物 为准 。 User Manual | Benutzerhandbuch | 用户手册...
-
Page 2: Table Of Contents
Contents Inhalt About the DXP4800 Über den DXP4800 Instructions Before Use Anweisungen vor dem Gebrauch Package Contents Inhalt der Verpackung Product Overview Produktübersicht 24-25 Installing 3.5-inch Hard Drives Installation von 3,5"-Festplatten 26-27 Installing 2.5-inch Hard Drives Installation von 2,5"-Festplatten 28-29 Installing M.2 SSDs 9-11 Installation von M.2-Festplatte... - Page 3 目 录 产品简介及用前须知 包装清单 产品展示 45-46 安装 3.5 英寸硬盘 47-48 安装 2.5 英寸硬盘 49-50 安装 M.2 硬盘 51-53 Next-Level Storage. 设备开机 指示灯及蜂鸣器说明 Limitless Possibilities. 电脑 Web 端—绑定与设置 手机/平板电脑等设备—绑定与设置 存储模式说明 分享设备 重置网络和密码 特色功能介绍 使用注意事项 安全警示 产品参数...
-
Page 4: About The Dxp4800
About the DXP4800 Package Contents UGREEN DXP4800 is a network-attached storage device designed for home and personal users. The DXP4800 works as an intelligent data management center where users can store and access data via smartphones, laptops, tablets, and TVs anywhere there is network access. -
Page 5: Product Overview
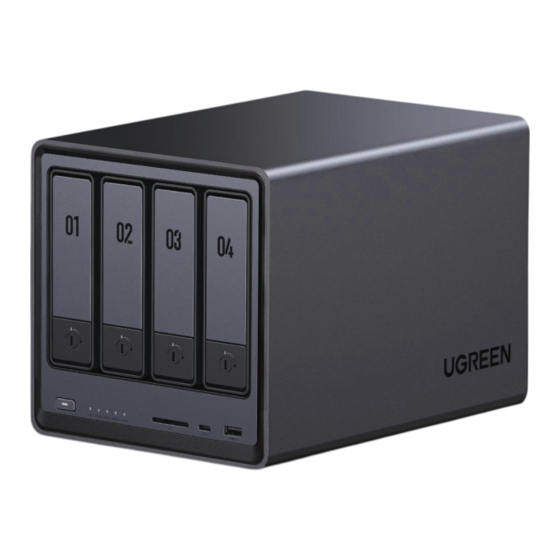
Product Overview Magnetic Dust Mesh Filter HDMI Port USB 3.2 Gen 1 Port 2×USB 2.0 Port Power Port 2×2.5GbE Ethernet Port Reset Hole 2×M.2 Slot Safety Lock (optional) 1×Memory Slot (with one memory module Panel (Loosen the Power Button pre-installed) screws to remove it) Power Indicator QR Code (For... -
Page 6: Installing 3.5-Inch Hard Drives
Unlocking Hard Drive Tray 2. Place hard drive on the tray following the Use the key to unlock the hard drive tray, and press the buckle to pop the handle out, then pull the tray out. angle shown in the figure. Ensure the four fastening pins on the tray (two on each side) are aligned with the screw holes on the hard drive. -
Page 7: Installing 2.5-Inch Hard Drives
Installing 2.5-inch Hard Drives 1. Remove the fastening pin as shown. 3. Turn the tray upside down and tighten the screws to secure the drive in place. Then insert loaded Note: Removed fastening pins can be attached in fixed holes near the tray covering in case they are drive tray into empty drive bay and push the handle to fasten in place. -
Page 8: Installing M.2 Ssds
Installing M.2 SSDs (Optional) 2. Unscrew the M.2 fixing screws. What does installing an M.2 SSD do? M.2 SSDs can be used as a normal storage drive or as a read/write cache to improve reading and writing performance of random data. 1. -
Page 9: Powering On
Tips: After powering on, you can download "UGREEN NAS" then go to "Control Panel" > "Hardware & Power" to select automatic startup after powering on. 5. Reinstall the panel and power on the NAS. After successful boot up, go to the "UGREEN NAS" app to set the SSD cache. -
Page 10: Web Client-Binding & Settings
Note: If the device does not undergo the initialization process, its status will be displayed as Buzzer "Not Initialized". Step 3: Set up Storage Mode Status Beeper Enter the "UGREEN NAS" > "Storage Manager", then you can set up storage mode and configure Power on Short beep once storage space. System reset Short beep once... -
Page 11: Phones/Tablets & Other Devices-Binding & Settings
Requires at least 3 drives. ② Open "UGREEN NAS". The system will automatically search for devices. You can also add a The total capacity of a RAID 5 group is equal to (number of hard drive-1) × volume of the smallest RAID 5 ≥3... -
Page 12: Device Sharing
"Add" to create a new user account, and provides the account and password to the invited user; data through the PC, browser, and mobile app without adjusting complicated network settings. the invited user logs in to the "UGREEN NAS", searches for the device via the LAN, then enters M.2 Capability Extension the account password to activate the account and bind the device. -
Page 13: Notices
· OF CHILDREN Do not dismantle or fix the NAS device by yourself. Improper disassembly and assembly may cause electric shock or other safety hazards. If repair or replacement parts and/or accessories are required, please contact UGREEN customer service. -
Page 14: Specifications
Memory Capacity 8GB/16GB (max memory size) Flash Memory 32GB eMMC Internal: ext4/Btrfs External: Btrfs/ext2/ext3/ext4/VFAT/exFAT/FAT16/FAT32/NTFS/XFS File System Internal non-"UGREEN NAS" storage pool: Btrfs/ext2/ext3/ext4/VFAT/exFAT/FAT16/FAT32/NTFS/XFS Storage Mode JBOD/Basic/RAID 0/RAID 1/RAID 5/RAID 6/RAID 10 4×2.5-inch/3.5-inch SATA hard drive Supported Drive 2×M.2 NVMe 2280 SSD Video Port 1×HDMI, Up to 4K... -
Page 15: Über Den Dxp4800
Über den DXP4800 UGREEN DXP4800 ist ein Netzwerkspeichergerät, das für Heim- und Privatanwender entwickelt wurde. Der DXP4800 dient als intelligentes Datenverwaltungszentrum, in dem Benutzer Daten speichern und über Smartphones, Laptops, Tablets und Fernsehgeräte überall dort abrufen können, wo ein Netzwerkzugang besteht. -
Page 16: Inhalt Der Verpackung
Inhalt der Verpackung Produktübersicht 2×Festplattenfach- 1×Netzwerkspeicher 1×Bedienungsanleitung 1×Garantiekarte Schlüssel Sicherheitsschloss Einschalttaste Netzkontrollleuchte USB 3.2 Gen 2-Anschluss Netzwerk-Anzeige Typ-C USB 3.2 Gen 2 Anschluss Festplatten-Anzeige SD-Kartensteckplatz 1×Ethernet-Kabel 2×SSD-Silikon-Pad 1×Netzteil Schrauben und (CAT7) (zur Wärmeableitung) (DC 12V/10A) Schraubendreher (für den Einbau von 2,5"-Festplatten) - Page 17 Entriegeln des Festplattenfachs Magnetischer Staubfilter Entriegeln Sie das Festplattenfach mit dem Schlüssel, drücken Sie auf die Schnalle, um den Griff herauszuziehen, und ziehen Sie dann das Fach heraus. HDMI-Anschluss USB 3.2 Gen 1-Anschluss 2×USB 2.0-Anschluss Stromanschluss 2×2,5-Gigabit-Ethernet-Anschluss Reset-Loch 2×M.2-Steckplatz (optional) Abdeckung Installation von 3,5-Zoll-Festplattenlaufwerken ("Schrauben"...
-
Page 18: Installation Von 2,5"-Festplatten
Installation von 2,5"-Festplatten 2. Legen Sie die Festplatte in dem in der 1. Entfernen Sie den Montagestift wie abgebildet. Abbildung gezeigten Winkel auf dem Fach. Hinweis: Die entfernten Montagestifte können in die festen Löcher in der Nähe der Fachabdeckung Stellen Sie sicher, dass die vier Montagestifte eingesetzt werden, wenn sie für 3,5"-Festplattenlaufwerke benötigt werden."... -
Page 19: Installation Von M.2-Festplatte
Installation von M.2-Festplatten (optional) 3. Drehen Sie das Fach um und ziehen Sie die Schrauben fest, um das Laufwerk zu befestigen. Legen Sie dann den geladenen Laufwerksträger in den leeren Laufwerksträger ein und drücken Sie den Griff, um sie zu sichern. Wozu dient die Installation einer M.2-Festplatte? M.2-Festplatten können als normales Speicherlaufwerk oder als Lese-/Schreibcache verwendet werden, um die Lese- und Schreibleistung von Zufallsdaten zu verbessern. - Page 20 3. Setzen Sie die M.2-Festplatte in der in der Abbildung gezeigten Richtung in den Steckplatz ein, und ziehen Sie dann die Schrauben fest. Warnung Um Datenverlust zu vermeiden, entfernen Sie bitte den SSD-Cache im „ UGREEN NAS“, bevor Sie eine M.2-SSD entfernen. Dies bietet zusätzlichen Schutz, falls das System es zum Cahce verwendet.
-
Page 21: Einschalten
Routers an. Schließen Sie den Netzadapter an das Gerät an und drücken Sie kurz die Ein-/Austaste, um es einzuschalten. Statisch Einschalten Tipps: Nach dem Einschalten können Sie "UGREEN NAS" herunterladen und dann unter Weiß Blinkend (einmal pro 0,5 s) Ausschalten "Systemsteuerung"... -
Page 22: Webclient - Bindung Und Einstellungen
· Benennen Sie das Gerät: Benennen Sie Ihr Gerät, um sicherzustellen, dass es leicht zu UGREEN Cloud Konto registrieren und Ihr Gerät vernüpfen möchten. Falls nicht, können Sie diesen Schritt überspringen und sich nur mit dem lokalen Konto beim Gerät anmelden. -
Page 23: Netzwerk Und Passwort Zurücksetzen
Wenn ein Laufwerk ausfällt, können alle Daten nicht wiederhergestellt werden. sich im „UGREEN NAS“ an, sucht nach das Gerät über das LAN, und gibt dann das Passwort Erfordert nur 1 Laufwerk. Die verfügbare Kapazität entspricht der Kapazität der Festplatte. Es ist des Kontos ein, um das Konto zu aktivieren und um sich mit dem Gerät zu verbinden. -
Page 24: Einführung Der Funktionen
Cache verwenden, um die Lese-/Schreibleistung zu verbessern. Lieblingstitel immer im Handumdrehen haben. Erstellen Sie personalisierte Wiedergabelisten für Einzelheiten und die Installation finden Sie unter "UGREEN NAS" > "Hilfecenter" > "Wissenscenter" jede Stimmung und jeden Anlass und tauchen Sie ein in eine überragende Klangqualität, bei der Ihnen jede Note noch lange nach dem Verklingen in Erinnerung bleibt. -
Page 25: Warnung
Falls die Bat terie ausläuf t, vermeiden Sie den Kontak t mit Haut oder Augen. Bei Kontak t mit Dateisystem Interner Nicht-„ UGREEN NAS “-Speicherpool: Haut oder Augen spülen Sie diese mit Wasser aus und suchen Sie sofor t einen Arzt auf. -
Page 26: 包装清单
前言 包装清单 尊敬的用户, 感谢您选购绿联产品。 为了能更进一步了解产品, 使用前请仔细阅读本说明书。 祝您体验愉快! 产品简介 绿联 DXP4800 是一款网络私有云存储服务器, 主要为家庭或个人用户构建智能数据管理中心, 通过与手机、 电 脑、 平板、 电视机等多终端互联, 将用户的零散数据集中存储管理。 用户可通过局域网或外网, 随时随地远程访问 服务器中的数据。 主机×1 说明书×1 保修卡×1 硬盘锁钥匙×2 用前须知 · 为保证数据传输效率, 建议使用支持千兆及以上的 LAN 口路由器或交换机, 并使用产品标配的网线 (CAT7 或 更高规格) 连接设备。 · 建议选用全新硬盘。 硬盘插入设备将会做格式化操作, 如您使用旧硬盘, 请务必提前备份旧硬盘数据。 ·... -
Page 27: 产品展示
产品展示 磁吸防尘网 HDMI 接口 USB 3.2 Gen 1 接口 USB 2.0 接口×2 电源接口 2.5GbE 网口×2 复位键 M.2 插槽×2 硬盘童锁 (按需选装) 内存条插槽×1 (已预装) 电源键 松开螺钉 取下面板 电 源 指 示 灯 设备绑定 USB 3.2 Gen 2 接口 二维码 网络指 示 灯 USB Type-C Gen 2 接口... -
Page 28: 安装 3.5 英寸硬盘
解锁硬盘托架 2. 如图示角度装入硬盘, 用钥匙解锁硬盘, 按下按钮使手柄弹出, 取出托架。 注意四个固定柱对准硬盘螺孔插入。 金手指 安装 3.5 英寸硬盘 3. 推回夹臂使其锁紧硬盘。最后将托架装回主机内, 再锁紧硬盘。 1. 托架翻转至背面, 拇指按住“Press” 处 同时拉开夹臂。... -
Page 29: 安装 2.5 英寸硬盘
安装 2.5 英寸硬盘 1. 如图示, 移除固定柱。 3. 如图示, 装入螺钉并拧紧。最后将托架装回主机内, 再锁紧硬盘。 注: 拆下的固定柱可装在首端固定孔, 以备后续更换 3.5 英寸硬盘使用。 2. 如图示, 硬盘对齐托架四个固定孔装入, 再翻转至托架背面。 金手指朝下... -
Page 30: 安装 M.2 硬盘
安装 M.2 硬盘(按需选装) 2. 松开 M.2 固盘螺钉。 安装 M.2 硬盘的作用是什么? M.2 硬盘可作普通存储盘或 SSD 缓存使用, SSD 缓存时, 可提升设备随机数据读写性能。 1. 设备关机断电后, 翻转至底部, 松开螺钉, 取下面板。 3. 将 M.2 硬盘如图示方向对应插入 M.2 插槽, 拧紧螺钉。... -
Page 31: 设备开机
设备开机 4. 导热片撕掉背膜, 贴在 M.2 硬盘上, 再撕下另一面背膜。 用网线将设备连接至路由器的 L AN 口, 接通电源适配器, 短按电源键开机。 提示: 开机后, 安装并登录「绿联云」App > 「控制面板」 > 「硬件与电源」 , 设置通电自动开机。 5. 装回面板, 设备通电开机, 待其稳定运行后前往「绿联云」客户端设置 SSD 缓存。 L A N 本 机 标 配电源 ( D C12 V/10A ) 警告... -
Page 32: 电脑 Web 端-绑定与设置
指示灯 电脑 Web 端—绑定与设置 第一步 添加设备 L E D 指 示 灯 颜 色 状 态 说 明 ① 请确保设备和电脑在同一局域网内,访问网址:find.ugnas.com。 ② 系统将自动搜索并显示您当前局域网内的设备。 常亮 开机 ③ 选择您要添加的设备,然后点击“连接”。 白色 闪烁 (每 0.5 秒一次) 关机中 电源指示灯 呼吸慢闪 系统休眠 第二步 初始化设备 ① 添加设备后,您将进入初始化设备界面。 橙色 慢闪... -
Page 33: 手机/平板电脑等设备-绑定与设置
手机/平板电脑等设备—绑定与设置 存储模式说明 1. 客户端下载 硬 盘 组合 所需 硬 盘 数 功能 说明 方式一:手机扫描下方二维码或设备上的二维码,安装「 绿联云」 App。 模 式 方式二:请前往绿联官网 (https://www.ugnas.com/download),下载和安装客户端。 至少合并两个硬盘来创建存储池, 存储池的可用容量等于该存储池中所有硬盘的总容量。 ≥2 J B O D 不提供数据冗余。 任意一个硬盘损坏, 存储池数据将永久丢失。 只需一个硬盘即可创建存储池, 存储池的可用容量等于该硬盘的容量。 不提供数据冗余。 B a s i c 硬盘损坏, 存储池数据将永久丢失不可恢复。 至少需要两个硬盘来创建存储池,... -
Page 34: 分享设备
分享设备 特色功能介绍 方式一(受邀用户与设备在同一网络环境): UGREENlink 服务 管理员登录「绿 联云」App, 进 入「控制面板」> 「用户管理」> 「新增」创建新用户后, 将新用户账号及密码 本功能为「绿联云」提供的外网访问服务。启用此服务后,在外网环境下,您也可通过 PC 客户端、 提 供给受 邀 用户; 受 邀 用户安装 并 登 录「绿 联云」客户端,通 过 局域网扫描并发现设备, 输入管理员分享 浏览器、手机 App 直接访问「绿联云」设备,无需复杂的网络设置。 的账号密码激活账号以绑定设备。 M.2 能力扩展 方式二(受邀用户与设备不在同一网络环境): 安装 M.2 硬盘后,即可设置高速存储池或将其作为某个存储池的读写缓存,以增强设备随机读写性能。 管理员先开启 UGREENlink 在线服务, 然后登录「绿联云」App, 进入「控制面板」> 「用户管理」> 「邀请」 详细介绍及安装方法,请前往「绿联云」>「帮助中心」>「知识中心」中查看。... -
Page 35: 安全警示
注意事项 产品参数 · 请参照本使用说明图示放置产品, 请勿倒置或竖立。 产品名称 网络存储服务器 · 请确保产品放置环境的温度和湿度恒定, 切勿暴露在直接受阳光曝晒或可能接触任何液体的环境中。 操作系统 UGOS Pro · 在雷雨天气或电压不稳定时, 请将产品关机断电, 停止使用, 以免产品受到损坏。 处理器 Intel N100 四核 · 请将产品远离热源或潮湿的环境使用, 避免火灾或电击的危险。 最大睿频频率 3.40GHz · 请勿将异物插入本产品内, 以免使用异常或短路导致损坏。 内存类型 SODIMM DDR5 · 清洁产品前, 请务必断开电源连接, 可用湿纸巾擦拭表面, 切勿使用化学或喷雾式清洁剂清洁。 内存容量 8GB; 整机最高支持 16GB ·...
Need help?
Do you have a question about the NASync DXP4800 and is the answer not in the manual?
Questions and answers
HOW TO ADD UGREEN NAS 4800 TO Windoes 11