Table of Contents
Advertisement
OPEN PRODUCE MERCHANDISER
READ THIS PAGE FIRST
1.
1.
1.
1.
1.
1.
1.
1.
1.
1.
1.
1.
1.
1.
1.
1.
1.
1.
1.
1.
1.
1.
1.
1.
1.
1.
1.
1.
1.
1.
1.
1.
1.
1.
1.
1.
1.
1.
1.
1.
1.
1.
1.
1.
1.
1.
1.
1.
1.
1.
1.
1.
1.
1.
1.
1.
1.
1.
1.
1.
1.
1.
1.
1.
1.
1.
1.
1.
1.
1.
1.
1. 1 1.
Howard-McCray would like to th
Howard-McCray would like to thank you for pu
How
Ho
Howar
Howard-McCray would lik
Howa
Howard-
Howard
Howard-Mc
Howard-M
Howard-McCr
Howard-McC
Howard-McCray
Howard-McCray would like to thank you for purc
Howard-McCray
Howard-McCray would like to thank you for purchasi
Howard-McCray would like to thank you for purcha
Howard-McCray would like to thank you for purchasing o
Howard-McCray would like to thank you for purchasing
Howard-McCray would like to thank you for purchasing one
Howard-McCray would like to thank you for purchasing one
Howard-McCray would like to thank you for purchasing one
Howard-McCray would like to thank you for purchasing one
Howard-McCray would like to thank you for purchasing one
Howard-McCray would like to thank you for purchasing one
Howard-McCray would like to thank you for purchasing one
Howard-McCray would like to thank you for purchasing one
Howard-McCray would like to thank you for purchasing one
Howard-McCray would like to thank you for purchasing one
Howard-McCray would like to thank you for purchasing one
Howard-McCray would like to thank you for purchasing on
Howard-McCray would like to thank you for purchasing one
Howard-McCray would like to thank you for purchasing
Howard-McCray would like to thank you for purchasing one
Howard-McCray would like to thank you for purchasin
Howard-McCray would like to thank you for purchasing one
Howard-McCray would like to thank you for purchas
Howard-McCray would like to thank you for purchasing one
Howard-McCray would like to thank you for purch
Howard-McCray would like to thank you for purchasing one
Howard-McCray would like to thank you for pur
Howard-McCra
Howard-McCray w
Howard-McCray wo
Howard-McCray would like to thank you for
Howard-McCray would
Howard-McCray woul
Howard-McCray would like
Howard-McCray would li
Howard-McCray would like to thank yo
Howard-McCray would like t
Howard-McCray would like to thank you
Howard-McCray would like to thank you
Howard-McCray would like to thank you f
Howard-McCray would like to thank you fo
Howard-McCray would like to thank you for
Howard-McCray would like to
Howard-McCray would like to thank y
Howard-McCray would like to
Howard-McCray would like to thank
Howard-McCray would like
Howard-McCray would like to thank
H
Howard-McCray would like to than
Howard-McCray would l
Howard-McCray would like to tha
Howard-McCray would
Howard-McCray would like to thank you for purchasing one
Howard-McCray wou
Howard-McCray would like to t
Howard-McCray would like to thank you for p
of our units.
of
o
of o
of
of our
of ou
of our un
of our
of our unit
of our uni
of our units.
of our units
of our u
of our units.
PLEASE
READ
PROCEEDING WITH THE INSTALLATION OR OPERATING OF
THIS UNIT.
2.
2.
2.
2.
2.
2.
2.
2.
2.
2.
2.
2.
2.
2.
2.
2.
2.
2.
2.
2.
2.
2.
2.
2.
2.
2.
2.
2.
2.
2.
2.
2.
2.
2.
2.
2.
2.
2.
2.
2.
2.
2.
2.
2.
2.
2.
2.
2.
2.
2.
2.
2.
2.
2.
2.
2.
2.
2.
2.
2.
2.
2.
2.
2.
2.
2.
2.
2.
2.
2.
2.
2.
2.
2.
2.
2.
2.
2.
2.
2.
2.
2.
2.
2.
2.
2.
2.
2.
2.
2.
2.
2.
2.
2.
2.
2.
2.
2.
2.
2.
2.
2.
2.
2.
2.
2.
2.
2.
2.
2.
2.
2.
2.
2.
2.
2.
2.
2.
2.
2.
2.
2.
2.
2.
2.
2.
2.
2.
2.
2.
2.
2.
2.
2.
2.
2.
2.
2.
2.
2.
2.
2.
2.
2.
2.
2.
2.
2.
2.
2.
2.
2.
2.
2.
2.
2. 2 2 .
Environment -
Environment -
Environment -
Environment -
Environment -
Environment -
Environment -
Environment -
Environment -
Environment -
Environment -
Environment -
Environment -
Environment -
Environment -
Environment -
Environment -
Environment -
Environment -
Environment -
Environment -
Environment -
Environment -
Environment -
Environment -
Environment -
Environment -
Environment -
Environment -
Environment -
Environment -
Environment -
Environment -
E
Environment
Env
En
Envir
Envi
Environ
Enviro
Environme
Environm
Environment -
Environmen
Environment - These display cabinets are made to operate at
Environment -
Environment -
Environment -
Environment -
Environment -
Environment -
Environment -
Environment -
Environment -
Environment -
Environment -
Environment -
Environment -
Environment -
Environment -
Environment -
Environment -
Environment -
Environment -
Environment -
Environment -
Environment -
Environment -
Environment -
Environment -
Environment -
Environment -
Environment -
Environment -
Environment -
Environment -
Environment -
Environment -
Environment -
Environment -
Environment -
Environment -
Environment -
Environment -
Environment -
Environment -
Environment -
Environment -
Environment -
Environment -
Environment -
Environment -
Environment -
Environment -
Environment -
Environment -
Environment -
Environment -
Environment -
Environment -
Environment -
Environment -
Environment -
Environment -
Environment -
Environment -
Environment -
Environment -
Environment -
Environment -
Environment -
Environment -
Environment -
Environment -
Environment -
Environment -
Environment -
Environment -
Environment -
Environment -
Environment -
Environment -
Environment -
Environment -
Environment -
Environment -
Environment -
Environment -
Environment -
Environment -
Environment -
Environment -
Environment -
Environment -
Environment -
Environment -
Environment -
Environment -
Environment -
Environment -
Environment -
Environment -
Environment -
Environment -
Environment -
Environment -
Environment -
Environment -
Environment -
Environment -
Environment -
Environment -
Environment -
Environment -
Environment -
75°F and 55% relative humidity. Temperature and/or humidity
greater than the factory recommendations will hinder the
performance of this cabinet.
3.
3.
3.
3.
3.
3.
3.
3.
3.
3.
3.
3.
3.
3.
3.
3.
3.
3.
3.
3.
3.
3.
3.
3.
3.
3.
3.
3.
3.
3.
3.
3.
3.
3.
3.
3.
3.
3.
3.
3.
3.
3.
3.
3.
3.
3.
3.
3.
3.
3.
3.
3.
3.
3
3.
3.
3.
3.
3.
3.
3.
3.
3.
3.
3.
3.
3.
3.
3.
3.
3.
3.
3.
3.
3.
3.
3.
3.
3.
3.
3.
3.
3.
3.
3.
3.
3.
3.
3.
3.
3.
3.
3.
3.
3.
3.
3.
3.
3.
3.
3.
3.
3.
3.
3.
3.
3.
3.
3.
3.
3.
3.
3.
3.
3.
3.
3.
3.
3.
3.
3.
3.
3.
3.
3.
3.
3.
3.
3.
3.
3.
3.
3.
3.
3.
3.
3.
3.
3.
3.
3.
3.
3.
Cabinet Set-U p
Cabinet Set-Up – A qualified refrigeration mechanic should
Cabinet Set-U p
Cabinet Set-U p
Cabinet Set-U
Cabinet Set-U p
Cabinet Set-U p
Cabinet Set-U p
Cabinet
Cabinet Set-U p
Cabinet Set-U p
Cabinet Set-U p
Cabinet Set-U p
Cabinet Set-U p
Cabinet Set-U p
Cabinet Set-U p
Cabinet Set-U p
Cabinet Set-U p
Cabinet Set-U p
Cabinet Set-Up
Cabinet Set-U p
Cabinet Set-U p
Cabinet Set-U p
Cabinet Set-U p
Cabinet Set-U p
Cabinet Set-
Cabinet Set-U p
Cabinet Set-U p
Cabinet Set-U p
Cabinet Set-U p
Cabinet Set-U p
Cabinet Set-U p
Cabinet Set-U p
Cabinet Set-U p
Cabinet Set-U p
Cabinet Set-U p
Cabinet Set-U p
Cabinet Set-U p
Cabinet Set-U p
Cabinet Set-U p
Cabinet Set-U p
Cabinet S
Cabinet Set-U p
Cabinet
Cabinet Set-U p
Cabinet Set-U p
Cabinet Set-U p
Cabinet Set-U p
Cabinet Set-U p
Cabinet Set-U p
Cabinet Set-U p
Cabinet Set-U p
Cabinet Set-U p
Cabinet Set-U p
Cabinet Set-U p
Cabinet Set-U p
Cabinet Set-U p
Cabinet Set-U p
Cabinet Set-U p
Cabinet Set-U p
Cabinet Set-U p
Cabinet Set-U p
Cabinet Set-U p
Cabinet Set-U p
Cabinet Set-U p
Cabinet Set-U p
Cabinet Set-U p
Cabinet Set-U p
Cabinet Set-U p
Cabinet Set-U p
Cabinet Set-U p
C
Cabinet Set-U p
Cabi
Cabinet Set-U p
Cabinet Se
Cabinet Set-U p
Cabinet Set-U p
Cabinet Set-U p
Cabinet Set-U p
Cabinet Set-U p
Cabinet Set-U p
Cabinet Set-U p
Cabinet Set-U p
Cabinet Set-U p
Cabinet Set-U p
Cabinet Set-U p
Cabinet Set-U p
Cabinet Set-U p
Cabinet Set-U p
Cabinet Set-U p
Cabinet Set-U p
Cabinet Set-U p
Cabinet Set-U p
Cabinet Set-U p
Cabinet Set-U p
Cabinet Set-U p
Cabinet Set-U p
Cabinet Set-U p
Cabinet Set-U p
Cabinet Set-U p
Cabinet Set-U p
Cabinet Set-U p
Cabinet Set-U p
Cabinet Set-U p
Cabinet Set-U p
Cabinet Set-U p
Cabinet Set-U p
Cabinet Set-U p
Cabinet Set-U p
Cabinet Set-U p
Cabinet Set-U p
Cabinet Set-U p
Cabinet Set-U p
Cabinet Set-U p
Cabinet Set-U p
Cabinet Set-U p
Cabinet Set-U p
Cabinet Set-U p
Cabinet Set-U p
Cabinet Set-U p
Cabinet Set-U p
Cabinet Set-U p
Cabinet Set-U p
Cabinet Set-U p
Cabinet Set-U p
Cabinet Set-U p
Cabinet Set-U p
Cabinet Set-U p
Cabinet Set-U p
Cabinet Set-U p
Cabinet Set-U p
Cabinet Set-U p
Ca
Cabinet Set-U p
Cab
Cabinet Set-U p
Cabin
Cabine
Cabinet Set
Cabinet Set-U p
set-up this cabinet. Check control settings are extremely
critical to the proper operation of this unit. These settings
are the responsibility of the customer and are not covered by
factory warranties. Failure to have this unit installed by a
qualified refrigeration mechanic may VOID all the warranties
on this unit.
4.
4.
4.
4.
4.
4.
4.
4.
4.
4.
4.
4.
4.
4.
4.
4.
4.
4.
4.
4.
4.
4.
4.
4.
4.
4.
4.
4.
4.
4.
4.
4.
4.
4.
4.
4.
4.
4.
4.
4.
4.
4.
4.
4.
4.
4.
4.
4.
4.
4.
4.
4.
4.
4.
4.
4.
4.
4.
4.
4.
4.
4.
4.
4.
4.
4.
4.
4.
4.
4.
4.
4.
4.
4.
4.
4.
4.
4.
4.
4.
4.
4.
4.
4.
4.
4.
4.
4.
4.
4.
4.
4.
4.
4.
4.
4.
4.
4.
4.
4.
4.
4.
4.
4.
4.
4.
4.
4.
4.
4.
4.
4.
4
4.
4.
4.
4.
4.
4.
4.
4.
4.
4.
4.
4.
4.
4.
Location
Location
Location
Location
Location
Location
Location
Location
Location
Location
Location
Location
Location
Location
Location
Location
Location
Location
Location
Location
Location
Location
Location
Location
Location
Location
Location
Location
Location
Location
Location
Location
Location
Location
Location
Location
Location
Location
Location
Location
Location
Location
Location
Location
Locatio
Location – This cabinet must not be located in the direct rays
Locat
Locati
Loc
Loca
L
Lo
Location
Location
Location
Location
Location
Location
Location
Location
Location
Location
Location
Location
Location
Location
Location
Location
Location
Location
Location
Location
Location
Location
Location
Location
Location
Location
Location
Location
Location
Location
Location
Location
Location
Location
Location
Location
Location
Location
Location
Location
Location
Location
Location
Location
Location
Location
Location
Location
Location
Location
Location
Location
Location
Location
Location
Location
Location
Location
Location
Location
Location
Location
Location
Location
Location
Location
Location
Location
Location
Location
Location
Location
Location
of the sun or near radiant heat sources. A minimum of 3" of
free air space is required at the rear of the cabinet.
5.
5.
5.
5.
5.
5.
5.
5.
5.
5.
5.
5.
5.
5.
5.
5.
5.
5.
5.
5.
5.
5.
5.
5.
5.
5.
5.
5.
5.
5.
5.
5.
5.
5.
5.
5.
5.
5.
5.
5.
5.
5.
5.
5.
5.
5.
5.
5.
5.
5.
5.
5.
5.
5.
5.
5.
5.
5.
5.
5.
5.
5.
5.
5.
5.
5.
5.
5.
5.
5.
5.
5.
5.
5.
5.
5.
5.
5.
5.
5.
5.
5.
5.
5.
5.
5.
5.
5.
5.
5.
5.
5.
5.
5.
5.
5.
5.
5.
5.
5.
5.
5.
5.
5.
5.
5.
5.
5.
5.
5.
5.
5.
5.
5.
5.
5.
5
Never spray water
Never spray water into the cabinet .
Never spray water in
Never spray water into the cabinet .
Never spray water into the cabinet .
Never spray water int
Never spray water into the cabinet .
Never spray water into the cabinet .
Never spray water into the cabinet .
Never spray water into the cabinet .
Never spray water into the cabinet .
Never spray water into the cabinet .
Never spray water into the cabinet .
Never spray water into the cabinet .
Never spray water into the cabinet .
Never spray water into the cabinet .
Never spray water into the cabinet .
Never spray water into the cabinet .
Never spray water into the cabinet .
Never spray water into the cabinet .
Never spray water into the cabinet .
Never spray water into the cabinet .
Never spray water into the cabinet .
Never spray water into the cabinet .
Never spray water into the cabinet .
Never spray water into the cabinet .
Never spray water into the cabinet .
Never spray water into the cabinet .
Never spray water into the cabinet .
Never spray water into the cabinet .
Never spray water into the cabinet .
Never spray water into the cabinet .
Never spray water into the cabinet .
Never spray water into the cabinet .
Never spray water into the cabinet .
Never spray water into the cabinet .
Never spray water into the cabinet .
Never spray water into the cabinet .
Never spray water into the cabinet .
Never spray water into the cabinet .
Never spray water into the cabinet .
Never spray water into the cabinet .
Never spray water into the cabinet .
Never spray water into the cabinet .
Never spray water into the cabinet .
Never spray water into the cabinet .
Never spray water i
Never spray water into the cabinet .
Never spray water into the cabinet .
Never spray water into the cabinet .
Never spray water into the cabinet .
Never spray water into the cabinet .
Never spray water into the cabinet .
Never spray water into the cabinet .
Never spray water into the cabinet .
Never spray water into the cabinet .
Never spray water into the cabinet .
Never spray water into the cabinet .
Never spray water into the cabinet .
Never spray water into the cabinet .
Never spray water into the cabinet .
Never spray water into the cabinet .
Never spray water into the cabinet .
Never spray water into the cabinet .
Never spray water into the cabinet .
Never spray water into the cabinet .
Never spray water into the cabinet .
Never spray water into the cabinet .
Never spray water into the cabinet .
Never spray water into the cabinet .
Never spray water into the cabinet .
Never spray water into the cabinet .
Never spray water into the cabinet .
Never spray water into the cabinet .
Never spray water into the cabinet .
Never spray water into the cabinet .
Never spray wa
Never spray
Never spray w
Never spra
Never spray
Never spray water
Never spr
Never
Never s
Neve
Never
Nev
Ne
N
Never spray wat
Never sp
Never spray wate
Never spray water into the cabinet .
Never spray water into the cabinet .
Never spray water into the cabine
Never spray water into the cabi
Never spray water into the cabin
Never spray water into the cabinet .
Never spray water into the cab
Never spray water into the cabinet .
Never spray water into the cabinet .
Never spray water into th
Never spray water into the
Never spray water into
Never spray water into t
Never spray water into
Never spray water into the cabinet .
Never spray water into the cabinet.
Never spray water into the cabinet
Never spray water into the
Never spray water into the cabinet. This will cause damage
Never spray water into the c
Never spray water into the cabinet .
Never spray water into the ca
to the seals.
6.
6
6.
6.
6.
6.
6.
6.
6.
6.
6.
6.
6.
6.
6.
6.
6.
6.
6.
6.
6.
6.
6.
6.
6.
6.
6.
6.
6.
6.
6.
6.
6.
6.
6.
6.
6.
6.
6.
6.
6.
6.
6.
6.
6.
6.
6.
6.
6.
6.
6.
6.
6.
6.
6.
6.
6.
6.
6.
6.
6.
6.
6.
6.
6.
6.
6.
6.
6.
6.
6.
6.
6.
6.
6.
6.
6.
6.
6.
6.
If additional assistance is required, please call us at
If additional assistance is required, please call us at
If additional assistance is required, please call us
If additional assistance is required, please call
If additional assistance is required, please
If additional assistance is required, ple
If additional assistance is required, please call us at
If additi
If addit
If addi
If add
If ad
If a
If additional assistance is required, please call us at
If additional assistance is required, please call us at
If additio
If additional assistance is required, please call us at
If addition
If additional assistance is required, pleas
If additiona
If additional assistance is required, please ca
If additional
I
If additional
If additional assistance is required, please call us at
If additional a
If additional assistance is required, please call us at
If additional as
If additional assistance is required, please call us at
If additional ass
If additional assistance is required, please call us at
If additional assi
If additional assistance is required, please call us at
If additional assis
If additional assistance is required, please call us at
If additional assist
If
If additional assista
If additional assistance is required, plea
If additional assistan
If additional assistance is required, please
If additional assistanc
If additional assistance is required, please c
If additional assistance
If additional assistance is required, please cal
If additional assistance
If additional assistance is required, please call
If additional assistance i
If additional assistance is required, please call us
If additional assistance is
If additional assistance is required, please call us a
If additional assistance is
If additional assistance is required, please call us at
If additional assistance is r
If additional assistance is required, please call us at
If additional assistance is re
If additional assistance is required, please call us at
If additional assistance is req
If additional assistance is required, please call us at
If additional assistance is requ
If additional assistance is required, please call us at
If additional assistance is requi
If additional assistance is required, please call us at
If additional assistance is requir
If additional assistance is required, please call us at
If additional assistance is require
If additional assistance is required, please call us at
If additional assistance is required
If additional assistance is required, please call us at
If additional assistance is required,
If additional assistance is required, please call us at
If additional assistance is required,
If additional assistance is required, please call us at
If additional assistance is required, pl
If additional assistance is required, p
If
If additional assistance is required, please call u
If additional assistance is required, please call us at
1-800-344-8222.
1-800-344-8222.
1-800-344-8222.
1-800-344-8222
1-8
1-800-344-8222.
1-800-344-8222.
1-800-344-
1-800-344
1-800-34
1-800-3
1-800-
1-800
1-80
1-800-344-8222.
1-800-344-8222.
1-800-344-8
1
1-800-344-82
1-800-344-822
1-
Installation and Operating Instruction for
THIS
MANUAL
90-020 OPEN PRODUCE MERCHANDISER 080115
CAREFULLY
BEFORE
1
Advertisement
Table of Contents

Related Manuals for Howard McCray SC-OP30E Series

Summary of Contents for Howard McCray SC-OP30E Series
- Page 1 Installation and Operating Instruction for OPEN PRODUCE MERCHANDISER READ THIS PAGE FIRST 1. 1 1. Howard-McCray would like to th Howa Howar Howard Howard- Howard-M Howard-Mc Howard-McC Howard-McCr Howard-McCra Howard-McCray Howard-McCray Howard-McCray w Howard-McCray wo Howard-McCray wou Howard-McCray woul Howard-McCray would Howard-McCray would Howard-McCray would l Howard-McCray would li...
- Page 3 Installation and Operating Instruction for OPEN PRODUCE MERCHANDISER IMPORTANT INSTRUCTIONS Please read carefully before attemping to install or service case Keep this Book for Future Reference 04/2018...
-
Page 5: Table Of Contents
Table of Contents Engineering Specifications ......................... 4 Installation ..............................5 Receiving and Inspection ........................... 6 Installation ..............................6 Electrical Service Connection ........................6 Drain Installation ............................6 Refrigeration Connection ..........................5 Sanitation...............................6 Divider ................................6 Remote Installations .............................7 Refrigeration Connection ..........................7 Start-Up Check-List ............................7 Start-Up ................................8 Thermostatic Expansion Valve ........................8 Temperature Control ............................8... -
Page 6: Engineering Specifications
The following instructions are for the benefit of the new owner and the installing contractor. They should be studied carefully before attempting to install or operate the cabinet. This manual is the property of the owner and should remain in the owner’s possession. Engineering Specifications –... -
Page 7: Installation
Installation and Operating Instructions for McCray OPEN PRODUCE MERCHANDISERS General Specifications and Features Drain Endless Installation The drain is a sink type with 1” Male NPT threads. A 1” Cabinets can be lined-up. Cabinets are lightweight, making PVC adapter, Drain Trap, & elbow are supplied with each them easy to move into position. -
Page 8: Receiving And Inspection
5% of the voltage shown on immediately. Make a request in writing with the carrier the nameplate. Howard McCray will not accept for an inspection within 15 days, and retain all responsibility for the performance of the cabinet or packaging. -
Page 9: Refrigeration Connection
8. Silphos or equivalent silver alloy material is recommended for brazing copper to ferrous or brass Remote Installations Remote installation of these cabinets require an experienced connections. and knowledgeable refrigeration mechanic. The proper 9. The use of 50 - 50 solder for refrigeration piping is not location, connection, and control of the cabinet is crucial for recommended. -
Page 10: Start-Up
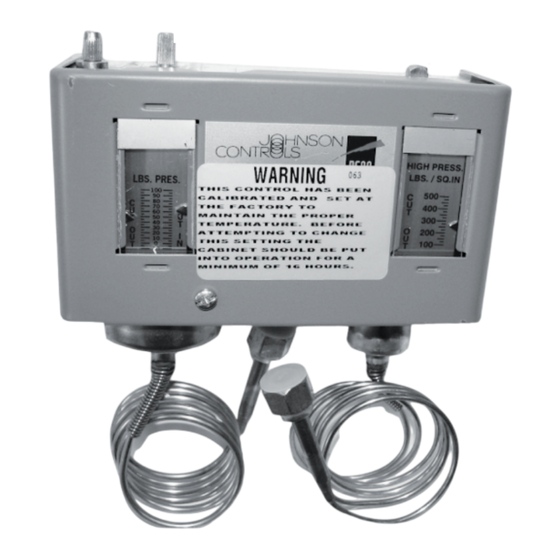
Start-Up Low Pressure Control Adjustments 1. Electrically energize the cabinet. Check the supply voltage, must be within +/- 5%. Check the evaporator fan motors to ensure all are operating and rotating in the correct direction. 2. Electrically energize the refrigeration system. Check the supply voltage, must be within +/- 5%. -
Page 11: Defrost Time Clock
Defrost Time Clock Loading Procedures (Self Contained Models) When loading the cabinet, product should be pre-cooled. Do not load cabinet beyond shelf size limits; this will disturb The time clock supplied with this cabinet is a time initiated, the air curtain designed to keep the product cool. Do not time terminated timer. - Page 12 Cleaning the Condenser It is crucial that the condenser face be cleaned weekly. Due to the condensing unit's location near the floor, the condenser will quickly accumulate any dust or dirt from the location. A dirty condenser will diminish the cooling ability of the system, thus resulting in longer operational times and warmer product temperatures.
-
Page 13: Trouble Chart
Trouble Chart A. Compressor will not start - no hum F. Compressor short cycles 1.Disconnect switch open 1.Control differential set too close Possible Causes: Possible Causes: 2.Blown fuse 2.Refrigerant undercharge 3.Defective wiring 3.Refrigerant overcharge 4.Overload protector tripped 4.Discharge valve leaking 5.Open control contacts (control may be defective, or 5.Expansion valve leaking unit location may be too cold) -
Page 14: Parts List
Parts List Refrigeration Components Part # Description Usage 1SH6521 Evaporator Fan Assembly ALL Models 20-006 Defrost Clock - 230V (8145-20) SC-OP30E-6, -8, -8L SC-P32E-6S, -8, -8S 21-025 Defrost Clock - 115V (8045-0) SC-OP30E-3, -3L, -4, -4L, -6L SC-P32E-4, -4S, -6 21-071 Pressure Control ALL SC- Models... -
Page 15: Customer Installation Record
Keep Page for Your Records: Dear Customer: We wish to congratulate you on your judgment. We are very proud to have been privileged to serve you with Howard-McCray equipment to fill your requirements. Howard-McCray equipment is the product of a company dedicated in producing products of quality, incorporating progressive features on a timely basis and backed by a warranty which provides confidence. -
Page 16: Warranty
Warranty ONE YEAR WARRANTY Howard-McCray warrants the refrigerator of the serial number shown, and all parts thereof, to be free from defects in material and workmanship under normal use and service. Its obligation under the warranty shall be limited to repairing or replacing any part of said refrigerator (F.O.B Factory), which proves to be defective within one year from the date of original shipment, provided that the installation date is not thirty (30) days beyond the original shipping date of the re- frigerator and examination discloses to its sole satisfaction that said refrigerator or any part thereof is defective. -
Page 17: Notes
Notes NOTES: NOTE NOTES NOTES: _________________________________________________________________ _________________________________________________________________ _________________________________________________________________ _________________________________________________________________ _________________________________________________________________ _________________________________________________________________ _________________________________________________________________ _________________________________________________________________ _________________________________________________________________ _________________________________________________________________ _________________________________________________________________ _________________________________________________________________ _________________________________________________________________ _________________________________________________________________ _________________________________________________________________ _________________________________________________________________ _________________________________________________________________ _________________________________________________________________ _________________________________________________________________ _________________________________________________________________ _________________________________________________________________ _________________________________________________________________ _________________________________________________________________ _________________________________________________________________ _________________________________________________________________ _________________________________________________________________ _________________________________________________________________ _________________________________________________________________ _________________________________________________________________ _________________________________________________________________ _________________________________________________________________ _________________________________________________________________ _________________________________________________________________ _________________________________________________________________ _________________________________________________________________ ... -
Page 30: 13P7526-Ins Joint Kit Instructions R-P32E
Joint Kit Contents R-P32E Part Number Description 6P1027 Top Panel Trim 13D1046 Light Canopy Trim 13D1045 Bottom Panel Trim 13D2028 Front Rail Trim 3WM2015 Rear Support – ( Installed ) 2 ½ lg Studs w/ washers and nuts 3 ½ lg Studs w/ washers and nuts 5 ½... - Page 31 JOINT KIT INSTRUCTIONS R-P32E STEP 1. PREPING CABINETS A. Set Cabinets in place. Level using shims if necessary Check upper back corner and front of cabinet. B. Remove Deck Pans C. Remove Lower Front Panels remove screws and lift panels off. D.
- Page 32 Under Return Air Grill Bolt Cabinets Using 3 1/2 lg Long Studs w/ washers and nuts B. Using 3 ½ lg Long Studs w/ washers and nuts Bolt Upper Front of Cabinets Togeather replace Honeycomb Discharge. 13D7526X Joint Kit Instructions 3 OF 7 9/22/2010...
- Page 33 Using 3 ½ lg Long Studs w/ washers and nuts Bolt Upper Front of Cabinets Thru Lamp Channel Area. E. Using 5 ½ lg Long Studs Bolt Rear of Cabinets together using Rear Channels 13D7526X Joint Kit Instructions 4 OF 7 9/22/2010...
- Page 34 F Reinstall Top Front Canopy. G. Reinstall Lower Front Panel STEP 3. INSTALLING JOINT TRIM A. Install Lamp Channel Trim inside of Cabinets using sheet metal screw 13D7526X Joint Kit Instructions 5 OF 7 9/22/2010...
- Page 35 Install Outside Top Front Trim on Cabinets using sheet metal screws. B. Install Lower Front Trim to Lower Front of Cabinets using sheet metal screws. 13D7526X Joint Kit Instructions 6 OF 7 9/22/2010...
- Page 36 Slip Front Rail Trim behind Bumper Rail and install with sheet metal screws E. Replace Deck Pans 13D7526X Joint Kit Instructions 7 OF 7 9/22/2010...
Need help?
Do you have a question about the SC-OP30E Series and is the answer not in the manual?
Questions and answers