Advertisement
Advertisement
Table of Contents

Summary of Contents for staratlas L36P
- Page 1 ⚫ 尺寸: 120*140mm 材质: 封面 200g 哑粉单面哑膜; 纸内页 128g 双铜版纸彩色过哑油...
- Page 2 L36P V1.03...
- Page 3 CUSTOMER SERVICE & WARRANTY Thank you for choosing this PROJECTOR and becoming our valued customer. We are committed to providing you with products that improve your daily life. Happy customers' experiences make us proud and we hope this product will bring you convenience and enjoyment.
-
Page 4: Table Of Contents
(English) CONTENTS NOTICE ---------------------------------------------------------------- 01 ACCESSORY LIST -------------------------------------------------- 01 REMOTE CONTROL ----------------------------------------------- 02 INTERFACES & QUICKSTART --------------------------------- 03 OPTICAL ADJUSTMENTS --------------------------------------- 07 MULTIMEDIA CONNECTIONG --------------------------------- 07 MENU SETTINGS -------------------------------------------------- 13 CONNECT TO A BLUETOOTH SPEAKER ------------------ 15 SCREEN MIRRORING -------------------------------------------- 16 CEILING MOUNTING ---------------------------------------------- 21 TECHNOLOGY FEATURES ------------------------------------- 22... -
Page 5: Notice
NOTICE 1. Not recommended for Powerpoint, Word, Excel, or business presentations. 2. Connect the mini projector with a tablet or smartphone, please use Wi-Fi screen mirroring feature or use external HDMI adaptor. For HDMI adaptor connection, Android phones need to support MHL and an MHL to HDMI cable is required, iPhone &... -
Page 6: Remote Control
REMOTE CONTROL Do not submerge the remote control in water. Do not put the remote control near a fire or in a wet/hot place. Do not use old and new batteries together in the remote control. Please take the batteries out if not using the remote control for a long time to avoid battery leakage. -
Page 7: Interfaces & Quickstart
INTERFACES & QUICKSTART Power input... - Page 8 1. Connecting the projector to power Connect the power cable to the projector. Then you can power on the projector after 3 seconds. Indicator light...
- Page 9 2. Power ON/OFF Press the “ ” button on the projector or on the remote control to power on. After the projector gets power through the power cable, It goes Into stand-by. 3. Multimedia boot screen After 5-10 seconds, the multimedia screen will be displayed.
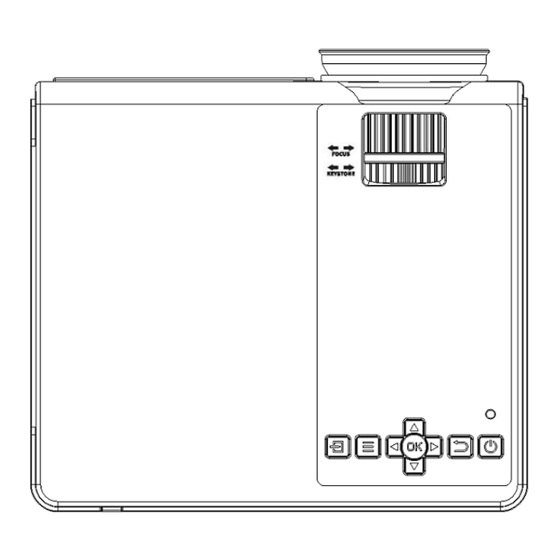
- Page 10 4. Focus & Keystone correction a. If the image is displayed as a trapezoid shape, you can adjust it with the keystone correction function by turning the keystone ring. This should normalize the display image. b. Image focusing Make sure the projector is horizontal to the projector screen and adjust the focus by turning the focus ring.
-
Page 11: Optical Adjustments
OPTICAL ADJUSTMENTS The projector uses an optical keystone correction function, so the image can be adjusted as below: However, this projector does not have a horizontal keystone correction function. The projector must be placed horizontally to the projection screen. If you encounter the problem as shown above, it is probably because the projector has not been placed horizontally to the projection screen, or the projection screen is not vertically positioned. - Page 12 1. Playing media from a USB a.lnsert the USB flash into the USB slot. b. Choose USB icon as source from the menu.
- Page 13 Supported multimedia formats Audio file MP3/WMA/OGG/AAC/MA4/FLAC/APE/WAV Picture file JPEG/BMP/PNG MPEG1, MPEG2, FLV, MPEG6, RM, AVI Multimedia Video file /RMVB, MOV, MKV, DIVX, FVOB M-JPEG (only unspported 640*480) Text file c.Choose the content which you need to display: PHOTO/MUSIC/MOVIE/TEXT d.Choose the file you want to display. Press" HI" to display or stop.
- Page 14 2. AV video connection Use a 3-in-1 AV cable to connect to the projector as shown below. Once connected, select the AV signal source.
- Page 15 3. HDMI connection Use the HDMI slot to connect computers and HDMI compatible devices. Once connected, select the HDMI signal source. Suported resolutions: 576P,480P,720P, 1080P,640x480,800x600,1024x768,1280x1024,1280x720, 1440x900,1366x768,1920x1080,1280x800,1440x960,680x1050...
- Page 16 4. 3.5mm audio connection Use the 3.5mm audio jack to connect headphones and speaker equipment. Note: This projector does not support Dolby sound.
-
Page 17: Menu Settings
MENU SETTINGS 1 .How to go to the Setting? Select the setting in the HOME main menu first. Then press " ◄/►" to select the sub-menu, next press " ok" to choose the option as required, and finally press the " ok" to confirm. - Page 18 2 .Function of sub-menu a.Picture sub-menus: Available adjustment: Picture Mode / Color Temperature / Aspect Ratio / Noise Reduction / Reduce Display size b.Sound sub-menus: Available adjustment: Sound Mode / Balance / Auto Volume / Surround Sound / Bluetooth c.Option sub-menus: Available adjustment: OSD Language / Restore Factory / Rotate / OSD Duration / Software Update(USB) d.Time sub-menus:...
-
Page 19: Connect To A Bluetooth Speaker
CONNECT TO A BLUETOOTH SPEAKER Select the "BT" in the HOME main menu first. Press“ok ” key to turn Bluetooth on 3.Select "Search" and press "OK" to scan nearby Bluetooth speakers. 4.Select your Bluetooth speaker from the list, press OK key to connect (pair). -'O’- Tips: When power on the projector or turn on Bluetooth, the projector attempts to connect the latest connected Bluetooth speaker. -
Page 20: Screen Mirroring
SCREEN MIRRORING “Screen Mirroring” Before screen mirroring, please select "Important: in the HOME main menu first. For iOS System For iOS devices, there are two ways to connect as follows. *Method A Streaming with Your router's WiFi 1.Turn on the projector, select “Screen Mirroring" in the HOME main menu and then choose "iOS Screen". - Page 21 3 .Turn on the WLAN of your iOS device and connect to the same Router's WiFi above.
- Page 22 4 .Then go to the "Screen Mirroring" of the iOS device and select "L36P-XXXXXX" to connect. The screen mirroring connection success. ‘Method B Lightning to USB Cable for iPhone Prepare an official Apple Lightning to USB Cable. After plugging the cable, please click “Trust” on your phone.
- Page 23 Settings first. 3.Turn on the phone’s WLAN. 4.Turn on "Screen Casting" in the phone's Settings, then select "L36P-XXXXXX" to connect. 5.The connection success Tip: You can use router WiFi or Android phone’s data to connect the projector by the above steps as needed.
- Page 24 /!\ *Notes for Screen Mirroring 1. The smoothness of the projector connection is affected by the strength of your WiFi signal. Please make sure that the WiFi signal is good enough. 2. If you connect the projector via a new WiFi the first time, please enter the WiFi password in the projector.
-
Page 25: Ceiling Mounting
CEILING MOUNTING Please refer to the following diagram for mounting the projector on a ceiling. Do not place the projector near heat sources to prevent the projector from overheating. When ceiling mounting the projector, please ensure screws of a suitable quality are used, and that screw depth is deep enough to prevent the projector from falling. -
Page 26: Technology Features
TECHNOLOGY FEATURES 1 . Basic parameters Imaging Color LTPS LCD 8.3M Technology Pixel Resolution 1920*1080 Keystone Manual Correction ±15° Highest 1920*1080 Power Voltage 100V-240V50/60HZ Resolution Light Integrated Watt 75W (Max) Lifespan 20,000 hrs Input USB/VGA/HDMI/AWTF Lens Multichip Coated Output Earphone USB(5V-500MA) Speaker 8R 3W Lens(F-125)
Need help?
Do you have a question about the L36P and is the answer not in the manual?
Questions and answers