Advertisement
Available languages
Available languages
Quick Links
Before you begin - Read these instructions completely
and carefully. IMPORTANT – OBSERVE ALL
GOVERNING CODES AND ORDINANCES. Note to
Installer – Be sure to leave these instructions with the
Consumer. Note to Consumer – Keep these instructions
with your Owner's Manual for future reference.
For further details, refer to the GE Appliances Architects and Engineers Design Data Manual for Zonelines. To
NOTES:
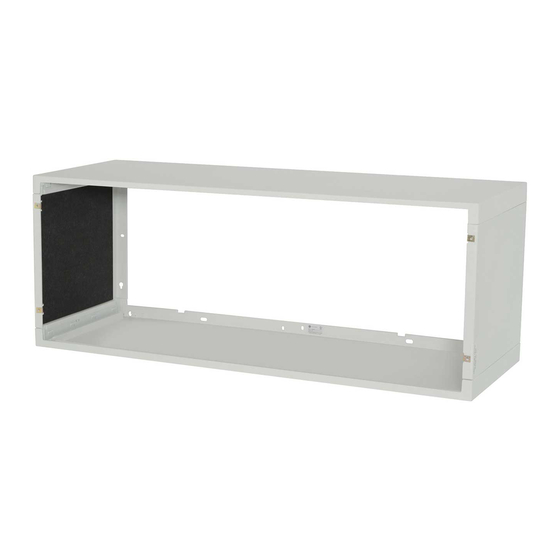
• Handle the sleeve carefully.
• The cardboard stiffener inside the case and the
rear protective panel must remain in place until
the chassis is installed to assure case rigidity and
squareness.
• If a sub-base is to be used, it may be desirable to
assemble it to the sleeve before securing the sleeve
in the wall.
CRITICAL DIMENSIONS
Outside wall
"C"
NOTE: Care should be taken in location of electrical
supply entry in relationship to wall sleeve to ensure
access to power once the unit is installed.
31-5000912 Rev. 0
Ceiling
"A"
"B"
Roomside
"D"
Installation Instructions
for your new
RAB42*
Assembly Required
Wall Sleeve for All AZ Series
Zoneline Models
Zoneline.com.
SLEEVE LOCATION
Sleeve must be located on an outside wall for proper
operation. As a general rule, the air conditioner should
be centrally located in an outside wall to ensure proper
distribution of conditioned air. It should be located in
a portion of the wall where there is no electrical wiring
or plumbing, and where there are no obstructions
immediately inside or outside.
Dimensions
Recommended Installation Clearance
A
B
projects into the room, a sub-base or other
support is recommended.
C
D
sub-base.
E
Left/Right side of sleeve to adjacent wall -
NOTE: For sleeves with an internal drain, install level
"E"
1
Top of Sleeve
Outside wall
"E"
Advertisement

Related Manuals for GE RAB42 Series


Summary of Contents for GE RAB42 Series
- Page 1 Installer – Be sure to leave these instructions with the Consumer. Note to Consumer – Keep these instructions with your Owner’s Manual for future reference. For further details, refer to the GE Appliances Architects and Engineers Design Data Manual for Zonelines. To Zoneline.com. NOTES: SLEEVE LOCATION •...
-
Page 2: Installation Instructions
Installation Instructions STEP 1: Preparation of the wall STEP 2: Assemble the Wall Sleeve The wall sleeve should be installed during construction 1. Set the bottom panel Front View and lintels should be used to support the block above surface. the wall sleeve. - Page 3 Installation Instructions STEP 3: Assemble the Wall Sleeve on Deep STEP 4: Sleeve angles Sleeve Models Only 1. Position the sleeve angle around top and sides of the sleeve the screws from the outside of the sleeve. NOTE: Do not drill any holes in the bottom of the sleeve. Sleeve Roomside Sleeve angle...
- Page 4 Installation Instructions STEP 5: Installation of the sleeve in the wall opening 1. Position the sleeve into the wall. Refer to chart on page to be able to caulk properly and prevent sealing the drain Steel lintel Caulk* Caulk* be installed under the sleeve and caulking applied between Room IMPORTANT: Sleeve...
- Page 5 Installation Instructions Electrical Requirements (230V/208V) Drain Kit Provisions should be made to have the proper electrical outlet If it is necessary to install a drain kit on this wall sleeve, the near the sleeve. All wiring should be made in accordance with local codes and regulations.
- Page 6 Notes 31-5000912 Rev. 0...
- Page 7 Pour de l’information détaillée, veuillez vous reporter au manuel des données de conception des ingénieurs et architectes GE relatif aux climatiseurs Zoneline. Pour obtenir une copie de ce manuel, appelez le GE Appliances au 800.626.2000 ou visitez-nous sur Zoneline.com.
-
Page 8: Instructions D'installation
Instructions d’installation ÉTAPE 2 : Assembler le manchon mural ÉTAPE 1: Préparation du mur 1. Placez le panneau inférieur sur une surface propre, plane et Le manchon mural doit être installé pendant la construction de niveau. et des linteaux doivent être utilisés pour supporter le bloc au-dessus du manchon mural. - Page 9 Instructions d’installation ÉTAPE 3 : Assemblez le manchon mural sur ÉTAPE 4 : (facultatif) Cornières de gaine les modèles à manchon profond S’il faut installer des cornières de gaine (achetées localement), procédez comme suit : seulement 1. Positionnez l’angle de manchon autour du haut et des côtés 2.
- Page 10 Instructions d’installation ÉTAPE 5 : Installation du manchon dans ÉTAPE 6: Étanchéisation l’ouverture murale Étanchéisez les espaces entre les murs extérieur et intérieur et le manchon avec un produit 1. Placez le manchon dans le mur. Consultez le tableau de la d’étanchéité...
- Page 11 Instructions d’installation EXIGENCES ÉLECTRIQUES (230V/208V) TROUSSE DE VIDANGE S’il est nécessaire d’installer une gouttière sur le manchon Des dispositions doivent être prises pour disposer d’une prise électrique adéquate proche du manchon.Tout le câblage doit Dispositif de vidange intérieur/extérieur RAD10 Le cordon de ligne fourni avec le châssis (le cas échéant) 1.
- Page 12 Remarques 31-5000912 Rev. 0...
Need help?
Do you have a question about the RAB42 Series and is the answer not in the manual?
Questions and answers