Advertisement
Quick Links
Advertisement

Summary of Contents for fox&summit FS-BNDL3
- Page 1 Security Sensor Bundle FS-BNDL3 Quick Start Guide...
- Page 2 What’s in the Wi-Fi Indoor Plug Box Wi-Fi Indoor Plug FS-IP100 Quick Start Guide Wi-Fi Indoor Plug Quick Start Guide...
- Page 3 Wi-Fi Indoor Plug Safety Instructions • Be sure there are no exposed wires from the wall outlet or Wi-Fi Indoor Plug before installation. • Your Wi-Fi Indoor Plug is intended for indoor use only. • Do not tamper with or make any modifications to your Wi-Fi Indoor Plug. •...
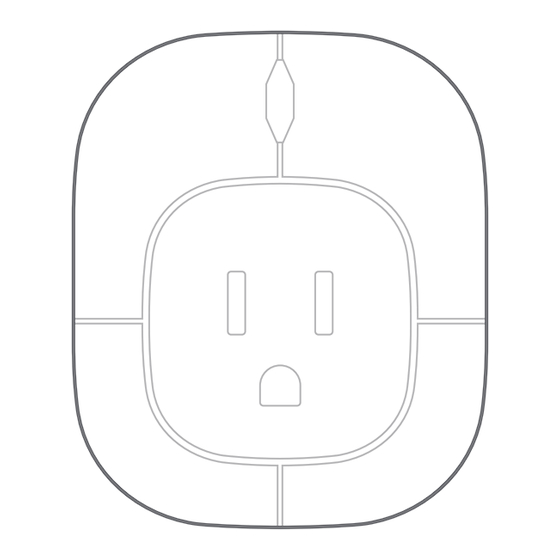
- Page 4 Wi-Fi Indoor Plug Installation and App Setup 1. Insert your Wi-Fi Indoor Plug into the desired wall outlet location. Wi-Fi Indoor Plug Power Rating: Input: AC 100-120V, 50-60Hz AC Outlet: AC 100-120V, 50-60Hz, Maximum Output 10A Consumption: Typ. < 1W 2.
- Page 5 3. Connect your smartphone or tablet to your local 2.4GHz Wi-Fi network. Your Smartphone Your Wi-Fi Router 4. Launch the FS Home App. 5. Sign up for an account or Login with your email or password. 6. Go to "Device" and press "+" in the upper right-hand of the screen and follow the on-screen pairing instructions.
- Page 6 Important: Ensure that the network name or SSID is the desired network you want the devices to use. If it is different from your smartphone’s Wi-Fi settings, your device pairing will be unsuccessful. 7. Enter your Wi-Fi network password. 8. Scan the device QR-Code/UID with your smartphone or tablet or enter it manually.
- Page 7 9. Insert Indoor Plug into an available power outlet. Once it has beeped, press and hold the button on the front of the plug until it emits one long beep, then release the button. Button 10. Press "Pair" in the FS Home App within 10 seconds of releasing the button on the front of the Indoor Plug.
- Page 8 What’s in the Wi-Fi Outdoor Motion Triggered Spot Light Box Wi-Fi Outdoor Motion Triggered Spot Light FS-OMSL100 Quick Start Guide Wi-Fi Outdoor Motion Quick Start Guide Triggered Spot Light Mounting Screws and Masonry Plugs...
- Page 9 Wi-Fi Outdoor Motion Triggered Spot Light Safety Instructions • Practice safe installation habits while installing the Wi-Fi Outdoor Motion Triggered Spot Light. • Do not tamper with or make any modifications to your Wi-Fi Outdoor Motion Triggered Spot Light. • Make sure you replace batteries with 4 D-Cell alkaline batteries. Insert batteries in the correct polarity as shown inside the battery case.
- Page 10 Wi-Fi Outdoor Motion Triggered Spot Light Installation and App Setup 1. Download the FS Home App from the App Store or Google Play. FS Home App Store is a service mark of Apple Inc. Google Play and the Google Play logo are trademarks of Google LLC. 2.
- Page 11 4. Pull the battery case out of the light case as shown below. 5. Push the tabs on the sides of the battery case to remove the cover. 6. Insert 4 new D Type alkaline batteries. Make sure you insert the batteries in the correct polarity.
- Page 12 7. Launch the FS Home App. 8. Sign up for an account or Login with your email or password. 9. Go to "Device" and press "+" in the upper right-hand of the screen and follow the on-screen pairing instructions. Make sure your phone is connected Wi-Fi NAME to a 2.4GHz Wi-Fi network ••••••••...
- Page 13 11. Scan the device QR-Code/UID with your smartphone or tablet or enter it manually. The QR-Code is located on the bottom of the battery case. QR-Code 12. Replace the battery casing cover. When you see the Passive Infrared Sensor (PIR, the little dome on the front of the light) flashing blue, it is in pairing mode.
- Page 14 What’s in the Wi-Fi Window/Door Sensor Box Wi-Fi Window/Door Sensor FS-WDS100 Quick Start Guide Wi-Fi Window/Door Sensor Quick Start Guide Screwdriver 2 AAA Batteries...
- Page 15 Wi-Fi Window/Door Sensor Safety Instructions • Practice safe installation habits while installing the Wi-Fi Window/ Door Sensor. • Your Wi-Fi Window/Door Sensor is intended for indoor use only. • Do not tamper with or make any modifications to your Wi-Fi Window/ Door Sensor.
- Page 16 Wi-Fi Window/Door Sensor Installation and App Setup 1. Download the FS Home App from the App Store or Google Play. FS Home App Store is a service mark of Apple Inc. Google Play and the Google Play logo are trademarks of Google LLC. 2.
- Page 17 3. Launch the FS Home App. 4. Sign up for an account or Login with your email or password. 5. Go to "Device" and press "+" in the upper right-hand of the screen and follow the on-screen pairing instructions. Make sure your phone is connected Wi-Fi NAME to a 2.4GHz Wi-Fi network ••••••••...
- Page 18 7. Using the provided screwdriver to remove the battery cover. unscrew the four screws on the back of the sensor. Unscrew this screw to open 8. Scan the device QR-Code/UID with your smartphone or tablet or enter it manually. The QR-Code is located on the inside of the battery cover. QR-Code 9.
- Page 19 10. Press "Pair" in the FS Home App within 10 seconds of inserting the batteries. Important: When pairing is successful, a new device will be added to your Device page. If unsuccessful, repeat Step 5. 11. Install the Wi-Fi Window/Door Sensor onto the desired window or door with the included adhesive strips.
-
Page 20: Troubleshooting
Troubleshooting 1. Pairing Unsuccessful a. Make sure that your smartphone or tablet is connected to the desired Wi-Fi network. b. Make sure that the Wi-Fi network your smartphone or tablet is connected to is a 2.4GHz network, not a 5GHz network. -
Page 21: Fcc Statement
FCC Statement This device complies with Part 15 of the FCC Rules. Operation is subject to the following two conditions: (1) this device may not cause harmful interference, and (2) this device must accept any interference received, including interference that may cause undesired operation. Please note that changes or modifications not expressly approved by the party responsible for compliance could void the user's authority to operate the equipment. - Page 22 CE marking on this product represents the product is in compliance with all directives that are applicable to it. Correct Disposal of this product This marking indicates that this product should not be disposed with other household wastes throughout the EU. To prevent possible harm to the environment or human health from uncontrolled waste disposal, recycle it responsibly to promote the sustainable reuse of material resources.
- Page 23 Fox & Summit USA, LLC | 888.606.1589 | www.foxandsummit.com © 2018 Fox & Summit USA LLC. All Rights Reserved.
Need help?
Do you have a question about the FS-BNDL3 and is the answer not in the manual?
Questions and answers