Advertisement
THANK YOU
for purchasing the Ninja® Luxe Café
REGISTER YOUR PURCHASE
registeryourninja.com
1-877-646-5288
Scan QR code using mobile device
RECORD THIS INFORMATION
Model Number: �������������������������
Serial Number: ��������������������������
Date of Purchase: �����������������������
(Keep receipt)
Store of Purchase: �����������������������
TECHNICAL SPECIFICATIONS
Voltage:
120V~, 60Hz
Power:
1650W
Water Reservoir
Capacity:
70 oz.
TIP: You can find the model and serial numbers on the
QR code label located on the back of the machine by
the power cord.
PLEASE READ CAREFULLY AND KEEP FOR FUTURE REFERENCE.
These instructions are designed to help you get a complete understanding of your new Ninja Luxe Café.
If you have any questions, please call our Customer Service line at 1-877-646-5288.
SharkNinja Operating LLC
US: Needham, MA 02494
1-877-646-5288
ninjakitchen.com
Illustrations may differ from actual product. We are constantly striving to improve our products, therefore the
specifications contained herein are subject to change without notice.
NINJA LUXE is a trademark of SharkNinja Operating LLC.
This product may be covered by one or more U.S. patents. See sharkninja.com/patents for more information.
© 2024 SharkNinja Operating LLC
ES601�IB�REV�Mv10
ES600 Series | Owner's Guide
IMPORTANT SAFETY INSTRUCTIONS
PLEASE READ CAREFULLY BEFORE USE • FOR HOUSEHOLD USE ONLY
Read all instructions before using your Ninja Luxe Café
Indicates the presence of a hazard that can cause personal injury, death or substantial property damage if the warning
included with this symbol is ignored.
Avoid contact with hot surface. Always use hand protection to avoid burns.
For indoor and household use only.
WARNING
To reduce the risk of injury, fire, electrical shock or property damage, basic safety precautions must always be followed,
including the following numbered warnings and subsequent instructions. Do not use machine for other than intended use.
General Precautions
•
To eliminate a choking hazard for young children, discard all packaging materials immediately upon unpacking.
•
This machine can be used by persons with reduced physical, sensory, or mental capabilities or lack of experience and knowledge if they
have been given supervision or instruction concerning use of the machine in a safe way and understand the hazards involved.
•
Keep the machine and its cord out of reach of children. DO NOT allow the machine to be played with or be used by children. Close
supervision is necessary when used near children.
To protect against fire, electric shock, and injury to persons, DO NOT immerse cord, plugs, or body of machine in water or other liquid.
•
•
NEVER carry the machine by the power cord or pull it to disconnect from electrical socket; instead grasp the plug and pull to disconnect.
•
DO NOT operate any machine with a damaged cord or plug, or after the machine malfunctions or has been dropped or damaged in any
manner. Contact SharkNinja Operating LLC for service.
•
For household and countertop use only. DO NOT let the power cord hang over the edge or touch hot surfaces such as a stove.
•
NEVER use an electrical socket below a counter.
To avoid risk of fire, electrical shock, or damage to the machine, DO NOT use machine in an machine garage or under a wall cabinet.
•
•
Unplug from outlet when the machine is not in use and before cleaning.
•
NEVER leave an machine unattended while in use.
•
Machine is not intended to be operated by means of an external timer or separate remote-control system.
DO NOT place on top of any other machine.
•
•
The machine shall not be placed in a cabinet when in use.
•
DO NOT use any accessory not recommended by the manufacturer, as this may result in injury or damage to the machine.
READ AND SAVE THESE INSTRUCTIONS
@ninjakitchen
Advertisement
Table of Contents

Related Manuals for Ninja LUXE CAFE ES600 Series


Summary of Contents for Ninja LUXE CAFE ES600 Series
- Page 1 For household and countertop use only. DO NOT let the power cord hang over the edge or touch hot surfaces such as a stove. These instructions are designed to help you get a complete understanding of your new Ninja Luxe Café.
-
Page 2: Important Safety Instructions
ASSEMBLY IMPORTANT SAFETY INSTRUCTIONS PLEASE READ CAREFULLY BEFORE USE • FOR HOUSEHOLD USE ONLY Scan for easy 3D instructions WARNING Tap. Zoom. Rotate with official To reduce the risk of injury, fire, electrical shock or property damage, basic safety precautions must always be followed, interactive instructions on the BILT app. -
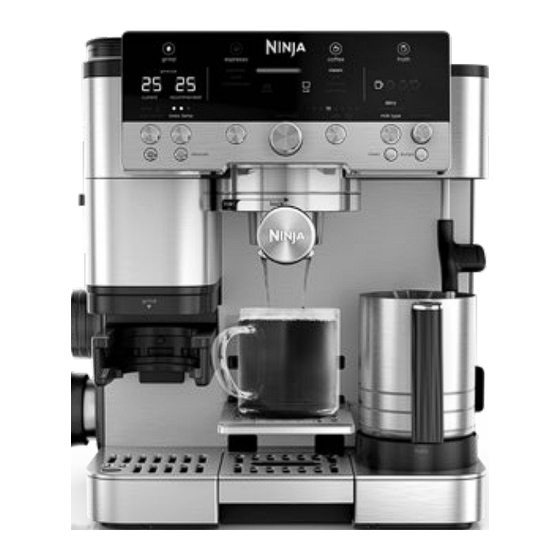
Page 3: Using The Control Panel
ACCESSORIES USING THE CONTROL PANEL Single Basket * POWER Button MILK TYPE Button (not available on all machines) START GRIND Button SIZE Selection Button Double Basket Progress Bar Center Dial/START BREW Button Luxe Basket Froth Dial/START FROTH Button STRENGTH Button Portafilter PURGE Button DESCALE Button... - Page 4 GETTING STARTED: BEFORE YOUR FIRST BREW REMOVE ACCESSORIES & PARTS FROM 4 Place test strip on a dry, flat surface and wait 1 FILL THE WATER RESERVOIR FILL THE BEAN HOPPER PACKAGING minute for test strip to display results. • Before you begin, make sure the water When adding beans to the hopper, be sure the •...
- Page 5 GETTING STARTED: BREWING ESPRESSO, DRIP COFFEE, BEFORE YOUR FIRST BREW CONT. AND COLD DRINKS WATER FLUSH 4 Press the SIZE button to adjust drink size to ESPRESSO/COFFEE BASKETS 2 With the funnel on top of the portafilter, 12 oz. Ensure you have at least 14 oz. of water insert into the grinding cradle.
- Page 6 BREWING ESPRESSO, DRIP COFFEE, AND COLD DRINKS CONT. APPROXIMATE BREW VOLUMES USING THE GRINDER UNDERSTANDING THE GRIND SETTINGS TAMPING 1 Once a brew is highlighted, Barista Assist What do the grind settings mean? Be sure to tamp on all espresso drinks, as well as COFFEE VOLUMES Technology™...
- Page 7 BREWING ESPRESSO, DRIP COFFEE, AND COLD DRINKS CONT. BREWING 3 The brew style and size that was ground will PROPER EXTRACTION RINSE NOTIFICATION still be selected on the control panel. Place 1 Place portafilter in group head by aligning • Drink will pour out at a slow, consistent rate. If you attempt to make a cold drink immediately a cup under the portafilter and press START orange dot on portafilter with orange dot on...
- Page 8 ADJUSTING YOUR BREW TEMP AND STRENGTH SWITCHING OUT BEANS ADJUSTING BREW TEMPERATURE. STRENGTH SWITCHING OUT BEANS 1 Hold the SIZE button for 3 seconds. If you find your brew is tasting too weak or too 1 Unlock bean hopper by rotating handle strong for your liking, you can use the strength counterclockwise.
- Page 9 FROTHING FROTHING 4 Next, select DAIRY or PLANT-BASED milk 6 When the steam wand is pushed back into its MANUAL FROTHING with the MILK TYPE button based on the down position, auto purging will occur. This 1 Fill the milk jug with the desired amount 1 Fill the milk jug as desired in between the min milk that is in the milk jug.
-
Page 10: Periodic Maintenance
PERIODIC MAINTENANCE IMMEDIATELY AFTER BREW CLEANING EMPTYING THE DRIP TRAY REMOVING THE SHOWER SCREEN AND 2 Once removed, clean the shower screen with REPLACING THE RUBBER GASKET soap and water. • When brew is complete, carefully remove As you brew, the drip tray will fill up. When portafilter from group head. - Page 11 PERIODIC MAINTENANCE CONT. CLEANING THE CONICAL BURR GRINDER 4 Clean removed burr grinder with brush. CLEANING THE STEAM WAND 4 Use the needle to remove any material from inside the steam wand and steam wand tip. Be sure that the machine is turned off and Over time, material can build up in the steam unplugged before proceeding.
- Page 12 2 Dissolve the provided Ninja descale powder in a separate container with 37 fl. oz. of water. Pour 9 The clean cycle will take approximately solution mixture into water reservoir.
- Page 13 BEST BREWING PRACTICES BEST FROTHING PRACTICES • For best results, use freshly roasted coffee beans. • For best results with plant-based milk, use the barista or full-fat version. • When purchasing coffee beans, it’s best to buy a bag with a “Roasted On” date rather than a •...
-
Page 14: Additional Settings
ADDITIONAL SETTINGS TROUBLESHOOTING GUIDE Why is there no water coming out of the portafilter? The additional settings menu offers additional options to customize your machine and is accessible by pressing and holding the SIZE button for 3 seconds. Several factors could affect the volume of water dispensing from the portafilter: •... - Page 15 TROUBLESHOOTING GUIDE CONT. Why am I not getting any crema? I matched the grind setting, but the output was not good. • Coffee is tamped too lightly: When tamping, make sure to place the portafilter on a level surface. • Refer to Dialing in Your Grinder for Proper Extraction section. Place the assisted tamper inside the funnel and push down on the tamper until you feel it contact the Bean hopper will not fit back onto the machine.
-
Page 16: Product Registration
VIP warranty service Please visit registeryourninja.com or call 1-877-646-5288 to register your new Ninja® product within ten options for select product categories. So we may better assist you, please register your product (10) days of purchase.
Need help?
Do you have a question about the LUXE CAFE ES600 Series and is the answer not in the manual?
Questions and answers
There’s a bunch of compact beans that have clogged the grinder. I need to know how to remove the whole burr grinder to clean it
To remove the burr grinder for cleaning on the Ninja ES600 Series:
1. Remove the bean hopper by lifting the handle and turning it counterclockwise.
2. Rotate the upper burr counterclockwise to align the orange arrow on the burr grinder with the orange arrow labeled ALIGN on the machine.
3. Once aligned, lift the upper burr out.
Note: Do not allow the burrs to come into contact with water. Use only the cleaning brush to clean the burr grinder.
This answer is automatically generated