Table of Contents
Advertisement
Quick Links
Advertisement
Table of Contents

Related Manuals for OUXI Q8

Summary of Contents for OUXI Q8
- Page 1 FAT TIRE ELECTRIC MOUNTAIN BIKE MADE IN CHINA...
- Page 2 C ATA L O G Product Safety No�ce Part 1 Package Contents Part 2 Product Overview Part 3 Installa�on Guide Part 4 Ba�ery Charging Guide Part 5 Riding Modes Part 6 LCD Display and Bu�on Part 7 Specifica�ons Part 8 Daily Care and Maintenance Part 9 Warranty and Customer Services...
-
Page 3: Part 1 Product Safety Notice
FAT T I R E E L E C T R I C M O U N TA I N B I K E Part 1 PRODUCT SAFETY NOTICE Before your riding, please read this manual carefully and observe the following precau�ons: Please remember to wear a helmet or other protectors to avoid injury when riding your elec- ①... -
Page 4: Part 2 Package Contents
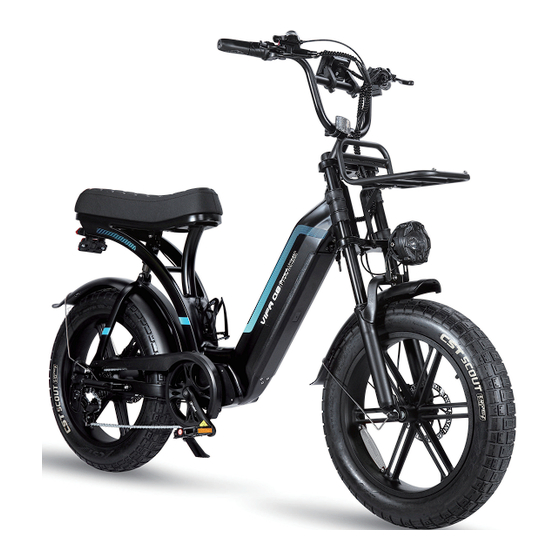
FAT T I R E E L E C T R I C M O U N TA I N B I K E Part 2 PACKAGE CONTENTS Please carefully check the package contents, any missing or damaged, please feel free to contact our customer service for support. - Page 5 FAT T I R E E L E C T R I C M O U N TA I N B I K E Part 3 PRODUCT OVERVIEW Refletor Brake Handle lock Headlight Horn/light Button Front Suspension Disc Brake LCD Display Built-in Battery Charging Port Saddle...
- Page 6 FAT T I R E E L E C T R I C M O U N TA I N B I K E Upshi� Bu�on Power Switch Brake Front Reflector Headlight Switch Brake Horn Switch Downshi� Bu�on LCD Display Thro�le Shi�...
- Page 7 FAT T I R E E L E C T R I C M O U N TA I N B I K E Part 4 INSTALLATION GUIDE — ASSEMBLE HANDLEBAR — 1: Loosen the screws of handle 2: Loosen the screws on the side 3: Remove the front fork cover of handle 4: Take the handle bar...
- Page 8 FAT T I R E E L E C T R I C M O U N TA I N B I K E 7. Tighten the screws and close the clamp. Notes: 1. Please make sure the front wheel is fixed in the right posi�on to avoid the serious injury caused by a loose wheel.
- Page 9 FAT T I R E E L E C T R I C M O U N TA I N B I K E — ASSEMBLE BRACKET — 1: Remove the screws 2: Remove the front fork screws 3: Assemble the bracket 4: Remove the screws 5: Install the screws of bracket 6: Install the bracket...
- Page 10 FAT T I R E E L E C T R I C M O U N TA I N B I K E — ASSEMBLE PEDALS — 1. The pedals in the package have an "L" or "R" label to indicate whether it should be installed on the le�...
-
Page 11: Part 5 Battery Charging Guide
FAT T I R E E L E C T R I C M O U N TA I N B I K E Part 5 BATTERY CHARGING GUIDE This fat �re electric bike adopts a built-in removable ba�ery, with 2 charging methods: directly charging the ebike and removing the ba�ery to charge. - Page 12 FAT T I R E E L E C T R I C M O U N TA I N B I K E — CHARGE OFF THE EBIKE — Remove the ba�ery from the ebike,connect the ba�ery with charger and then plug the charger into a power outlet.
-
Page 13: Part 6 Riding Modes
FAT T I R E E L E C T R I C M O U N TA I N B I K E How to twist the key? Key Port Informa�on Details Unlock to remove the ba�ery (you need to push the key in Unlock the deep and turn the key counterclockwise) Power off... - Page 14 FAT T I R E E L E C T R I C M O U N TA I N B I K E Part 7 LCD DISPLAY AND BUTTON Press and hold middle bu�on(3) for 3S un�l power on Turn on bike Turn off...
-
Page 15: Part 8 Specifications
FAT T I R E E L E C T R I C M O U N TA I N B I K E Part 8 SPECIFICATIONS NAME SPECIFICATIONS VIFA Q8 Model 20 inch Fat Tire Item 63*27.5*49 inch Ebike Size... -
Page 16: Part 9 Daily Care And Maintenance
FAT T I R E E L E C T R I C M O U N TA I N B I K E Part 9 DAILY CARE AND MAINTENANCE — CLEANING AND STORAGE — 1.If you see stains on the bike body, wipe them off with a damp cloth. If the stains won't scrub off, put on some toothpaste, and brush them with a toothbrush, then wipe them off... - Page 17 FAT T I R E E L E C T R I C M O U N TA I N B I K E — BEFORE RIDE SAFETY CHECKLIST — Before every ride, we advise you do following the pre-ride safety checklist. Also wear a qualified helmet to avoid any possible injuries during the ride.
-
Page 18: Warranty
FAT T I R E E L E C T R I C M O U N TA I N B I K E Part 10 WARRANTY AND CUSTOMER SERVICES — WARRANTY — We provide one year warranty for the battery, motor and controller. Note: The Warranty does not apply to any damage due to improper use, failure to follow the incrusta- �ons,unauthorized maintenance and repair, external causes such as accidents, abuse other force majeure.
Need help?
Do you have a question about the Q8 and is the answer not in the manual?
Questions and answers