
Related Manuals for AVIRE RATH SmartView 2

Summary of Contents for AVIRE RATH SmartView 2
- Page 1 Installation & Operations Manual SmartView 2 Modular YEAR YEAR WARRANTY WARRANTY...
-
Page 2: Table Of Contents
Testing the Video Page 11 Restoring Device Page 12 Troubleshooting Page 13 Monitoring Set-Up Page 15 Mounting Template Page 16 Appendix Page 17 Network Requirements Page 18 N56 W24720 N. Corporate Circle • Sussex, WI 53089 | 800-451-1460 | avire-global.com/en-us/... -
Page 3: Pre-Installation Requirements
Pre-Installation Requirements Required (Not Included): • Ethernet Cable to connect hardware to Internet connection • Machine Room Unit (Part Number: 7100) and • Small screwdriver Included Components: • Drill • 24vdc Plug-in Transformer • Mobile device, Laptop, or PC for programming •... -
Page 4: Installing Smartview 2 Modular System
Installing SmartView 2 Modular Visual System Machine Room Unit Mount machine room unit in desired restricted access location using appropriate mounting hardware (See mounting template on page 16). Unit cannot be mounted more than 61/2 feet (78 inches) off the ground. NOTE: PLEASE WAIT UNTIL ALL CONNECTIONS ARE MADE BEFORE TURNING ON POWER TO UNIT. - Page 5 Elevator Unit Place the protective display cover in the display cut-out in the elevator panel. NOTE: The display cover has protective plastic on the front and back that should be removed before installation. Mount the elevator unit over the display cover in the elevator panel and secure using appropriate mounting hardware.
-
Page 6: Powering On System
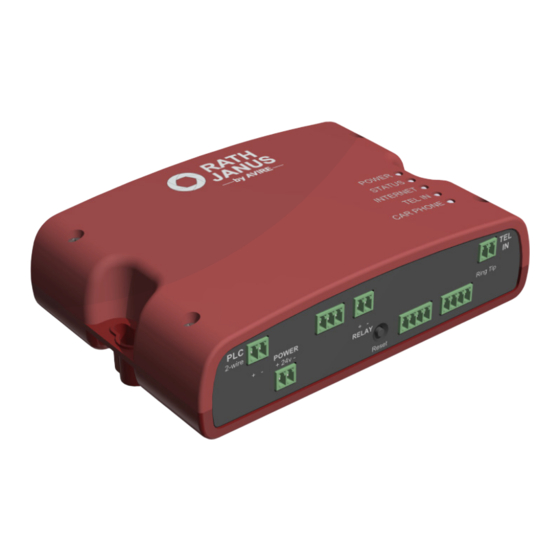
Powering on System DO NOT HAVE THE WIFI DONGLE PLUGGED IN WHEN POWERING ON THE SYSTEM Once all connections have been made, plug the provided plug-in transformer into a battery backed up 110vac power supply then turn on 110vac power. Once power is applied, the power LED will turn on. After approximately 3 to 5 minutes and unit has fully booted, LEDs on unit should be illuminated as follows: POWER –... -
Page 7: Programming The System
Programming the System The SmartView 2 hardware configuration settings can be programmed either locally with an Ethernet cable (not provided), or over WIFI. Follow steps below for desired option. WIFI: Plug the WIFI Dongle into the USB2 port on the Machine Room unit. The dongle will be active for 10 minutes after it is plugged in. - Page 8 After clicking “update”, a login box will pop up. Log in again with new credentials. After logging in, the home page will appear. The home page will show Online status for both the machine room unit, as well as the elevator unit and MAC address information for the system. If this is the first time logging into the unit, the elevator unit will need to be accepted by the system.
- Page 9 (approximately 30 seconds). NOTE: Leaving the dongle in the unit may result in a security vulnerability. RATH by AVIRE is not responsible for any damage caused by a security breach due to the dongle not being removed from the unit.
-
Page 10: Setting Up Static Ip
Setting Up the Machine Room Unit for a Static IP By default the RATH SmartView 2 system is set to obtain an IP address automatically through DHCP. If the network requires it, the device can be set up with a Static IP address using the following instructions. The device will need to be connected through DHCP before a static address can be assigned to it if connecting through an Ethernet connection. -
Page 11: Verifying Installation
Verify Installation While still on the configuration page, click “MENU” icon in top right-hand corner. Click “Startup Tests” Verify all applicable hardware tests passed. If all tests passed, exit out of configuration page and continue on to testing the system. If any of the tests failed, see page 13 for troubleshooting. -
Page 12: Restoring Device
Restoring Device DO NOT HAVE THE WIFI DONGLE PLUGGED IN WHEN RESTORING ON THE SYSTEM The SmartView system has the ability to be restored to factory settings. This will remove any saved data and replace them with defaults. Reset can be done using one of the following methods: To perform a hard reset on the device using the Reset Button: Press and hold “Reset”... -
Page 13: Troubleshooting
Troubleshooting Problem Possible Cause & Solutions The Internet light on the • Verify network has an Internet speed of at least 5MB/s. machine room unit is always • Make sure IP Address machine room unit is pulling is not the same as another RED or will not stay GREEN: device on the network. - Page 14 Troubleshooting Cont. Problem Possible Cause & Solutions Can’t get to smartviewconfig.com • If using WIFI dongle, make sure device is connected to the correct network. If it has been on computer or mobile device: longer than 10 minutes from dongle initially being plugged in, it has timed out. Unplug dongle and reconnect restore signal.
-
Page 15: Monitoring Setup
Monitoring Setup Compatible Internet Browsers: Google Chrome, Mozilla Firefox, Microsoft Edge, or Safari Before getting access to the viewing site the monitoring company or personnel handling the monitoring must set up an account for the viewing site https://www.smartviewhub.com. It is recommended your monitoring company registers before inspection. -
Page 16: Mounting Template
Mounting Templates Machine Room Unit Elevator Unit (7200M) Panel Cut-out Dimensions Page 16... -
Page 17: Appendix
Appendix Machine Room Unit: • Power Requirements: 24vdc, 1.66A amps. Power supply for unit must be a UL rated power supply with a current rating of 1.66A or greater • Current Draw: Active = 1A Idle = 0.5A • Operating Temperature: 32°F to 104°F (0°C to 40°C) •... -
Page 18: Network Requirements
Standard port for HTTP communication – recommended for Cloudflare services and needed for internal tests and webserver access For detailed network security associated with the system or questions about the information mentioned above, please contact RATH by AVIRE at 1-800-451-1460 or emailing rath-janus@avire-global.com Page 17... - Page 19 N56 W24720 N. Corporate Circle • Sussex, WI 53089 | 800-451-1460...
Need help?
Do you have a question about the RATH SmartView 2 and is the answer not in the manual?
Questions and answers