Table of Contents
Advertisement
Quick Links
Wireless Multi-channel
Thermometer and Hygrometer
Sensor
Model: DP50
Contents
1. Introduction ............................................... 3
2. Get Started ............................................... 4
2.1 Parts List ......................................... 4
3. Overview ................................................... 5
4. Setup Guide ............................................. 7
1
Advertisement
Table of Contents

Subscribe to Our Youtube Channel
Related Manuals for Froggit DP50

Summary of Contents for Froggit DP50
-
Page 1: Table Of Contents
Wireless Multi-channel Thermometer and Hygrometer Sensor Model: DP50 Contents 1. Introduction ..........3 2. Get Started ..........4 2.1 Parts List ......... 4 3. Overview ........... 5 4. Setup Guide ..........7... - Page 2 4.1 Install batteries ......7 5. Sensor Placement ......... 11 6. Setup Guide (using with Wi-Fi gateway)14 6.1 Pair with Gateway ....... 14 6.2 Wi-Fi Connection for the Gateway15 7. View Online Data on WS View .... 16 8. Specification ........... 18 9.Warranty InformationFehler! Textmarke nicht definiert.
-
Page 3: Introduction
1. Introduction Thanks for purchasing this DP50 wireless thermometer and hygrometer sensor. This device measures temperature humidity supports channels(one unit channel, optional sensors sold separately). The data can be streamed by DP1500 Wi-Fi Gateway(sold separately) and can be viewed on our WS View mobile application after the Wi-Fi configuration done. -
Page 4: Get Started
2. Get Started 2.1 Parts List One Multi-channel Temperature and Humidity sensor One User Manual... -
Page 5: Overview
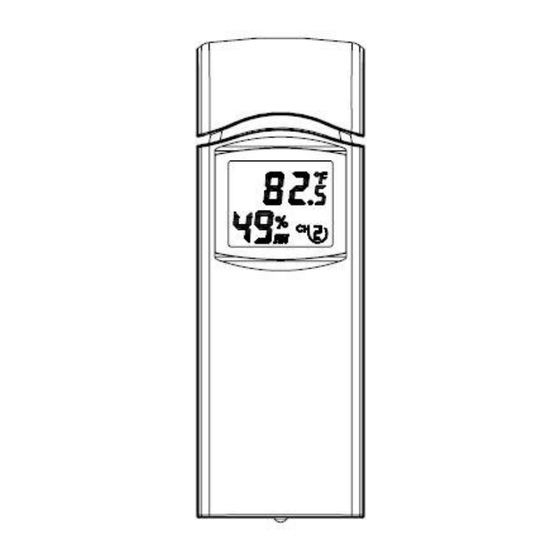
3. Overview Figure 1: Multi-channel Thermo-Hygro Sensor... - Page 6 Figure 2: Sensor LCD display (1) temperature (2) temperature units (°F vs. °C) (3) channel number...
-
Page 7: Setup Guide
(4) relative humidity 4. Setup Guide 4.1 Install batteries 1.Remove the battery door on the back of the transmitter(s) by sliding down the battery door, as shown in Fehler! Verweisquelle konnte nicht gefunden werden.3 . - Page 8 Figure 3: Battery installation 2. Before inserting the batteries, find the Before inserting the batteries, find the dip switches above the battery...
- Page 9 compartment and set the temperature units and channel number: Temperature Units: To change the transmitter display units of temperature measure (°F vs. °C), change Dip Switch 4, as referenced in Figure 3. Channel Number: This device supports up to eight sensors. To set each channel number, change Dip Switches 1, 2 and 3, as referenced in Figure 4.
- Page 10 Switch in down position. Switch in Switch in up position. Figure 4: Dip Switch diagram...
-
Page 11: Sensor Placement
3.Insert two AA batteries. 4.Verify the correct channel number (CH) and temperature units of measure (°F vs. °C) are on the display. 5.Close the battery door. Repeat additional remote transmitters(sold separately), verifying each remote is on a different channel. 5. Sensor Placement The best mounting location for the indoor sensor is in a location that never receives direct sunlight, not even through windows. - Page 12 Also, do not install in a location where a nearby radiant heat source (radiator, heaters, etc.) will affect it. Direct sunlight and radiant heat sources will result in inaccurate temperature readings. The unit is weatherproof, but besides heeding the placement instructions above, you should also attempt to mount the unit under cover (eve or awning or similar).
- Page 13 Hang the remote sensor using a string, as shown in right side of figure 5. Figure 5: Indoor sensor mounting Note: Make sure the sensor is mounted vertically and not lying down on a flat surface. This will insure optimum reception. Wireless signals are impacted by distance, interference (other weather stations,...
-
Page 14: Setup Guide (Using With Wi-Fi Gateway)14
wireless phones, wireless routers, TVs and computer monitors), and transmission barriers, such as walls. In general, wireless signals will not penetrate solid metal and earth (down a hill, for example). 6. Setup Guide (using with Wi-Fi gateway) If you want to view the multi channel sensor data on your mobile application, you need to pair this device with our DP1500 Wi-Fi Gateway(sold separately). -
Page 15: Wi-Fi Connection For The Gateway15
If a DP50 sensor has been hooked on DP1500 before, and you have a new DP50 sensor to replace the old one, unplug DP1500 from USB socket and power up again, then the new sensor will be learned and old sensor will be erased. -
Page 16: View Online Data On Ws View
the DP1500 Wi-Fi gateway. Any question, please contact the customer service. 7. View Online Data on WS View When the Wi-Fi configuration is done, you can view the local data of your multi temperature and humidity sensor(s) on the WS View application. -
Page 18: Specification
8. Specification Power: 2 AA batteries(not included) Sensor Size: 123x42x14mm Frequency: 868 Mhz Temperature range:-10°C – 60°C (14°F - 140°F) Temperature resolution:0.1°C, or 0.1°F Temperature accuracy: ± 1°C Humidity range: 10% ~ 99% Humidity resolution:1%... - Page 19 Humidity accuracy: ± 5% Sensor reporting interval: 48 seconds Note: A low battery icon will display on the APP to indicate the battery status of the sensor(s).
Need help?
Do you have a question about the DP50 and is the answer not in the manual?
Questions and answers