Table of Contents
Advertisement
Quick Links
UM 17
Instructions and Proper Use
Remote Keyless Entry
500-1100 e-FOB / e-PAD System
22310-01
e-FOB Receiver (Unsealed)
22311-01/02
4-Button e-FOB Transmitter
24470-01
2-Button e-FOB Transmitter
Optional Accessories
36429-01 through -06
36448-04 through -10 e-PAD Keypad
TriMark Corporation
500 Bailey Avenue
New Hampton, Iowa 50659
United States
www.trimarkcorp.com
Lighted Grab Handle with Keypad
TriMark
TriMark Corporation
TriMark Corporation
05/24-06
Advertisement
Table of Contents

Subscribe to Our Youtube Channel
Summary of Contents for TriMark 500-1100
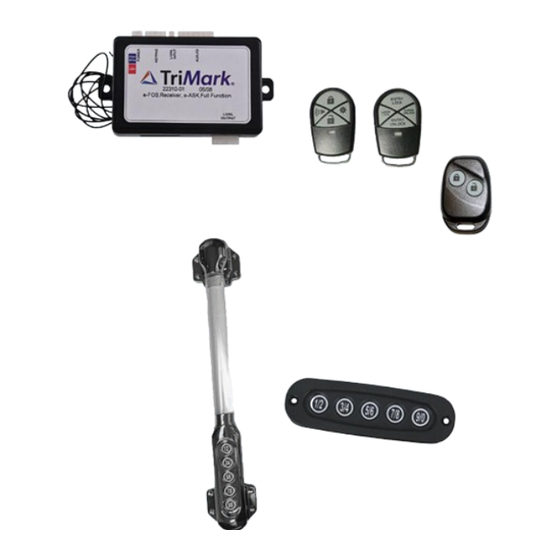
- Page 1 UM 17 Instructions and Proper Use Remote Keyless Entry 500-1100 e-FOB / e-PAD System 22310-01 e-FOB Receiver (Unsealed) 22311-01/02 4-Button e-FOB Transmitter 24470-01 2-Button e-FOB Transmitter Optional Accessories 36429-01 through -06 Lighted Grab Handle with Keypad 36448-04 through -10 e-PAD Keypad...
-
Page 2: Table Of Contents
Table of Contents Table of Contents ..........................2 Introduction ............................4 Acronyms ............................. 4 General Component Overview ......................4 e-FOB ................................4 e-FOB Receiver ..............................4 e-GRAB Lighted Grab Handle with Keypad / e-PAD (Both Optional) ..............5 Chapter 1: e-FOB Operation and Features ..................5 e-FOB Functionality ............................ - Page 3 Appendix G: RF Exposure Statement ..................... 29 Appendix H: Trademark Statement ....................29 TriMark makes every attempt to assure that information contained in the User Manual is correct and accurate; however, changes in design, dimension and specifications may occur at any time and without notice.
-
Page 4: Introduction
Introduction This manual provides the necessary information for the proper installation and use of TriMark’s 500- 1100 e-FOB and e-PAD System. The system includes the following components: • e-FOB: 2 or 4-Button Keyless entry Radiofrequency (RF) • e-FOB receiver: (sometimes called Full-Feature or TMFF): The input/output processor with Radiofrequency (RF) transceiver capabilities to communicate with the e-FOBs. -
Page 5: E-Grab Lighted Grab Handle With Keypad / E-Pad (Both Optional)
Lighted Grab Handle with Keypad / e-PAD (Both Optional) • Entry assist handle incorporates TriMark’s e-GRAB or e-PAD keypad into a stylish combo for RV coaches, motor homes and travel trailers • Button presses with tactile, visual, and audio feedback •... -
Page 6: Synchronizing E-Fobs To E-Fob Receiver
Synchronizing e-FOBS to e-FOB Receiver When you need to replace or add fobs to this 500-1100 Discrete system, you need to sync fobs to the receiver, they will not work with your system until they are sync’d to the receiver. Skipping steps in this procedure will cause the failure in the addition of new FOBs. -
Page 7: E-Fob Guidelines
6. Wait 3 seconds, the Status LED should come on RED and stay on = synching window open. 7. Within 10 seconds of the LED coming on press and release any button on the first FOB. a. The Status LED should go OFF and then Back on. If equipped or wired, the horn will sound once. -
Page 8: Chapter 2: E-Fob Receiver Operation And Features
Chapter 2: e-FOB Receiver Operation and Features The e-FOB Receiver is equipped with a Feature Pushbutton and a Status LED. These items may be installed remotely in your vehicle. See your OEM manual for location information. For example: • The status LED may be installed where it can be seen in the dashboard as a security feature, such as showing the alarm being armed •... -
Page 9: Dip Switch Assignments
The setting of these switches should be done with the assistance of either your OEM, service personnel, or TriMark tech support. Changing these switches can result in negative and/or undesirable results if the proper usage of them is not understood. -
Page 10: Detailed Explanations Of The Dip Switch Settings
Depending on the DIP switch settings, the Controller will respond to Fob button press events in different ways. If DIP switch #1 is ON (Cargo Mode) the #1 button is Entry Lock on either Fob. o Button #3 is Cargo Lock on the four button FOB. o There is not a Panic Feature in Cargo Mode If DIP switch #1 if OFF the #1 button is Lock on either FOB. - Page 11 DIP switch #7: Automatic Lock/Unlock. • DIP switch #7 ON: The auto-lock feature is activated. All doors lock 5 seconds after the ignition start. Doors will also unlock when the ignition is turned off. THIS FEATURE IS CANCELLED if a door ajar is sensed when the ignition is started. This helps protect against the locking of keys in vehicles •...
-
Page 12: Additional System Features
Additional system features Light Activation • When the alarm is armed, the parking lights flash and the horn honks • With an unlock from the Fob, or the keypad, the dome light output activates for 30 seconds Unlock Output • Standard Mode DIP switch #1 OFF o Pressing the Fob Unlock button (Button #2) twice for a pulse output o Enter secure operation #2 from keypad for a pulse output •... -
Page 13: Arming Alarm From Fobs
Arming alarm from Fobs • If in standard mode DIP switch #1. OFF Arming the alarm is Dependent on DIP switch #6 o DIP switch #6 ON. One press of the Lock button (button #1) arms the alarm o DIP switch #6 OFF. Two presses of the Lock button (button #1) arms the alarm •... -
Page 14: Wireless Switches
RF message that the switch was triggered. There are several types: magnetic contact, motion, and shock sensors. TriMark no longer sells these, but they are available from several sources. Since we no longer sell these, we cannot provide recommendations. -
Page 15: Chapter 3: Keypad / E-Grab Operation And Features
Chapter 3: Keypad / e-GRAB Operation and Features Programming, use, and default codes are slightly different if you have two numbers per button or one button in a doorbell configuration keypad. ALL TRIMARK KEYPADS USE 5-DIGIT CODES, NO more, NO less. 36429-01 36448-05... -
Page 16: Locking
Standard Keypad + Button Secure Doorbell Keypad + Button Secure Entry Code Option Output Entry Code Option Output 1,3,5,7,9 Entry Unlock 1,2,3,4,4 Entry Unlock Unlock Unlock 1,3,5,7,9 1,2,3,4,4 (cargos) (Cargos) 1,3,5,7,9 1,2,3,4,4 Entry & 2 Entry & 2 1,3,5,7,9 1,2,3,4,4 Unlock Unlock Toggle Dome... -
Page 17: Keypad Buzzer Feedback
Keypad Buzzer Feedback • In normal code entry mode, the keypad will emit 1 short 200mS beep per button press every time • When the ENTRY CODE is properly entered the keypad will emit two short beeps • During code reprogramming mode the keypad will emit two short beeps per button press o This will be covered in depth in the section “Programming the Authority Code”... -
Page 18: Method Two
2. Enter the desired 5-digit Authority Code, the keypad will beep twice per button press. 3. After the 5 digit is entered, The Keypad will beep 3 times. 4. Enter the 5-digit Authority Code again. The keypad will beep twice per button press. a. -
Page 19: Programming Entry Codes
Programming Entry Codes All codes are exactly 5 digits. You may reuse numbers. Have a number chosen before you start. 1. Press and hold button 5/6 (3 for Doorbell keypads), for 5 seconds. The keypad beeps again and begins flashing when it is held long enough. 2. -
Page 20: Appendix A: Coin Cell Battery Warning
Appendix A: Coin Cell Battery Warning WARNING: TriMark Keyless Entry Fobs contain a lithium button/coin cell battery. Keep coin cell batteries out of reach of children. . Remove and immediately recycle or dispose of used batteries according to local regulations and keep away from children. -
Page 21: Appendix B: Wiring Diagram
Appendix B: Wiring Diagram... -
Page 23: Appendix C: Installing Components
Appendix C: Installing Components This system uses low-voltage circuitry and wireless communication. To protect these components and to ensure the device operates as expected, these application notes must be followed. RF Antenna Guidelines Typical RF antenna implementation consists of a single wire from the control module. To ensure optimal reception the RF antenna wire should be designed to the following specifications: Wire Length: 107.5cm +/- 1cm... -
Page 24: Connector Locations And Pin Assignments
Connector Locations and Pin Assignments C1 C2 Wire Colors CONNECTOR C1: 4-PIN HARNESS Yellow Ignition Input Black Ground Input Power (+12V) Wire Colors CONNECTOR C2: KEYPAD HARNESS Black System Ground Purple Lights/Doorbell Output Brown 3/4 (2) Secure Operation White/Green Lock All System Power (12V) Yellow Learn Mode (GND to enter) -
Page 25: Mating Connector Information
Wire Colors CONNECTOR C4: 14-PIN HARNESS White/Purple (-) Security Trigger Input 3 Orange Armed Output (-500 mA) Brown Starter Kill Output (-500 mA) Gray Lights Output (-500 mA) Brown/White Horn Output (-500 mA) White/Black (-) Security Trigger Input 1 White/Yellow Siren Output (A/C) Red/White Aux. -
Page 26: E-Grab Chrome Keypad: 36429-04
e-GRAB Chrome Keypad: 36429-04 e-PAD Keypad: 36448-0X... -
Page 27: Appendix D: Troubleshooting
Appendix D: Troubleshooting Problem description Possible solutions General Problems Check and clean your Entry door contacts. Are they aligned, stuck down, or damaged? Entry door does not operate from Fobs or Keypad. The Cargo locks Verify power and ground connections on C5. operate properly. -
Page 28: Appendix E: Warranty
If any product supplied by TriMark is found to be defective by TriMark in its sole discretion, TriMark reserves the right to replace, rework, repair, or give credit for defective product. Upon confirmation of the defective condition of the subject part either with return of subject part and/or proper documentation, TriMark will replace such defective product exclusive of any labor, shipping, transportation, or delivery cost associated with the replacement. -
Page 29: Appendix G: Rf Exposure Statement
Trademarks, logos and service marks (“Trademarks”) used on TriMark website(s), product literature, manuals, communications or other representations in the name of TriMark including, but not limited to “TriMark,” “e-ASK,” “e-FOB,” “e-GRAB,” “e-PAD,” “TriGuard,” “Access Series,” “TIPS,” and “KeyOne” are registered and unregistered trademarks of TriMark.
Need help?
Do you have a question about the 500-1100 and is the answer not in the manual?
Questions and answers