Table of Contents
Advertisement
Quick Links
Advertisement
Table of Contents

Summary of Contents for Crosley Furniture SF105-18G
- Page 1 Model # SF105-18G...
-
Page 2: Lmportant Safety Information
lMPORTANT SAFETY lNFORMATlON! WARNING ! • ALWAYS keep electric cords, home furnishings, drapes, clothing, papers, or other combustibles at least 3 feet (0.9m) away from the front of this heater, and away from the bottom, sides, and rear of this heater. •... -
Page 3: Lmportant Safety Information
WARNING ! electric shock • Risk of !DO NOT OPEN! No user-serviceable parts inside! • ALWAYS disconnect this unit from the power supply before performing any assembly or cleaning, before replacing the light bulb, or before relocating the electric fireplace. •... -
Page 4: Table Of Contents
TABLE OF CONTENTS lmportant Safety Information ......................2 lmportant Safety Information ......................3 Table of Contents ..........................4 Important Information ....................... 4 Safety Information....................5 FCC Statement......................6 Wa r r a n t y ................... 6 Pre-installation....................... -
Page 5: Safety Information
SAFETY INFORMATION SAVE THESE INSTRUCTIONS! WARNING: There are no user serviceable parts WARNING: Always unplug the heater ! inside the fireplace/heater. If the unit appears when not in use. ! to malfunction, turn the unit off and unplug the unit from the wall immediately, and WARNING: Do not insert or allow foreign objects contact Customer Service at 1-800-815-4796. -
Page 6: Fcc Statement
SAFETY INFORMATION (CONTINUED) FCC STATEMENT Note: This equipment has been tested and found to comply with the limits for a Class B digital device, pursuant to Part 15 of the FCC Rules. These limits are designed to provide reasonable protection against harmful interference in a residential installation. -
Page 7: Pre-Installation
PRE-INSTALLATION ELECTRICAL SPECIFICATIONS Voltage: 120VAC,60HZ Watts:1400Watts TOOLS REQUIRED Phillips Screwdriver (not provided) HARDWARE INCLUDED NOTE Hardware not shown to actual size. Part Description Quantity Screw 8+2 extra Z Bracket PACKAGE CONTENTS #1 Screw X 10 #2 Z Bracket X 4 This insert has front panel made of GLASS! ALWAYS use extreme caution when handling glass. CAUTION ! personal injury Failure to do so could result in or property damage. -
Page 8: Assembly
ASSEMBLY STEP 1 Take out the unit from the box and layout all the spare parts for easy assembly. Make sure all small items are not left in packaging materials. CAUTION This unit has a glass front panel. Use extreme caution when handling glass to prevent personal injury or damage. -
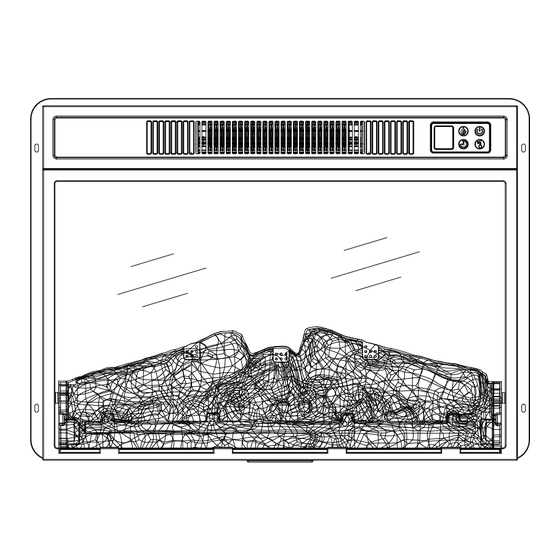
Page 9: User Instruction (Control Panel)
USER INSTRUCTION (CONTROL PANEL) Control Panel The control panel is located on the top right corner of the unit. Power ON / OFF Press the power button to turn on the unit. Press again to turn off the unit. NOTE: There is a thermostat limiter inside the unit. When the inner temperature is too hot, the unit will automatically turn off to avoid damage to the product or risk of fire. -
Page 10: Heater Control
Heater Control Press the heater control to turn on and off the heater. When the heater is turned on, press and hold the heater control button for 5 seconds to enter temperature adjustment mode. The LED indicator is red. In adjustment mode, the display will flashes. There are 22 levels to change Fahrenheit temperature (ON, 62°F - 82°F). -
Page 11: User Instruction (Remote Control)
USER INSTRUCTION (REMOTE CONTROL) USER INSTRUCTION (REMOTE CONTROL) Remote Control The operation of the remote control buttons work the same as the button on the control panel. NOTE: The remote control cannot be used to switch between degree Fahrenheit and degree Celsius. Install / Replace Battery The remote control is provided with 2 AAA batteries. -
Page 12: Care And Maintenance
MAINTENANCE INSTRUCTIONS Always disconnect from the power supply before cleaning the heater. WARNING First turn off the main power. Then remove the electrical plug from the wall outlet. Do not use this fireplace insert if any part of it has been under water. WARNING Immediately call a qualified service technician to inspect the firebox and replace any part of the electrical system which has been under water. -
Page 13: Troubleshooting
TROUBLESHOOTING Problem Solution Make sure the unit is plugged into a standard 120V grounded power source. The unit does not turn on. Press the power button on the control panel. Open the top and back panel to check if the flame Flame effect is on, but there is no flame effect spindle has fallen off from the spindle motor.
Need help?
Do you have a question about the SF105-18G and is the answer not in the manual?
Questions and answers