
Related Manuals for Calimar CaliNav360

Summary of Contents for Calimar CaliNav360
- Page 1 CaliMar® CaliNav360 Robotic Pool Cleaner (CMARNAV360-5Y) OPERATION MANUAL READ AND FOLLOW ALL INSTRUCTIONS SAVE THESE INSTRUCTIONS...
-
Page 2: Important Safety Instructions
Important Safety Instructions Warnings • Use the original charging adaptor only. Do not use an extension cable in any case. Keep a safe distance from combustibles when charging. Do not charge or use the cleaner when any anomaly is noticed. Please contact customer support. •... -
Page 3: Product Overview
Product Overview Packing List • CaliNav® robotic pool cleaner • Charging adaptor • Hook • User manual Specifications Motor IP rating: IP 68 Minimum depth: 0.5m/1.64ft Maximum depth: 3m/9.84ft Charging Adopter: Input: 100-240VAC 50/60Hz 2.0A MAX Output: 25.2V = 3.0A 75.6W... -
Page 4: Operation
Operation Charging your cleaner Turning on your cleaner 1. Keep it still on level ground. 2. Select cleaning mode. Standard Cleaning Mode: If you haven’t cleaned your pool in a long time, or your pool is very dirty and you want to clean all pool surfaces, use Standard Cleaning Mode. - Page 5 3. Don’t move the cleaner before the indicator flashes yellow. Putting your cleaner into the pool 1. Submerge the cleaner in the pool as soon as the indicator starts flashing yellow.
- Page 6 2. Hold the cleaner in water for a few seconds as it releases air trapped in it. Keep the cleaner steady and do not tilt. 3. Release the cleaner. It takes about 1-2 minutes to complete the self-test and start the cycle.
- Page 7 Taking your cleaner out of the pool 1. Cleaner will automatically stop at the pool edge. 2. Pick up the cleaner with the hook.
-
Page 8: Maintenance
3. Turn the cleaner off. Maintenance Care Instructions For the best product performance, please clean and maintain your cleaner according to the following instructions. After daily use: Clean the robotic cleaner and the filter basket after each cleaning cycle. • Keep the cleaner away from strong and direct sunlight. - Page 9 1. Take off the side panel: Remove the two screw covers. Using a Phillips-head screwdriver, remove the two screws that hold the side panel and track tread in place. Take off the side panel and the track tread and place them to the side. 2.
-
Page 10: Filter Cleaning
Filter Cleaning It is highly recommended to clean the filter basket after each cleaning cycle. -
Page 11: Off-Season Storage
Note: Do not let the filter basket dry out before cleaning. Clogged tilters will affect the overall cleaning performance of your cleaner by making it difficult to create suction or keep dirt and debris in the tilter basket. Replace the tilter basket when the cleaning results are not satisfying and cleaning the tilter does not make a difference. -
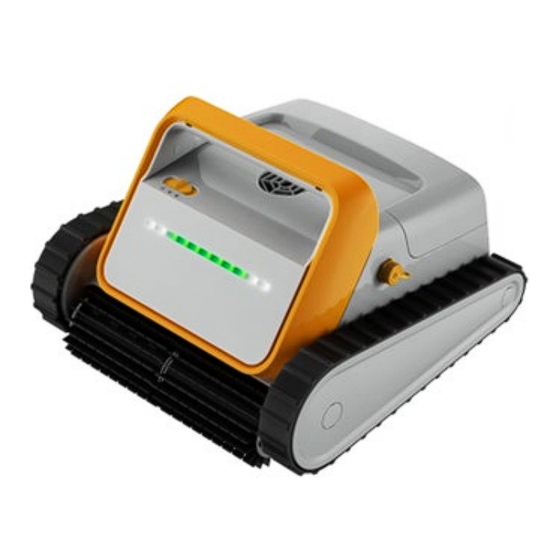
Page 12: Indicator Lights
Indicator Lights Schematic diagram of the indicator lights. Battery indicator lights in a cleaning cycle. During the working process, the number of green lights gradually decreases. When there is only one red light left, it is in low power mode. The cleaner needs charging. White function indicator lights in a cleaning cycle. - Page 13 Stop: Four lights off. Battery indicator lights when charging. When charging, the number of green lights will increase from one to 11, and the outermost two lights will flash until fully charged. When all 11 lights turn green, charging is complete. All lights will turn off after 10 mins. When should the cleaner be submerged in the pool? When the two outer function indicator lights are blue, and the two inner ones are flashing yellow, the cleaner must be submerged in the pool as soon as possible.
-
Page 14: Troubleshooting
Pump motor is stuck: Cleaner stops and function lights flash red in turn. Note: It is normal to have water condensation behind the LED cover. Troubleshooting If the suggested solutions do not solve the problem, please contact CaliMar® customer service. ISSUE POSSIBLE CAUSE SUGGESTED SOLUTION ... -
Page 15: Limited Warranty
The CaliMar® limited warranty is restricted to the United States. The warranty is void on items taken outside the United States. This cleaner is designed for residential pool use, and any commercial application voids all warranties. - Page 16 • Expenses related to removal, reinstallation, or any such costs incurred in obtaining warranty service. If a defect in any covered item or part becomes apparent during the warranty period, CaliMar® will, at its sole discretion, either repair or replace such item or part. CaliMar® reserves the right to substitute defective parts with new or refurbished ones.
- Page 17 CaliMar® Pool Products USA, Inc. Manufacturers of Innovative & Quality Pool & Spa Products sales@calimarpool.com www.calimarpool.com...
Need help?
Do you have a question about the CaliNav360 and is the answer not in the manual?
Questions and answers