Table of Contents
Advertisement
Quick Links
Advertisement
Table of Contents

Summary of Contents for FARMSCAN AG jackal v3
-
Page 2: Table Of Contents
TABLE OF CONTENTS GENERAL DESCRIPTION .................... 1 INSTALLATION ......................2 CONNECTIONS ......................3 OVERVIEW ........................ 6 AREA & SPEED METER SETUP (WIZARD) ..............9 AREA & SPEED METER USING GPS SETUP (WIZARD) ..........12 TACHOMETER - RPM METER SETUP (WIZARD) ............13 TRIPS ........................ -
Page 3: General Description
Output DISCLAIMER The warranty offered on this Farmscan Ag product is limited to the repair or replacement of the faulty goods. No liability will be accepted for loss of profit or productivity. WARRANTY IS VOID if power and or sensors are not connected as described in this guide. -
Page 4: Installation
INSTALLATION PARTS LIST PART NUMBER DESCRIPTION A-Jackal Jackal Monitor AH-407 Mounting Bracket P-321 x1 11 Way Input Plug 1 each colour P-322 x1 Green & Grey AC-105 5m Power Cable HM-506 Screw Driver Not Pictured AM-200 Warranty Card Not Pictured AM-Jackal Manual PARTS PICTORIAL... -
Page 5: Connections
CONNECTIONS The connector on the rear of the Jackal Basic has the following connection points available for use POWER CONNECTION Power connection must come direct from the battery terminals. WARRANTY IS VOID if power is not connected as described in this section. 1. - Page 6 INSTALLING SENSORS The following examples will help to determine appropriate sensor input connections into the Jackal. TWO WIRE “COIL” – YELLOW END SENSOR KIT # 2034, 2077 These kits will all include a “coil” type sensor. The coil type sensor is a 2 wire sensor (normally yellow end) and only uses a ground/earth wire and a signal wire.
- Page 7 KIT #T-135 GPS units supplied from Farmscan Ag are pre-programmed and ready to use with the Jackal Basic. The diagram to the right shows which terminals to connect your GPS to. Insert the black wire to (B1) and the white or yellow wire into...
-
Page 8: Overview
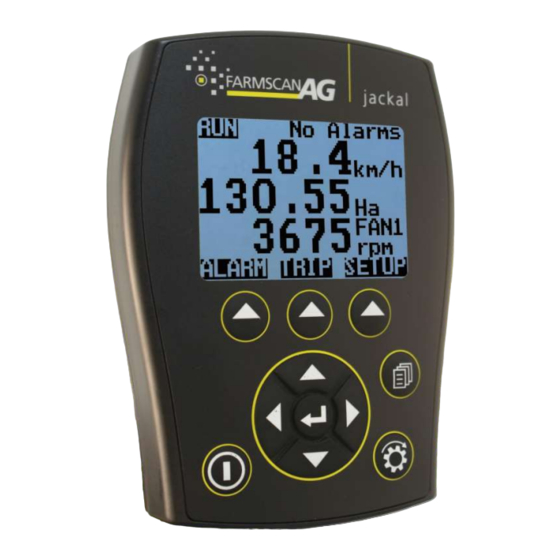
OVERVIEW BUTTON FUNCTIONS 1. Power On/Off button a. Power is turned on by pressing the ON/OFF button for 1 second. b. Power is turned off by holding the ON/OFF button for 2 seconds. 2. Run/Hold button a. The RUN/HOLD button has a dual function. a. - Page 9 SCREEN LAYOUT The Jackal can display up to two or three lines of live information at any one time. Using the middle NAV/Enter button allows you to toggle between the different display modes when multiple inputs are being used. Example : 2 Lines Example : 3 Lines AM-JACKAL-B / MAY 2017 WWW.FARMSCANAG.COM...
- Page 10 MAIN MENU The level of Jackal unlock will determine what options are viewable and available to be edited. Use the NAV button down to reveal further menu information Wizard Run a predefined wizard for setting up the Jackal Basic as an Area Meter or Tachometer. Inputs View what the inputs are setup as.
-
Page 11: Area & Speed Meter Setup (Wizard)
AREA & SPEED METER SETUP (WIZARD) The Jackal can display Speed & Area in any combination of km/Ha or mph/acre. A pickup can be mounted either on a wheel hub or shaft. (Example image right) NB: THERE SHOULD BE A 5-10MM CLEARANCE BETWEEN SENSOR AND MAGNET Sensors Required Wheel sensor pickup 2 (Reed) or 3 wire... - Page 12 CALIBRATION (AUTO SET) 1. Ensure that the sensor and pickup are end-end before continuing 2. Mark bottom centre of tyre on which the sensor is fitted and peg ground in corresponding position 3. Measure out a known distance to calibrate i.e. 20m 4.
- Page 13 CALIBRATION (MANUAL RATIO) 1. Ensure that the sensor and pickup are end-end before continuing 2. Mark bottom centre of tyre on which the sensor is fitted and mark ground in corresponding position 3. Drive ONE full rotation of the wheel, returning the mark point on tyre to bottom centre 4.
-
Page 14: Area & Speed Meter Using Gps Setup (Wizard)
AREA & SPEED METER USING GPS SETUP (WIZARD) The Jackal can display Speed & Area in any combination of km/Ha or mph/acre. A wheel sensor is not required when using a GPS. GPS purchased from Farmscan Ag are pre-programmed. If you BYO please ensure the following: GPS programmed with RMC –... -
Page 15: Tachometer - Rpm Meter Setup (Wizard)
TACHOMETER - RPM METER SETUP (WIZARD) The Jackal can display an rpm (Revolutions per minute) which is useful for monitoring fans or shafts. NB: THERE SHOULD BE A 5-10MM CLEARANCE BETWEEN SENSOR AND MAGNET OR 2-5MM BETWEEN PROX AND PICKUP Sensors Required Shaft Sensor pickup 2 (Reed) or 3 wire (Proximity) Magnet (Used with 2 wire sensor) - Page 16 Leave the default value of You have the option to set Change the input name if you Press NEXT to finalise the RPM. Alarm Min/Max points if desire, Press EDIT Wizard required. Using the NAV Press NEXT Select NEXT buttons select and EDIT as required.
-
Page 17: Trips
TRIPS The Trips page allows accumulating values to be saved and recalled at a later time. From the front page press TRIP The screen above allows you to SAVE/RESET individual By pressing the SAVE/RESET you have the ability to trips or view SAVED TRIPS Reset Trip | Save Trip | Reset All By pressing 2. -
Page 18: Alarms
ALARMS Alarms are set on a per input basis. High/Low Alarm points can be set for speed, hectares and RPM. Alarms will be displayed visually and made audible. To EDIT your alarms re-run the wizard by pressing SETUP from the front screen. Your existing settings will not be lost during the wizard re-run. -
Page 19: Other Settings (Implement Width)
OTHER SETTINGS (IMPLEMENT WIDTH) The other settings allows you to edit the following options: Implement EDIT your implement width here to update your Width working hectares. AlarmBeep EDIT this value to change the number of seconds between each audible alarm. AlarmOnHold EDIT this value to change if the alarm is activate or not when the Jackal is on hold. -
Page 20: Gps/Serial
Displays the Firmware version that’s installed on the Jackal. This screen also allows you to UNLOCK your Jackal to further functionality. Please contact Farmscan Ag should you wish to purchase an unlock code. DIAGNOSTICS This screen provides the following information:... - Page 22 Farmscan Ag Pty Ltd ABN 92 143 803 070 11/493 South Street Toowoomba QLD 4350 AUSTRALIA Ph +61 (7) 4602 4150 Fax +61 (7) 4602 4151 sales@farmscanag.com ©2010-2017 Farmscan Ag Pty Ltd AM-JACKAL-B MAY 2017 220517...
Need help?
Do you have a question about the jackal v3 and is the answer not in the manual?
Questions and answers