Table of Contents
Advertisement
Quick Links
Advertisement
Table of Contents

Summary of Contents for Yanzeo AR980
- Page 1 Yanzeo AR980 User manual...
-
Page 2: Table Of Contents
content Overview ..........................3 Performance parameters ....................4 Function introduction and operation instructions ............5 Description of the boot display interface ............... 5 Basic operation ........................6 Power on ........................6 Scan the label ......................6 System settings ........................6 1: Return to the scanning interface ................. -
Page 3: Overview
A. Overview This handheld device adopts wireless reading mode, Support FDX-B, FDX-A, EMID, HDX(ISO11784/85) format of electronic tags The product uses a high-brightness LCD (480x320) display, which can be clearly displayed in indoor or outdoor strong light conditions. The built-in storage function of the product can store up to 20,000 pieces of label information, and the user can read the stored information to a computer or mobile phone through a USB data cable or wireless connection for data management. -
Page 4: Performance Parameters
B. Performance parameters Working 134.2KHz frequency Label format FDX-B、FDX-A 、HDX、EMID (ISO11784/85) FDX-B: 30mmAnimal ear tag>20cm FDX-A: 2.12*12Glass tube chip >5cm Induction HDX: distance 15mmAnimal ear tag >15cm EMID: ID card>10cm standard ISO11784/85 Induction time less than 100ms Signal indication 480*320 high-brightness LCD, buzzer Power supply 3.7V lithium battery Power... -
Page 5: Function Introduction And Operation Instructions
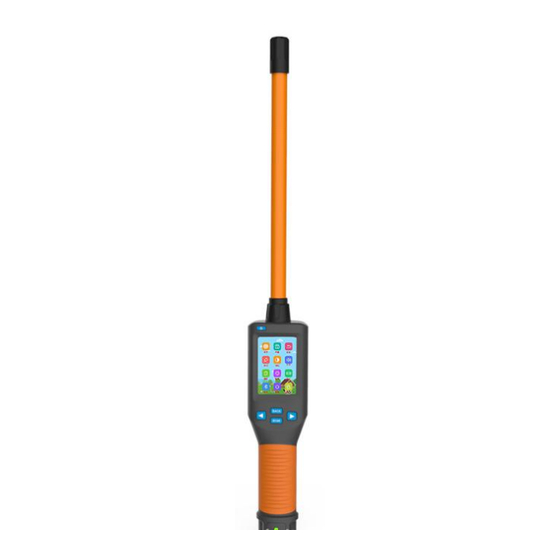
C. Function introduction and operation instructions Figure 1 Appearance interface 1. Description of the boot display interface The device comes with a 480*320 highlighted LCD screen in the upper left corner of the LCD, it can display the reread mode, storage mode, Bluetooth mode, and mark mode at the same time. -
Page 6: Basic Operation
Boot interface 2. Basic operation Power on In the shutdown state, long press the key, the system starts up and enters the scan label display interface. Scan the label In the scan label display interface, press the "Scan" button to start scanning the label. -
Page 7: 1: Return To The Scanning Interface
When powering on, press the left and right keys, the device enters the setting mode, and press the left and right keys ‘<’ or ’>’to move the "arrow" cursor to select different functions for setting. 1: Return to the scanning interface In the icon interface, press the key "BACK"... -
Page 8: 3: Storage Settings
Danish, Traditional Chinese, Spanish, Portuguese, and Kazakh to choose from) 3: storage settings Move the cursor to the "storage" icon and press the "SCAN" key to enter the storage setting. At the storage setting menu, press the "SCAN" key to switch between "Y" and "N". (Y means yes, N means no). -
Page 9: 6: Data Comparison
Move the cursor to the "mark" icon, click the "SCAN" button to enter the data mark setting, and press "<" ">" "SCAN" in the menu to select the mark number. (Note: This function is a data marking function, you can set 9 groups of different marks, and mark 1-9 kinds of marks for the next stored labels) 6: Data comparison... -
Page 10: 9: Version Number
(Note: After deleting the data, the data cannot be recovered, please operate with caution.) 9: version number Move the "arrow" cursor to the "version number" menu and press the "SCAN" key to query the current version information of the device. 10: Card reading, delayed shutdown Move the "arrow"... -
Page 11: 11: Bluetooth Switch Settings
11: Bluetooth switch settings Move the "arrow" cursor to the "Bluetooth" menu, press the "SCAN" key to switch between "Y" and "N", set it to "Y" mode, turn on the Bluetooth function of the handheld, and set it to "N" mode , The Bluetooth function of the handheld is turned off. -
Page 12: 12: Shut Down
be sent through Bluetooth each time. The tag ID number is given to the relevant Bluetooth device.) 12: Shut down Move the "arrow" cursor to the "Shutdown" menu and press "SCAN" to turn off the handheld. 13: Restore factory settings Move the "arrow"... - Page 13 Database management software as shown Figure 1 Database management software interface Connect the reader to the computer with a USB cable, then open the database management software, click "Connect Device" and hear a beep and pop up a successful connection prompt, you can proceed to the next step (the driver needs to be installed for the first use).
-
Page 14: Wireless Data Transmission Function
"Read range": Set the start position and end position. After clicking the read range, only the data whose serial number is the corresponding start bit and receive bit will be displayed. "Delete data": Clear all tag information stored in the handheld (note: the information cannot be restored after clearing). -
Page 15: Matters Needing Attention
When using the Bluetooth function, turn on the wireless transmission function in the setting mode of the handheld, and use the upper computer to search for and add Bluetooth devices. In the HID simulation keyboard mode, the Bluetooth device name of the handheld is "HID-A02";... -
Page 16: Packing List
F. Packing list Serial number Name Stick Bluetooth handheld device USB data cable Certificate of approval 《Instruction for Bluetooth Stick Handheld Device》...
Need help?
Do you have a question about the AR980 and is the answer not in the manual?
Questions and answers