Table of Contents
Advertisement
Quick Links
Advertisement
Table of Contents

Related Manuals for QODOSEN DX-286

Summary of Contents for QODOSEN DX-286
- Page 1 QODOSEN DX-286 FM STEREO / LW / MW / SW High-Performance Digital Receiver...
-
Page 2: Table Of Contents
TABLE OF CONTENTS INTRODUCTION UNPACKING CAUTION EXTERIOR CONDITION DISPLAY INDICATION FUNCTIONALITY PREVIEW POWER ON/OFF/SLEEP TIMER 1. Quickly power on/off the Radio 2. Setting the Sleep Timer VIEW SLEEP TIME BAND SWITCHING FREQUENCY CHANGE MODE"FREQ"/MEMORY- PRESELECTED STATION MODES"MEMO" TUNING/SEARCHING FOR RADIO STATIONS 1. - Page 3 AUTOMATIC BROWSING OF SAVED STATIONS DELETING STORED RADIO STATIONS 1.Delete The Specified Page (PAGE0~99) 2.Delete The Specified Address Radio Station (P000~P999) 3.Browse and Delete Radio Stations 4.Delete All Pages Of Stored Radio EDIT PAGE NAME MUTE FUNCTION BACKLIGHT FUNCTION LCD SHOWS OFF/ON TONE SWITCHING FM BAND STEREO/MONO BANDWIDTH SWITCHING...
-
Page 4: Introduction
INTRODUCTION Welcome to the world of the QODOSEN DX-286 radio receiver. With its superior performance and rich features, this radio offers enthusiasts an exceptional long- distance reception experience. The DX-286 adopts the high-performance automotive chip TEF6686 from NXP, ensuring excellent selectivity and sensitivity. It supports FM, LW, MW, and SW bands, allowing you to thoroughly enjoy broadcasts from every band. -
Page 5: Exterior Condition
EXTERIOR CONDITION... -
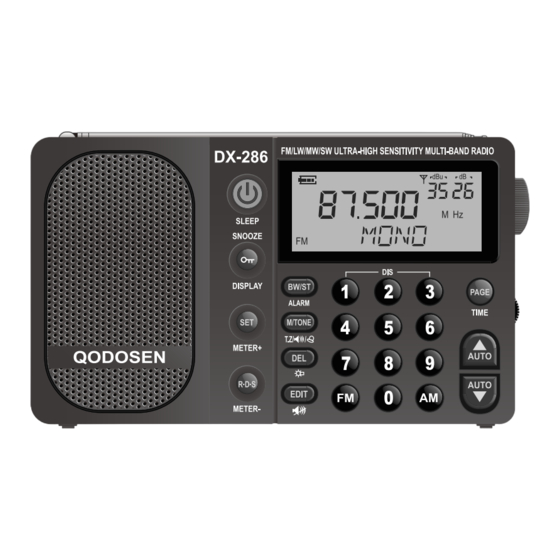
Page 6: Display Indication
DISPLAY INDICATION ALARM SQUELCH World Time dBµ:Signal Strength Measuring Unit dB:Signal-to-noise Ratio Measuring Unit Sleep Timer Display Clock Time/Alarm Battery Power WORLD Time/Signal Stength/ S/N Ratio/World Time/Memory Frequency Band Location FM:Frequency Modulation Display Time/Frequency etc. SW:Short Wave MHz:Unit Display for FM MW:Medium Wave KHz:Unit Display for LW:Long Wave... -
Page 7: Power On/Off/Sleep Timer
Retractable Antenna Foldable kickstand Battery compartment • Button Conbinations: [< >+< >]:LCD Auto OFF after power on/temporary LCD OFF after power on. [< >+< >]:Antenna attenuation PAGE TIME setting. LISTENING TO RADIO POWER ON/OFF/SLEEP TIMER 1. Quickly Power On/Off The Radio Quick Press the <... -
Page 8: View Sleep Time
Method 2:Use < > To Select Sleep Time. SLEEP Power off the radio, Press and Hold the < > button for 2 seconds until SLEEP "SLEEP-XX" appears on the LCD and the sleep symbol " " flashes, rotate the < >... -
Page 9: Automatic Radio Station Search
Power on the radio and switch to "FREQ" mode, Quick Press the < > or AUTO < > button, or rotate the < > knob to change the tuning frequency and AUTO search for a satisfactory station. 2. Automatic Radio Station Search (1). -
Page 10: Ats Function Operation
ATS COVER means that during ATS, it will store the stations according to the address from smallest to largest. (P00.P01...Pnn...Pnn+1, see the Tip for the starting address of each band); the new station's frequency will overwrite the station stored at the current address. 2). -
Page 11: Direct Input Of Radio Frequency (Only In "Freq" Mode)
Table 1:Knob Tuning Frequency Step Description MODE FAST SLOW SPEED ON SPEED ON FAST SLOW AUTO STOP (fast (fast STEP spinning) spinning) BAND 30KHz 30KHz 30KHz 50KHz 50KHz 50KHz (FM Step setting STOP 100KHz 10KHz 100KHz 1000KHz 100KHz 100KHz sections, 200KHz 200KHz 200KHz... -
Page 12: Sw Meter Band/Fast Tuning Frequency
Example 1: Listen to FM: 107.500MHz, Quick Press the < >< >< >< > < > buttons in any band. Example 2: Listen to MW: 1287KHz, Quick Press the < >< >< >< > < > buttons in any band. Example 3: In the FM band, Quick Press the <... -
Page 13: Ats/Seek Search Threshold Setting
Tip: When turn on RDS function in FM band, < > button is R(B)DS message R D S METER- switching, the Fast Tuning Frequency button is invalid. 2. Power on the radio and switch to the LW/MW band; Quick Press the < >... -
Page 14: Fm Signal Processing
DATA — Provides current time information, including day/month/day/year/hour/ minute; "NO DATA" is displayed when DATA is not received. PI (program identification) — Provide station identification code; "NO PI" is displayed when PI is not received. The display format when a DATA message is received is: "Day of the week Month-Day-Year Hour: Minute"... -
Page 15: Page Selection
Page Selection: There are 2 ways to select a page . Power on the radio: 1. Use the numeric keys to enter a page:Power on the radio and switch to "FREQ" mode, Quick Press the numeric button to input page directly and then Quick Press the <... - Page 16 Methods Of Operation: 1). Power on the radio, and Quick Press the < > button, "PAGE-XX" will be M/TONE T.Z/ displayed at the bottom of LCD, and "PXXX" will be displayed at the top right corner. > knob LCD upper proper corner display "PXXX" to select 2).
-
Page 17: Use Delay Mode Auto Search To Store Stations
4. Use DELAY Mode Auto Search To Store Stations Tip: This function is effective only in "DELAY" mode (See page 8 for STOP/DELAY Mode Setting Method for details). Power on the radio and switch to "FREQ" mode; Press and Hold the < >... -
Page 18: Delete The Specified Address Radio Station (P000~P999)
3). Quick Press the < > button to exit the delete operation. PAGE TIME 2. Delete The Specified Address Radio Station (P000~P999) 1). Power on the radio, Press and Hold the < > button for 2 seconds, LCD will show "DEL" and "PAGE-XX" alternately to enter the delete mode. 2). -
Page 19: Mute Function
Tips: (1). To display a blank at the cursor position, while the cursor is flashing " _ ", refrain from rotating the < > knob; simply Quick Press the < > PAGE TIME button to skip the current cursor position. For instance, after selecting "ABC", if the following five positions are blank, you can consecutively Quick Press the <... -
Page 20: Tone Switching
Temporary LCD OFF: Power on the radio, Quick Press the < > and < > buttons at the same time while powering on the radio can temporarily turn off the LCD display. Pressing any button will turn the LCD back on. TONE SWITCHING Power on the radio, Press and Hold the <... -
Page 21: Squelch Setting
SQUELCH SETTING Power on the radio, Press and Hold the button on the right knob < > for 2 seconds, and the display will show "SQUELCH-XX" (XX=1~9); rotate the < > knob, select 1~9 means the squelch is on, 1~9 represents different squelch level, select "OFF"... -
Page 22: Antenna Attenuator
LCD shows "AMP ON" means the AMP line is turned on (default). LCD shows "AMP OFF" means the AMP line is turned off. Note: LW/MW is only effective when "ANT-EXT" is connected to an external mast antenna or external antenna status.(see "LW/MW ANTENNA SWITH- ING"... -
Page 23: Setting World Time
2). After selecting the option you want to set, Quick Press the < > button METER+ briefly and cyclically to adjust the setting options. 3). To continue setting other options, continue to rotate the < > knob, and then Quick Press the < >... -
Page 24: Setting The Clock
Table 2:UTC time difference Time Zone World City and Code ANC -- Anchorage BEG -- Beijing BKK -- Bangkok CAI -- Cairo CCS -- Caracas CHI -- Chicago DAC -- Dhaka DEL -- Delhi DEN -- Denver DXB -- Dubai GMT -- GMT HKG -- Hong Kong HNL -- Honolulu... -
Page 25: Alarm Clock Working Mode Selection
3.Therefore, to obtain accurate world time, the first time you set the local clock, you need to follow the steps: Select the local time zone > Set the clock > Select world time 1). Ensure that you have set the time zone for your current region (see "Setting World Time"... -
Page 26: Alarm Working Mode Setting: "Speak"/"Buzzer"/"Alarmoff
3). Quick Press the < > button LCD shows "DELAY-XX", rotate the < > PAGE TIME knob to set the alarms duration of the desired alarm (1~99 minutes), Quick Press the < > button to complete the alarm clock timing setting. PAGE TIME Alarm Working Mode Setting: "SPEAK"/"BUZZER"/"ALARMOFF"... -
Page 27: Reset Radio
SNOOZE 2). Press and Hold the < > button for 2 seconds, LCD " " symbol DISPLAY disappears, enter unlock state, all buttons, the < > knob, volume knob effective. RESET RADIO To resolve display errors, button malfunctions, or other abnormalities, use a sharp object like a toothpick to Quick Press the <... -
Page 28: Smart Charging
1." ": Battery fully charged 2." ": Slightly low battery 3." ": Battery power is low, please charge or change the battery. 4." ": flashing: the battery is dead, the radio will automatically power off, please charge it. SMART CHARGING This unit is charged by a Micro-USB port, and the charging voltage is 5V;... - Page 29 1.There are no pre-stored stations for reception 1.Re-select the radio frequency of the alarm clock. Radio alarm activated. after a radio alarm. (See page 24) Alarm clock is radio noise. 2.Stations pre-stored for 2.Change alarm mode to beep alarm. (see page 25) reception after a radio alarm are not broadcast.
-
Page 30: Precautions For Using Batteries
Can the reception of You can try the FM signal processing settings, normal listening FMDX signal or FM weak is recommended to be set in the "DEFAULT" state. (see page signal be improved? No LW band Input LW LW band closed Switching on the LW band "LW ON". -
Page 31: Routine Maintenance
ROUTINE MAINTENANCE 1. Avoid intense collision or dropping the unit. 2. Do not use corrosive liquid to clean the unit. 3. Do not use the unit in high temperature and moisture environments. 4. Strictly avoid charging non-rechargeable lithium batteries. Remove battery when radio is not in use for extended periods. - Page 32 If further service is required, the technical staff will instruct how to proceed based on whether the radio is still under warranty or needs non-warranty service. If your product is still in warranty and the QODOSEN service representative determines that warranty service is needed, a return authorization will be issued and instructions for shipment to an authorized warranty repair facility.
- Page 33 25). Confirmation of LW.MW.SW frequency input: After inputting the corresponding DX-286 Quick Start Guide LW.MW.SW frequency by numeric keys, quick press this button to confirm the Stored radio stations: (see page 14 for detailed operation).
Need help?
Do you have a question about the DX-286 and is the answer not in the manual?
Questions and answers