Table of Contents
Advertisement
Quick Links
Advertisement
Table of Contents

Summary of Contents for Faunamaster FM130
- Page 1 Flail Mower Engine-powered ATV Comp OPERATOR’S MANUAL FM13 Operator’s manual Engine-powered ATV Compatible · FM130 Please carefully read this manual and follow all the instructions. Failure to comply with the warnings and precautions may result in serious injury or death.
-
Page 2: Table Of Contents
Table of Content Table of Content SAFETY PRECAUTIONS Safety Always Comes First General Safety Motorized machine safety Operating Safety Maintenance Safety Storage & Transport Safety Environment Protection Safety Signs and Model Decals Safety signs Implement decals PRODUCT SPECIFICATION Implement Specification Implement Identification UNPACKING Product Overview... -
Page 3: Safety Precautions
Safety precautions SAFETY PRECAUTIONS Safety Always Comes First Please be fully aware that YOU are responsible for the SAFE operation and maintenance of your flail mower. YOU must ensure that you and anyone else who is going to operate, maintain or work around the flail mower is familiar with the operating and maintenance procedures and related SAFETY information contained in this manual. -
Page 4: Motorized Machine Safety
with the equipment. Long hair should be tied up when working with equipment that has moving parts. Use protective gloves to avoid the risk of burns if hot surfaces such as exhaust pipes are touched, and to avoid oil and petrol getting in contact with the skin. Ear defenders must be worn whilst the engine is running. -
Page 5: Storage & Transport Safety
Before working on this machine, shut off the engine, set the brakes, and remove the ignition key. Never work under the machine unless it is secured by a mechanical stand. Use personal protection devices such as safety goggles, hand gloves and hearing protectors, when performing any service or maintenance work. -
Page 6: Safety Signs And Model Decals
Safety Signs and Model Decals Safety signs... -
Page 7: Implement Decals
Implement decals Engine decals are not included here. Serious attentions should also be paid to those. 25 m STOP STOP... -
Page 8: Product Specification
Product specification PRODUCT SPECIFICATION Implement Specification Model FM 130 2300 (mm) (mm) -
Page 9: Implement Identification
(m/s) Implement Identification An Identification plate is affixed to the implement. contains “CE” Certification brand and information about: the Manufacturer, Type, Serial Number, Model Number, Weight and Year of Manufacture. Unpacking UNPACKING Upon receipt, check that the machine and its components are not damaged. In the case of damage or missing parts, call the manufacturer or your local dealer to agree upon the procedures to be adopted. -
Page 10: Product Overview
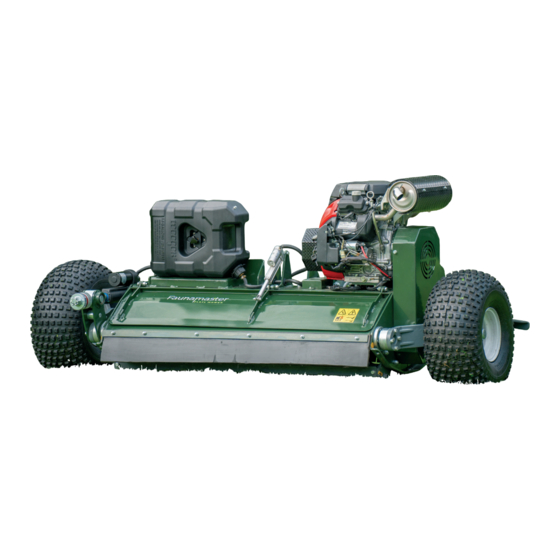
PRODUCT OVERVIEW See Figure 2 FM130 engine-powered ATV-compatible flail mower provides a compact and versatile solution for efficient land maintenance. This innovative attachment combines the agility of an ATV with the cutting power of a robust flail mower, making it ideal for homeowners, farmers, and land management professionals. -
Page 11: Assembly & Set-Up
Figure 2 Assembly & Set-up ASSEMBLY & SET-UP Install the Drawbar See Figure 3 1. Align drawbar mounting holes with the holes on the rotating plate bracket; 2. Secure the drawbar with bolts, washers and nuts; tighten to correct torque. Be aware of fasteners in different s izes used here... -
Page 12: Attaching The Implement
Before attachment, ALWAYS ensure the following: All safety guards & decals are in good working order and correctly fitted; All blades are correctly fitted, undamaged, and not worn to excess Lubrication points have been lubricated as per scheduled maintenance period The engine oil level is correct &... -
Page 13: Operation
Operation OPERATION Check-list Before Operation Hazard control and accident prevention are dependent upon the awareness, concern, prudence, and proper training involved in the operation, transport, storage, and maintenance of the mower. Therefore, it is absolutely essential that no one operates the machine without first having read, fully understood, and become totally familiar with the Operator’s Manual. -
Page 14: Drawbar Offsetting
Drawbar Offsetting Changing the drawbar angle must be undertaken with the engine switched off & the ignition keys removed. Failure to do so could result in injury or damage to the machine. The drawbar can be offset to the left or right horizontally as well as be tilted vertically as indicated. See Figure 3 Pull up and bend the handle quick... -
Page 15: Drive Belt Adjustment
See Figure 4 Note: The machine is equipped with electrical control of wheel height adjustment, tailgate open & close as well as engine shutdown. The electrical control is realized by 3 control knobs (A/B/C). Figure 4 Drive Belt Adjustment Excessive tension on the belt may lead to premature failure of belt and drive components. Excessive tension on the belt may also lead to a safety hazard to the operator or bystanders. -
Page 16: Starting
See Figure 5 Untighten the bolts and washers to remove the wheel arm together with the tire; Untighten the bolts, spacers and nuts to remove the belt guard; Check belt tension by applying approximately 22 pounds of pressure onto the belt, and the belt should deflect approximately 3/8". -
Page 17: Stopping
Figure 6 Stopping When stopping the mower after a period of heavy use, allow adequate time for the drive belts to cool down. Show caution to hot parts e.g. engine exhaust, belts etc. after engine is switched off. Ensure the mower drawbar has been adjusted to allow the mower to run directly behind the towing vehicle and is not in an offset position. -
Page 18: Tightening Torque
Tightening Torque Please follow the table below to identify the torque value as required. Flails Replacement To avoid serious injury or death, the engine must be turned off, and switch key removed before doing work underneath the machine. Wear heavy gloves and all necessary protections while replacing theflails. -
Page 19: Battery Voltage Measurement
Frequently check the flails to make sure they are in good working condition and properly secured to the rotor. Replace worn or damaged parts with new flails. Make sure that the replacement of blade with the same weight to achieve a balance of rotor spinning.The replaced blade must be the original factory accessories. -
Page 20: Battery Related Precautions
voltage of the battery. The no-load voltage is measured when there is no load, and the on-load voltage is measured when there is a load. Battery Related Precautions Battery storage If the idle time exceeds one week; the negative wire of the battery manufacturer should be ... -
Page 21: Transport
Transport The engine must be stopped and the blades at a standstill before adjusting to the transport position. Never move from one site to another with the engine running. Remove any grass debris from the deck before leaving the field. Please note the machine is not road legal, and should not be used on public roadways. -
Page 22: Exploded Views & Parts List
Exploded views & parts list EXPLODED VIEWS & PARTS LIST MACHINE BREAK-DOWN... - Page 23 POS. COD. Specification Description 2060107284 G11006C01000-000 Hood assembly 2060107122 G11006A14000-000 Engine mounting components 2060107285 G11006C07000-000 side drive assembly 2060107286 G11006C08000-000 Side protection cover assembly 2060107269 G11006B10000-000 protective components 2090005893 G11006A16000-000 Assembly 2060106705 G11003A03000-000 Roller assembly 2090006044 G11006A02000-000 knife shaft components 2060105468 G11001A04000-000 Cutter shaft bearing block assembly...
- Page 24 HOUSING ASSEMBLY...
- Page 25 Description Specification POS. COD. 2020007222 G11006C01100-000 Housing weldment 2020006955 G11006A01200-000 Swing plate weldment 3080100009 GB/T95-16-EP•Zn Plain washer 3050500009 GB/T889.1-M16-8-EP•Zn Locknut 3050500004 GB/T889.1-M10-8-EP•Zn Locknut 3080200009 GB/T96.2-10-EP•Zn Large plain washer 3040300641 GB/T5782-M10×120-8.8-EP•Zn Hexagon head bolts 3040300053 GB/T5782-M16×70-8.8-EP•Zn Hexagon head bolts 3040300105 GB/T5782-M16×130-8.8-EP•Zn Hexagon head bolts 3040100076 GB/T5783-M12×65-8.8-EP•Zn...
- Page 26 POS. COD. Specification Description 3050500003 GB/T889.1-M8-8-EP•Zn Locknut 3040300007 GB/T5782-M8×70-8.8-EP•Zn Hexagon head bolts 3970100694 M8X60 Quick fastener Bolt collar 2010005622 G11006A01000-002 2020006376 R02025A09200-000 Park stand 3120400008 Din11024-4-EP•Zn R Pin 2010005461 R02025A11000-010 Bent pin 3210200004 41×41 Square plug 3210500700 XY-1031-BLACK Rubber grommet 3210500699 XY-1025-BLACK Rubber grommet...
- Page 27 SIDE DRIVE ASSEMBLY POS. COD. Specification Description 3161000608 98-150-126-3B Clutch 2000005906 G11006A07000-002 Clutch washer 3160500001 Z3A-35×60 Expanding sleeve 3160400062 SPB110-3-1-60-HT200-O Pulley NAURENCE-SPB1106 3160300688 Belt 3170400005 DIN71412-A G1/8 304 Grease nipple 3080300005 GB_T5287-12-EP_Zn Extra Large plain washer 3080500009 GB/T93-12-EP•Zn Spring washer 7/16-20X30 HSCS-Cap 7/16-20X30 3041600013...
- Page 28 BELT GUARD ASSEMBLY POS. COD. Specification Description 2020007223 G11006C08300-000 Belt guard base plate weldment 2090006043 G11006A08100-000 Grease assembly 3080500008 GB/T93-10-EP•Zn Spring washer 3040100043 GB/T5783-M10×25-8.8-EP•Zn Full-thread hexagon bolts 3080100006 GB/T95-10-EP•Zn Plain washer 3080100004 GB/T95-8-EP•Zn Plain washer 3080500007 GB/T93-8-EP•Zn Spring washer 3040100022 GB/T5783-M8×20-8.8-EP•Zn Full-thread hexagon bolts Cover plate weldment...
- Page 29 AXLE ASSEMBLY BAFFLE ASSEMBLY POS. COD. Specification Description 2020007022 G11006A10100-000 axle welding 3080100008 GB/T95-14-EP•Zn Plain washer 3040100041 GB/T5783-M10×20-8.8-EP•Zn Full-thread hexagon bolts 3080100006 GB/T95-10-EP•Zn Plain washer 3080500008 GB/T93-10-EP•Zn Spring washer 2000006100 G11006B10000-001 Baffle Plate 2000006101 G11006B10000-002 Baffle Plate...
- Page 30 WHEEL ASSEMBLY WHEEL ASSEMBLY...
- Page 31 POS. COD. Specification Description 2090006048 G11001B13100-000 Tire components 3060200033 GB/T70.3-M10×25-8.8-EP•Zn HSCS-Countersunk 2020007023 G11006A13400-000 adjustment plate welding 2020007209 G11006B13500-000 plate welding 2010000726 G11001A13000-008 Adjustment plate 3080100006 GB/T95-10-EP•Zn Plain washer 3080500008 GB/T93-10-EP•Zn Spring washer 3040100051 GB/T5783-M10×60-8.8-EP•Zn Full-thread hexagon bolts 2010005641 G11006A13000-011 axis 3100100063 UBC-61906-2Z Deep groove ball bearing...
- Page 32 Hexagon slotted and castle 3050800012 GB/T9459-M24×2-05-EP•Zn•P nuts 2010005822 G11006B13000-005 ring 3040100055 GB/T5783-M10×80-8.8-EP•Zn Full-thread hexagon bolts 2010005889 G11006D13000-002 Tire adjustment sleeve 3190500606 Actuator LA36 Actuator LA36 Adhesive stainless steel 3250101198 G11006C13000-003 ruler stick 3080100002 Plain washer GB/T95-5-EP•Zn 3080500005 Spring washer GB/T93-5-EP•Zn Hexagon socket button head 3060300605 GB/T 70.2-2000...
- Page 33 REGULATOR PLATE COMPONENTS POS. COD. Specification Description 2020007604 G11006B13210-000 Adjusting plate welding 2010005722 G11006A13200-002 tire shaft 3060200613 GB/T70.3-M10×45-12.9-EP•Zn Bolt 3080100006 GB/T95-10-EP•Zn Plain washer 3051500600 GB/T6184-M10-8-EP•Zn Metal locknut...
- Page 34 TIRE ASSEMBLY POS. COD. Specification Description P323 TIRE 22×11- 3140200025 Tire components 8+ WHITE RIM 8×8 4-101.6 3140200625 HUB 4-101.6-1 The bearing shell...
- Page 35 ENGINE MOUNTING ASSEMBLY POS. COD. Specification Description 3200100614 HONDA GX690 Engine 2020006953 G11006A14100-000 Air inlet weldment 3040100050 GB/T5783-M10X55-8.8-EP·Zn Full-thread hexagon bolts GB/T95-10-EP·Zn 3080100006 Plain washer GB/T93-10-EP·Zn 3080500008 Spring washer 3090400603 6.3*6.3*70 Parallel key 2020002005 G11001A14100-000 Exhaust pipe weldment 3040100002 GB/T5783-M5X20-8.8-EP·Zn Full-thread hexagon bolts...
- Page 36 BLADE ASSEMBLY( ( OPTIONAL) ) BLADE ASSEMBLY BLADE ASSEMBLY ( ( OPTIONAL) ) POS. COD. Specification Description 2020007216 G11006C02100-000 welding 2060205384 G11006A02200-000 Blade components POS. COD. Specification Description 2020007220 G11006D02100-000 welding 2060205384 G11006A02200-000 Blade components...
- Page 37 BLADE ASSEMBLY( ( OPTIONAL) ) POS. COD. Specification Description 2020007216 G11006C02100-000 welding 2060205384 G11006A02200-000 Blade components POS. COD. Specification Description 2020007220 G11006D02100-000 welding 2060205384 G11006A02200-000 Blade components...
- Page 38 POS. COD. Specification Description 2020007216 G11006C02100-000 welding 2060204855 G01009B02200-000 Blade assembly POS. COD. Specification Description 2020007220 G11006D02100-000 welding 2060204855 G01009B02200-000 Blade assembly...
- Page 39 BATTERY ASSEMBLY POS. COD. Specification Description 3040300608 GB/T5782-M12×50-10.9-O Hexagon head bolts 3050500007 GB/T889.1-M12-8-EP•Zn Locknut 3220100027 MT02011 Blade 2000000001 G01009B02200-001 Blade spacer...
- Page 40 BATTERY ASSEMBLY POS. COD. Specification Description 3220100034 MT01020 Blade 3040300020 GB/T5782-M12×55-10.9-O Hexagon head bolts 3080500009 GB/T93-12-EP•Zn Spring washer 3050500007 GB/T889.1-M12-8-EP•Zn Locknut...
- Page 41 FUEL TANK ASSEMBLY...
- Page 42 POS. COD. Specification Description 3200200677 21L(BLACK) Accessories 2010000733 G11001A16000-001 Fuel tank connector 3200100627 Ф6×1000 Engine 3210100603 8J-S-12 Lock Hexagon socket head cap 3060100004 GB/T70.1-M5×16-8.8-EP•Zn screws 3080500005 GB/T93-5-EP•Zn Spring washer 3080100002 GB/T95-5-EP•Zn Plain washer 3200200679 G11006A16000-001 tank hanger 3200200692 M8X1.25-L10-304 Accessories 3140600004 QJ177.16A-16-6-ES Hose clamp...
- Page 43 ROLLER ASSEMBLY POS. COD. Specification Description 2020006177 G11003A03100-000 Roller weldment 2020007171 G11003A03200-000 Adjustment plate weldment 2020007172 G11003A03300-000 Adjustment plate weldment 2000005475 G11003A03000-001 Scraper 3240300005 G01009A03000-001 Bearing Block GB/T5783-M10×30- 3040100045 Full-thread hexagon bolts 8.8-EP•Zn GB/T889.1-M10-8- 3050500004 Locknut EP•Zn 3080100006 GB/T95-10-EP•Zn Plain washer GB/T70.3-M8×16-8.8- 3060200017 HSCS-Countersunk screw...
- Page 44 LONG SHAFT BEARING SEAT ASSEMBLY POS. COD. Specification Description 3150100061 G11001A04100-001 Long shaft head bearing seat GB/T95-10-EP•Zn 3080100006 Plain washer GB/T93-10-EP•Zn 3080500008 Spring washer GB/T5783-M10×25-8.8-EP•Zn 3040100043 Full-thread hexagon bolts 3100200008 GB/T281-1307 Self-aligning ball bearing 3080600046 GB/T893-80-A Retaining rings 3170100008 GB/T13871.1-FB-35×55×8-NBR Shaft seal 3170100046 GB/T13871.1-FB-55×80×8-NBR...
- Page 45 SHORT SHAFT BEARING SEAT ASSEMBLY POS. COD. Specification Description 3150100004 F01001A05000-001 Bearing seat 3080100006 GB/T95-10-EP•Zn Plain washer 3040100043 GB/T5783-M10×25-8.8-EP•Zn Full-thread hexagon bolts 3080500008 GB/T93-10-EP•Zn Spring washer 3080600046 GB/T893-80-A Retaining rings 3170100046 GB/T13871.1-FB-55×80×8-NBR Shaft seal 3100200008 GB/T281-1307 Self-aligning ball bearing 3170400005 DIN71412-A G1/8 304 Grease nipple...
- Page 46 REAR COVER ASSEMBLY POS. COD. Specification Description 2020007206 G11006B05100-000 Cover plate welded parts 2010005837 G11006C05000-002 Spacer 3080100004 Plain washer GB/T95-8-EP•Zn 3080100006 Plain washer GB/T95-10-EP•Zn 3050500004 Locknut GB/T889.1-M10-8-EP•Zn 3040100061 Full-thread hexagon bolts GB/T5783-M10×130-8.8-EP•Zn 3040100047 Full-thread hexagon bolts GB/T5783-M10×40-8.8-EP•Zn 3040100026 Full-thread hexagon bolts GB/T5783-M8×35-8.8-EP•Zn 3050500003 Locknut...
- Page 47 RUBBER BAFFLE ASSEMBLY POS. COD. Specification Description 3210500693 G11006A17000-001 Rubber curtain 2000005933 G11006A17000-002 Mounting bar 3040100025 GB/T5783-M8X30-8.8-EP·Zn Full-thread hexagon bolts 3050500003 GB/T889.1-M8-8-EP·Zn Locknut 3080100004 GB/T95-8-EP·Zn Plain washer...
- Page 48 BELT TENSIONING ASSEMBLY POS. COD. Specification Description Tension pulley 2010005720 G11006B20000-001 2020006368 F02022A10100-000 Tension pulley weldment GB/T5783-M12×25-8.8- 3040100065 Full-thread hexagon bolts EP•Zn 3080200010 GB/T96.2-12-EP•Zn Large plain washer 3080500009 GB/T93-12-EP•Zn Spring washer 3080600043 GB/T893-72-A Retaining ring 3080700020 GB/T894-30-A Retaining ring 3080700026 GB/T894-40-A Retaining ring 3100100631...
- Page 49 BATTERY ASSEMBLY...
- Page 50 POS. COD. Specification Description 2020007207 G11006B15100-000 Battery box welding fittings 3190400001 12V-20AH(180*75*168) Battery 2000006102 G11006B15000-001 battery cover 3060100006 GB/T70.1-M5×25-8.8-EP•Zn Hexagon socket head cap screws 3050500005 Locknut GB/T889.1-M3-8-EP•Zn 3080100621 GB/T95-4-EP•Zn Plain washer 3060100635 GB/T70.1-M3×12-8.8-EP•Zn bolt 3210500707 G11006B15000-003 rubber 3080100004 GB/T95-8-EP•Zn Plain washer 3050500003 GB/T889.1-M8-8-EP•Zn Locknut...
-
Page 51: Warranty
Warranty WARRANTY MANUFACTURER warrants to the original purchaser that this product will be free from defects in material and workmanship beginning on the date of purchase by the end user according to the following schedule when used as intended and under normal service and conditions for personal use. Overall Unit and Driveline: 2 years Parts and Labor Blades and Belts: Consumable part This Warranty is limited to the replacement of any defective part by MANUFACTURER and the... - Page 52 F L A I L M O W E R Faunamaster ApS · Tårnvej 32 · VAT No. DK42053767 Phone +45 61404080 · Web: www.faunamaster.com · Mail: sales@faunamaster.com...
Need help?
Do you have a question about the FM130 and is the answer not in the manual?
Questions and answers