
Related Manuals for Briggs & Stratton Bad Boy BBRR219BS


Summary of Contents for Briggs & Stratton Bad Boy BBRR219BS
- Page 1 Operator's Manual 21” VARIABLE SPEED REAR DISCHARGE WALK BEHIND MOWER Model No. Description 7800671 BBRR219BS Manual No. 7104047 (Rev. ‘-’, 12/8/2009)
- Page 2 Thank You for purchasing this quality-built Bad Boy mower. We’re pleased that you placed your confidence in the Bad Boy brand. When operated and maintained according to the instructions in this manual, your Bad Boy mower will provide many years of dependable service. This manual contains safety information to make you aware of the hazards and risks associated with the machine and how to avoid them.
-
Page 3: Table Of Contents
Table of Contents Operator Safety ............4 Important Operator Safety Instructions . -
Page 4: Operator Safety
IMPORTANT OPERATOR SAFETY INSTRUCTIONS WARNING: This powerful cutting machine is capable of amputating hands and feet and can throw objects that can cause injury and damage! Failure to comply with the following SAFETY instructions could result in serious injury or death to the operator or other persons. The owner of the machine must understand these instructions and must allow only persons who understand these instructions to operate machine. - Page 5 IMPORTANT OPERATOR SAFETY INSTRUCTIONS (Continued) SAFE HANDLING OF GASOLINE OPERATION (Continued From Previous Page) (Continued From Previous Column) 7. Remove gas-powered equipment from the vehicle or 14. DO NOT discharge material against a wall or trailer and refuel it on the ground. If this is not possible, obstruction.
-
Page 6: Features And Controls
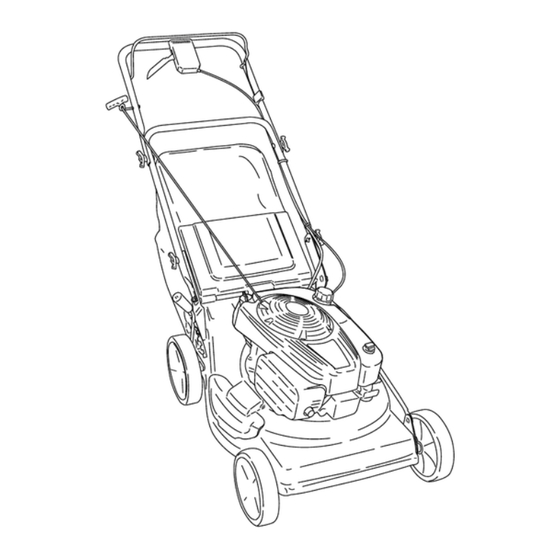
IMPORTANT The figures and illustrations in this manual are provided for reference only and may differ from your specific model. Contact your dealer if you have questions. Features and Controls Oil Fill Cap and Dipstick Rope Start Handle Fuel Filler Cap Drive Wheel Control Recycling Cover Rear Discharge Door... -
Page 7: Operation
Pre-Start Check List Starting and Operation Make the following checks and perform the service required Engine and Blade before each start-up. 1. Pull the blade control (A, Figure 3) against the handle. 1. Check the guards, deflectors, grass bag, and covers to 2. -
Page 8: Propelling Mower
Starting and Operation (Continued) Handle Height Adjustment Propelling the Mower The height of the mower handle can be adjusted as follows: 1. Remove the wingnuts (A, Figure 4), washers (not 1. Start the engine. Refer to the Section entitled “Starting shown), and bolts (B) from the right and left handle and Operation –... -
Page 9: Cutting Height Adjustment
WARNING DO NOT attempt any maintenance, adjustments or service with engine and blade running. STOP engine and blade. Disconnect spark plug wire and secure away from spark plug. Engine and components are HOT. Avoid serious burns, allow sufficient time for all components to cool. 1.50 in 4.00 in Cutting Height Adjustment... -
Page 10: Installing The Discharge Deflector
Installing the Grass Bag WARNING 1. Raise the rear discharge door (A, Figure 11). DO NOT attempt any maintenance, adjustments or service 2. Remove the recycling plug. Refer to the section entitled with engine and blade running. STOP engine and blade. “Removing the Recycling Plug”. -
Page 11: Maintenance
Maintenance - Introduction Check Mower Blade 1. Disconnect the spark plug wire and secure the end away To retain the quality of the mower, use genuine replacement from the plug. parts only. Contact a local dealer for parts and service 2. -
Page 12: Wheel Drive Components
WARNING DO NOT attempt any maintenance, adjustments or service with engine and blade running. STOP engine and blade. Disconnect spark plug wire and secure away from spark plug. Engine and components are HOT. Avoid serious burns, allow sufficient time for all components to cool. Wear heavy leather gloves when handling or working around cutting blades. -
Page 13: Mower Blade Replacement
3. Remove the blade (B, Figure 16). WARNING DO NOT attempt any maintenance, adjustments or service Make sure that with engine and blade running. STOP engine and blade. blade hub is seated Disconnect spark plug wire and secure away from spark between flanges plug. -
Page 14: Wheel Drive Control Adjustment
3. Fully engage the lever, and measure the length of the WARNING extended spring. The overall spring length should DO NOT attempt any maintenance, adjustments or service increase by 0.020 – 0.025”. with engine and blade running. STOP engine and blade. 4. -
Page 15: Belt Service
Engine Drive Belt Replacement WARNING 1. Empty the fuel tank. DO NOT attempt any maintenance, adjustments or service 2. Remove the blade (A, Figure 21). Refer to the Section with engine and blade running. STOP engine and blade. entitled “Blade Sharpening”. Disconnect spark plug wire and secure away from spark 3. -
Page 16: Rear Cover Removal & Installation
WARNING DO NOT attempt any maintenance, adjustments or service with engine and blade running. STOP engine and blade. Disconnect spark plug wire and secure away from spark plug. Engine and components are HOT. Avoid serious burns, allow sufficient time for all components to cool. Rear Cover Removal and Installation To Remove the Rear Cover 1. -
Page 17: Troubleshooting
Troubleshooting PROBLEM PROBABLE CAUSE CORRECTIVE ACTION Engine Will Not Start 1. Fuel tank empty. 1. Fill fuel tank with fresh fuel. Using Recoil Starter 2. Engine needs priming. 2. Prime. Check Engine Manual for Instructions. 3. Spark plug wire disconnected. 3. -
Page 18: Warranty
BRIGGS & STRATTON POWER PRODUCTS GROUP, L.L.C. OWNER WARRANTY POLICY LIMITED WARRANTY Briggs & Stratton Power Products Group, LLC will repair and/or replace, free of charge, any part(s) of the equipment that is defective in material or workmanship or both. Briggs & Stratton Corporation will repair and/or replace, free of charge, any part(s) of the Briggs and Stratton engine* (if equipped) that is defective in material or workmanship or both. - Page 20 21” VARIABLE SPEED REAR DISCHARGE WALK BEHIND MOWER Product Specifications (All) Common Service Parts Part Number Deck Size (in) Blade Control Cable 7101395YP Height of Cut (in) 1.25 - 4 Wheel Drive Control Cable 7101398YP Cutter Blade (Double Wave) 7100242AYP Transmission Type Variable Speed/Gear Drive Belt...
Need help?
Do you have a question about the Bad Boy BBRR219BS and is the answer not in the manual?
Questions and answers