
Subscribe to Our Youtube Channel
Summary of Contents for HEANTLE NTUS-ZNS-H004
- Page 1 Smart Lock Manual Fingerprint Door Lock Customer Support E-Mail: heantletech@gmail.com Toll Free: 1-888-988-7968(US) Version: HNTUS-ZNS-H004...
- Page 2 VIDEO INSTRUCTION & UPDATE 1.Installation Video (Scan below code and watch the video) https://youtu.be/ftR7mgF7JMA 2.For more video,please search “Heantle Tech” and subscribe us on Youtube,we will update all our videos there. Link: https://www.youtube.com/channel/UCPt61y4t_rHHwYTHo FYgOYg (Scan below code and subscribe us)
-
Page 3: Table Of Contents
Contents PRODUCT DETAILS PACKAGE LIST GETTING STARTED HOW TO RESET THE LOCK APP GUIDE GATEWAY CONNECTION ALEXA CONNECTION GOOGLE HOME CONNECTION... -
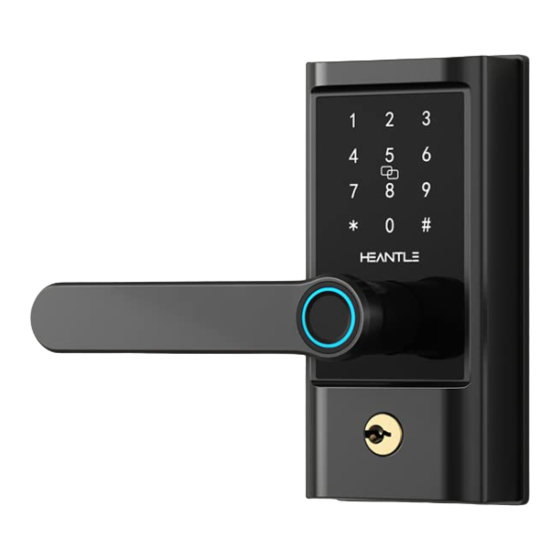
Page 4: Product Details
Product Details Front View Touch Screen IC Card Reader Fingerprint Reader IC Wire Handle Key Hole Type C USB port Rear View Screw Hole Battery Cover Handle Screw Hole Reset Button Material Alloy Weight 4.41lb Waterproof IP63 Operation Temp -13°F-149°F Power Supply AA Battery Backup Power... -
Page 5: Package List
Package List Battery Cover Front Panel Back Panel Latch Mechanical Keys*3 Strike Plate IC Card*2 Strike Pad Handle Direction Back Plate Latch/Strike Back Panel Screws*3 Adjustment Screws*2 Screws*4 Screws*4 Note: All kinds of screws have 1 more for backup, they are packed in 1 small bag. -
Page 6: Getting Started
GETTING STARTED Identify Left/Right Hand Door Stand by OUTSIDE facing the keypad. Hinge is on the LEFT: Hinge is on the RIGHT: LEFT hand door RIGHT hand door Hinge Hinge Check Door Measurements inside door 1-1/2~1-7/8" 2-1/8′′ 38 to 48 mm 54 mm (Door thickness) (The cross-bore diameter) - Page 7 INSTALL THE HANDLE LOCK Adjust the Latch × 2 3/8" (60mm) √ 2 3/4" (70mm) ①Please make sure the hole in the Measuring if the latch is long middle is a square instead of rhomb enough, pull it to adjust from like picture on the top shows 2 3/8"...
- Page 8 Adjust the Handle Direction A Loosen the screws on the front and back panel to adjust the handle direction Back Lock Front Lock Front Lock Back Lock Front Lock Back Lock C Right Hand Door: B Left Hand Door: Turn the front handle to Right Turn the front handle to Left Turn the back handle to Left Turn the back handle to Right...
- Page 9 Install the Touchscreen Keypad Front door Flat Ruler A Adjust the flat ruler direction and B Determine the Handle Direction Handle Direction Adjustment Screws Adjustment Screws installation to fix the handle direction position according to the door opening direction. C Tighten up 3pcs female screw bolt Route the IC Wire &...
- Page 10 Install the Back Panel back panel screws A Connect the IC wire B Install the 4 back panel screws Note: Make the ribbon won't be covered by the back panel C Install the batteries and cover. <07>...
- Page 11 That wasn't so bad, was it? Your lock is now installed! Let's do a final test! Note: Please keep your door open to run the test to avoid being locked out. 1.Extend and retract the bolt using the mechanical key and handle, make sure the latch retracts smoothly.
-
Page 12: How To Reset The Lock
How to Reset the Lock 1)Take out 1 battery, wait 5s, put the battery back. 2)Use the screwdriver or a stick to press and hold the reset button for 3s 3)Input 000# on the keypad after hear "Please input the initialization passcode”... - Page 13 Smart Lock Instructions <10>...
-
Page 14: App Guide
APP GUIDE ACCOUNT REGISTRATION Download the “Next lock” from Google Play or App Store. STEP 1 STEP 2 United States Click “Register” Choose your Email to continue or Phone number as your app account. LOCK PAIRNG STEP 1 Click the “3-bar” icon STEP2 Choose “Add lock”... - Page 15 STEP 4 STEP 3 Click “+” to Click “Next” add lock Note: Press any keys on the keypad STEP 5 Name your lock Tech Support E-Mail: heantletech@gmail.com Toll Free: 1-888-988-7968(US) <12>...
- Page 16 HOME PAGE OVERVIEW Unlock/Lock Remote Unlock Unlock/Lock the door G2 gateway via Bluetooth required eKeys Passcodes Manage and send Manage and create electronic keys keypad passcodes Cards Fingerprints Manage and add IC Manage and set up cards/fobs fingerprints Remote Authorized Admin Manage and add Create and edit remotes...
- Page 17 PASSCODES STEP 2 STEP 1 Generate Passcode Click“Passcodes” STEP 3 Decide which type of passcodes do you want and then enter a name for the passcode. Note:To generate custom passcode, your phone must be within 5 meters to the lock. Choose different types of passcodes according to your needs (all the 6 kinds of passcodes are randomly generated except the “Custom Passcode”)...
- Page 18 IC CARDS 1.Click “Cards” 2.Add card 3.Enter a name for the card 4.Place the card at the designated spot of the keypad when the lock says “Please swipe your card” 5.Input successful eKeys STEP 1 Click “eKeys” Note: 1.The recipients of eKeys must first register a app account.
- Page 19 FINGERPRINTS STEP 2 STEP 1 Add Fingerprint Click “Fingerprints” STEP 3 Name the fingerprint STEP 4 The lock will remind you to place your finger on the sensor 4 times STEP 5 Input successful To increase recognition rate: 1.Make sure the fingerprint reader is clean 2.Try to use different fingers 3.Place your finger the way you did when you were adding your fingerprints...
- Page 20 AUTHORIZED ADMIN STEP 1 STEP 2 Click “Authorized Create Admin Admin” STEP 3 Enter recipient’s account Note: 1.An authorized admin can program the lock nearly the way the admin does. But compared with the admin, an authorized admin has no access to “Admin Passcode”...
- Page 21 AUTO LOCK STEP 1 Click “Settings” STEP 2 When “Auto Lock” is on, the lock will automatically lock after 5s by default. Note:Please lock and unlock the door manually one time to activate this feature. <18>...
- Page 22 PASSAGE MODE STEP 2 STEP 1 Turn on ‘’Passage Mode” STEP 3 Choose the days and hours that you want this feature to function When this feature is on: ①The lock will remain unlocked ②The “Auto Lock” will be disabled <19>...
-
Page 23: Gateway Connection
GATEWAY CONNECTION The Gateway is only compatible with 2.4GHz Wi-Fi. Please check your router before you connect the Gateway. Please place the Gateway within 30 feet to the smart lock, ideally within 10 feet. In Step 6, please make sure the Gateway flashes blue&red, and then hit “+”. - Page 24 Note: To remotely unlock: Touch the small button To remotely lock Hold the big lock button <21>...
-
Page 25: Alexa Connection
ALEXA CONNECTION Before you connect your HEANTLE smart lock with Alexa,, please make sure you have connected Gateway and turned on Remote Unlock in Settings. Step 1: Click “Menu” icon in Alexa App; Step 2: Select”Skill&Games”; Step 3: Enter "nextlock" in search bar;... -
Page 26: Google Home Connection
Turn On “Unlock by app” and “Unlock by voice” in Alexa App Click “Locks”---Select your lock---Click”Settings” icon---Turn on “Unlock by App” and “Unlock by voice” GOOGLE HOME CONNECTION Step 1: Make sure you have installed Google Home APP, connected Gateway and Turned on Remote Unlock in NextLock Settings. Step 2: Click "+"... -
Page 27: Faq
fingerprints. Additionally, he/she is able to adjust settings like auto-lock, passage mode etc. Please feel free to contact us if you have any question or concern about the HEANTLE Smart Lock or G2 Gateway: Customer Support E-Mail: heantletech@gmail.com Toll Free: 1-888-988-7968(US) <24>...
Need help?
Do you have a question about the NTUS-ZNS-H004 and is the answer not in the manual?
Questions and answers