Table of Contents
Advertisement
Quick Links
Instruction Manual
-
S
SP 030 Mini
ewing Machine
Before using the machine for the first time, read through these operating instructions carefully and
follow the safety advice!
This product may only be used as directed in the operating instructions and for the intended purposes.
Please keep these instructions in a safe place for future reference.
Advertisement
Table of Contents

Summary of Contents for SEWPLUS SP-030
- Page 1 Instruction Manual SP 030 Mini ewing Machine Before using the machine for the first time, read through these operating instructions carefully and follow the safety advice! This product may only be used as directed in the operating instructions and for the intended purposes. Please keep these instructions in a safe place for future reference.
-
Page 2: Table Of Contents
Contents Contents ........................1 Device parts........................2 Package contents ......................3 Safety information......................4 About Instruction manual....................5 Proper use ........................6 Electrical connection.....................7 Selection of stitches pattern ..................8 Sewing function ......................9 Bobbing winding ......................10 Replacing the bobbin ....................11 Threading the sewing machine...................12 Bring up the lower thread ...................15 Adjusting the upper thread tension................16 Sewing........................17 Removing and fitting the presser foot.................18... -
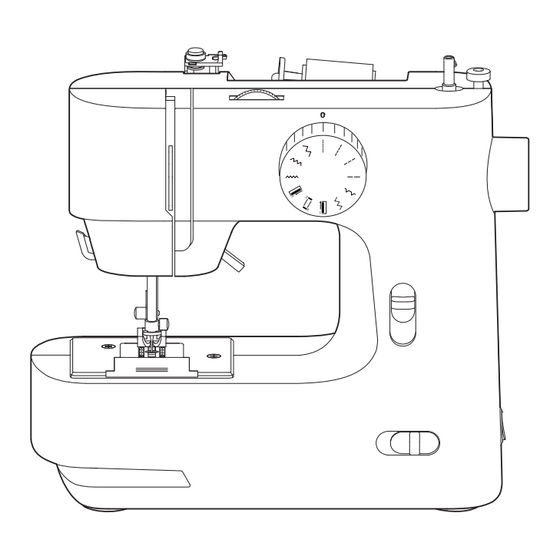
Page 3: Device Parts
Device parts Speed control switch Reverse lever Pattern selection dial Hand wheel Bobbin spindle Upper thread tension dial Reel cover Spool pin Thread guide Thread take up Thread cutter Presser foot holder Presser foot holder screw Presser foot Feeder teeth Bobbin cover Thread guide Needle holder screw... -
Page 4: Package Contents
Package contents Please check your purchase to ensure that all items are included. If anything is missing, please contact the distributor within 14 days of purchase. Mini sewing machine Instruction manual n u a l io n m a In st u ct SP 03 0 SP 03 0 ully and... -
Page 5: Safety Information
Safety information While sewing please follow the basic safety precausion as below Danger–in order to reduce the risk of electric shock 1. When you leave the sewing machine unattended, unplug it to prevent accidents. Unplug the sewing machine before any cleaning or finishing your work. 2. -
Page 6: About Instruction Manual
About instruction manual About Instruction manual Before using the machine for the fi rst time, read through these operating instructions carefully and follow the safety advice! This product may only be used as directed in the operating instructions and for the intended purposes. Please keep these instructions in a safe place for future reference. - Page 7 Electrical connection Risk of injury! There is a risk of injury from accidental operation of the foot control. Once you have finished working or before you start maintenance, always turn off and unplug the machine. Electrical connection 2. Use batteries 1.
-
Page 8: Proper Use
Proper use Proper use Your appliance offers a number of options for usage: The sewing machine can be used to join and finish seams on lightweight to heavy material. Maximum thickness of cloth sewed by this model is 5 layers of 12oz jean. Over this thickness may cause damage of the sewing machine. -
Page 9: Selection Of Stitches Pattern
Selection of stitch pattern 1. Stitch pattern selection function This machine has 12 kinds of stitch patterns, you can use the pattern selection dial to select the stitch you want. Rotating the dial, make sure the pattern you want it lined up with the mark. -
Page 10: Sewing Function
Reverse stitching/Cutting thread/Free arm 2. Reverse stitching Reverse stitching can be only used in straight stitch Sew forward as usual, and then press and hold down the reverse stitch lever to sew backward. The length of the reverse stitch depend on the pressure on the lever, when pressing to the bottom, the length of the stitch is maximum. -
Page 11: Bobbing Winding
Bobbin winding You can use the sewing machine to wind thread onto the bobbins easily 1. Raise the spool pin , place reel and the reel cover on it. The spool pin can be adjusted up and down to match the different thread reel in order to keep the sewing smoothly. -
Page 12: Replacing The Bobbin
Replacing the bobbin Remove the bobbin 1. Turn the hand wheel toward you 2.Take out the bobbin from the bobbin holder. until the needle is in its highest position. Raise the presser foot lever . Slide the bobbin cover forward. Insert the bobbin 1. -
Page 13: Threading The Sewing Machine
Threading the sewing machine Threading upper thread Please read the following instructions carefully as an incorrect sequence or thread guiding can lead to broken threads, missed stitches and gathered fabric. 1.Before threading the needle, raise the needle to its highest position by turning the hand wheel It’s better to develop a habit of turning the hand wheel toward you (as shown),... - Page 14 Threading the sewing machine 5. As shown, pull the thread down into the tension regulator. Unlike the tension discs on most sewing machines, the tension discs on the upper thread tension regulator are not visible, so checking very carefully that the thread is between the tension discs.
- Page 15 Diagram of the upper thread guide The diagram summarises the route of the upper thread. The numbers indicate the sequence of the steps in the threading process.
-
Page 16: Bring Up The Lower Thread
Bringing up the lower thread 1. As shown, turn the hand wheel towards you with your right hand until the needle is in the uppermost position. It’s better to develop a habit of turning the hand wheel toward you (as shown), especially when the upper thread is already threaded. Otherwise, the machine will be knotted by the thread in the hook. -
Page 17: Adjusting The Upper Thread Tension
Adjusting the upper thread tension The tension is created by the discs through which the thread is guided. The pressure on these discs is controlled by the upper thread tension regulator . The higher the number, the higher the tension. reduce tension increase tension thread tension discs... -
Page 18: Sewing
Sewing If you are not sure whether the thread tension or stitch type, for example, is correct, test the settings on a swatch. The fabric will run through automatically under the presser foot. It should not be held fast or pulled by hand, but should only be gently guided so that the stitches go in the desired direction. -
Page 19: Removing And Fitting The Presser Foot
Removing and fitting the presser foot Raising and lowering the presser foot Raise or lower the presser foot lever in order to move the presser foot up or down. Position 1: The presser foot presses the fabric onto the feeders and the thread tension is activated. You can start sewing. -
Page 20: Replacing Needle
Replacing the needle Replacing the needle Risk of injury! There is a risk of injury from accidental operation of the foot control or speed switch. - Once you have finished working or before you start maintenance, always turn off and unplug the machine. - Turn the hand wheel towards you until the needle has reached its highest position. -
Page 21: Buttonhole
Buttonholes Buttonholes To determine the correct stitch length, we recommend you sew a test buttonhole on a scrap of fabric. Presser foot:………………………………Buttonhole presser foot Program:…………………………………………Buttonhole programs - Set the foot and needle to their highest position. - Replace the foot with the buttonhole presser foot. Please read section “Removing and fitting the presser foot”. - Page 22 Faults and solutions Solution Cause Malfunction Connect to the power correctly Not connected correctly or there is no power (page 7) Machine does not Reinstall the batteries making Batteries are installed run or runs very sure they are correct way incorrectly slowly around (page 7)
-
Page 23: Faults And Solutions
Faults and solutions Solution Cause Malfunction Remove and re-insert a new Needle is bent needle (page 19) Needle is inserted Re-insert the needle (page 19) Needle breaks incorrectly Needle holding screw too Re-insert the needle (page 19) loose Turn off the power, pull out the Thread knotted under Machine stopped thread by turning hand wheel...
Need help?
Do you have a question about the SP-030 and is the answer not in the manual?
Questions and answers