Table of Contents
Advertisement
Available languages
Available languages
Raddy PT-3 Manual [EN]
Raddy PT-3 Manual
Table of contents
Technical Data and Features------------------------------------------------------2
Wireless Outdoor Sensor----------------------------------------------------------2
MAIN Appearance-------------------------------------------------------------------3
Initial operation----------------------------------------------------------------------5
Outdoor sensor transmission---------------------------------------------------10
Manual time setting---------------------------------------------------------------10
Setting the daily alarms----------------------------------------------------------11
Switching off the alarm signal--------------------------------------------------12
Snooze Function--------------------------------------------------------------------12
Maximum/Minimum Temperature/Humidity-----------------------------12
Battery charging and power-on and power-off ---------------------------12
Background lighting---------------------------------------------------------------13
APP interface description--------------------------------------------------------13
1
Advertisement
Table of Contents

Summary of Contents for Raddy PT-3
-
Page 1: Table Of Contents
Raddy PT-3 Manual [EN] Raddy PT-3 Manual Table of contents Technical Data and Features------------------------------------------------------2 Wireless Outdoor Sensor----------------------------------------------------------2 MAIN Appearance-------------------------------------------------------------------3 Initial operation----------------------------------------------------------------------5 Outdoor sensor transmission---------------------------------------------------10 Manual time setting---------------------------------------------------------------10 Setting the daily alarms----------------------------------------------------------11 Switching off the alarm signal--------------------------------------------------12 Snooze Function--------------------------------------------------------------------12 Maximum/Minimum Temperature/Humidity-----------------------------12... -
Page 2: Technical Data And Features
Raddy PT-3 Manual [EN] Technical Data and Features MAIN: Time in optional 12/24 hour format. Automatic calibration of network time service Daily Alarm with snooze function Indoor and outdoor humidity measurable range: 20%RH to 95%RH temperature measurement ranges:: —... -
Page 3: Main Appearance
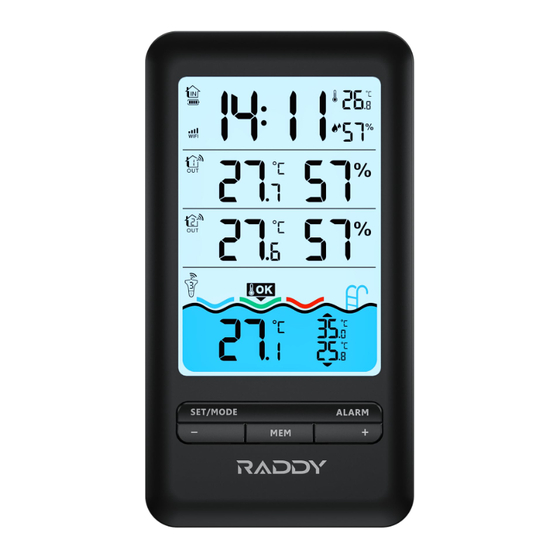
Raddy PT-3 Manual [EN] Feature Introduction: Part A - Positive LCD A1: Time A2: Indoor temperature A3: Indoor humidity A4:Channel 1 temperature A5:Channel 1 humidity A6: Channel 2 temperature A7:Channel 2 humidity A8: Comfort level display of pool temperature A9: Channel 3 Pool Thermometer... - Page 4 Raddy PT-3 Manual [EN] Part B - Back Button and Power B1: “SNOOZE/LIGHT” button B2: “SET/MODE” B3: “-” button B4: “MEM” button ALARM ” button B5: “ B6: “+” button B7: Power ON/OFF button B8: Reset button B9: Power supply socket –TYPE-C...
-
Page 5: Initial Operation
Raddy PT-3 Manual [EN] C6: Battery compartment Part D –Wireless Water Temperature Sensor: B: Low battery indicator A: Channel switch C: Temperature signal emission indicator D: Temperature value E: LED indicator for signal transmitting F: Transmitting antenna H: Channel selection switch G: Unlocking key I: °C/°F selection switch... - Page 6 Raddy PT-3 Manual [EN] Before closing battery door, make sure both gaskets are properly seated in their traces as shown in below image. Failure to properly seal the floating thermometer will result in water leakage and damage. To close the lid, twist the upper lid and lower lid with wrench until it is firmly locked and the key hole is...
- Page 7 Raddy PT-3 Manual [EN] After close the lid, a tether can be added into the key hole. This pairing mode only takes 3 minutes, if the pairing fails after more than 3 minutes, you need to press and hold the “CH”...
- Page 8 Raddy PT-3 Manual [EN] Make sure that the two wrenches are properly matched to 90 degrees, so that it can be opened easily. Grasp the small wrench with your left hand and the large wrench with your right hand, and twist the wrench with force in the direction indicated by the arrow on the wrench.
- Page 9 Raddy PT-3 Manual [EN] After the APP download is complete, open the APP to register an account and complete the login According to the illustration, insert the power adapter into the power input interface of B9, the display screen of the main unit will show all the graphics, and a BEEP sound prompt will be issued.
-
Page 10: Outdoor Sensor Transmission
Raddy PT-3 Manual [EN] The icon " " is displayed, which means the network time, and at the same time, it starts to search for the signal of the remote wireless sensor. The icon " " flashes, and the time is about 3 minutes. At this time, if the outdoor wireless sensor is running normally, the main unit will start to search for the signal of the remote wireless sensor in about 1-2 minutes. -
Page 11: Setting The Daily Alarms
Raddy PT-3 Manual [EN] Press “SET/MODE” to confirm your setting, the Hour display starts to flash. Now use“+” and “-” buttons to set the correct hour. Press “SET/MODE” to confirm your setting, the Minute displays starts to flash. Now use “+” and “-” buttons to set the correct minute. -
Page 12: Switching Off The Alarm Signal
Raddy PT-3 Manual [EN] unit is minutes. Switching off the alarm signal While the alarm is sounding, press any button except the “SNOOZE/LIGHT” button or press hold the “SNOOZE/LIGHT” button for 3 seconds to stop the alarm signal. Snooze Function: ... -
Page 13: Background Lighting
Raddy PT-3 Manual [EN] fully charged, and the display of one cell indicates that the battery is low. If only the battery frame is displayed and blinks, it means that the battery power is exhausted, and the product will automatically shut down and enter the standby state. At this time, the external power supply must be connected for charging. - Page 14 Raddy PT-3 Manual [EN] Main interface History interface Setting interface...
- Page 15 Raddy PT-3 Manual [DE] Raddy PT-3 Handbuch Inhaltsübersicht Technische Daten und Eigenschaften------------------------------------------------------2 Wireless Outdoor Sensor----------------------------------------------------------2 MAIN Appearance-------------------------------------------------------------------3 Initial operation----------------------------------------------------------------------5 Outdoor sensor transmission---------------------------------------------------10 Manual time setting---------------------------------------------------------------10 Einstellung der täglichen Alarme----------------------------------------------------------11 Ausschalten des Alarmsignals--------------------------------------------------12 Snooze Function--------------------------------------------------------------------12 Maximum/Minimum Temperature/Humidity-----------------------------12 Aufladen der Batterie und Ein- und Ausschalten ---------------------------12...
- Page 16 Raddy PT-3 Manual [DE] Technische Daten und Merkmale MAIN: Uhrzeit im optionalen 12/24-Stunden-Format. Automatische Kalibrierung des Netzzeitdienstes Täglicher Alarm mit Schlummerfunktion Messbereich für Innen- und Außenluftfeuchtigkeit: 20%RH bis 95%RH Temperaturmessbereiche:: - Innenbereich:-9,9°C bis 50°C oder(14,2°F bis 122°F) -Außenbereich: -40°C bis 70°C oder (-40°F bis 158°F)
- Page 17 Raddy PT-3 Manual [DE] Feature Einführung: Teil A - Positives LCD A1: Zeit A2: Innentemperatur A3: Luftfeuchtigkeit in Innenräumen A4:Temperatur von Kanal 1 A5:Kanal 1 Feuchtigkeit A6: Temperatur von Kanal 2 A7:Kanal 2 Feuchtigkeit A8: Anzeige der Komfortstufe der Pooltemperatur A9: Kanal 3 Pool-Thermometer A10: Höchstwert des Poolthermometers für...
- Page 18 Raddy PT-3 Manual [DE] Fernbedienungssensor Kanal 1 : Symbol für den drahtlosen Fernsensor Kanal : Symbol für den drahtlosen Fernbedienungssensor Kanal 3 Teil B - Zurück-Taste und Power B1: "SNOOZE/LIGHT"-Taste B2: "SET/MODE" B3: Taste "-" B4: "MEM"-Taste ALARM "-Taste B5: "...
- Page 19 Raddy PT-3 Manual [DE] C1: LCD-Anzeige - Temperatur C2: LCD-Anzeige - Luftfeuchtigkeit C3: LED für das Sendesignal C4: Taste "°C/°F C5: Taste "TX C6: Batteriefach Teil D - Kabelloser Wassertemperatursensor: B: Anzeige für schwache Batterie A: Kanalschalter C: Anzeige der Temperatursignalabgabe D: Temperaturwert E: LED-Anzeige für Signalübermittlung...
- Page 20 Raddy PT-3 Manual [DE] Polarität "+" und "-" Markierungen】, wie im unteren Bild gezeigt. Die Temperatureinheit °C/°F kann durch Drehen des Schalters "I" gewählt werden , der Kanal kann durch Drehen des Schalters "H" gewählt werden Vergewissern Sie sich vor dem Schließen des Batteriefachs, dass beide Dichtungen ordnungsgemäß in ihren Spuren sitzen, wie in der Abbildung unten gezeigt.
- Page 21 Raddy PT-3 Manual [DE] Um den Deckel zu schließen, drehen Sie den oberen und unteren Deckel mit einem Schraubenschlüssel, bis er fest verriegelt ist und das Schlüsselloch auf einer Linie liegt. Stecken Sie den Schlüssel ein und drehen Sie ihn um 90 Grad, um den Deckel zu verriegeln, wie in der Abbildung unten gezeigt.
- Page 22 Raddy PT-3 Manual [DE] Achten Sie darauf, dass die beiden Schlüssel im 90-Grad-Winkel zueinander stehen, damit sie sich leicht öffnen lassen. Fassen Sie den kleinen Schlüssel mit der linken Hand und den großen Schlüssel mit der rechten Hand und drehen Sie den Schlüssel mit Kraft in die Richtung, die der Pfeil auf dem Schlüssel angibt.
- Page 23 Raddy PT-3 Manual [DE] finden Sie die APP mit dem unten stehenden Symbol und laden Sie die APP herunter. Nachdem Sie die APP heruntergeladen haben, öffnen Sie die APP, um ein Konto zu registrieren und sich anzumelden. Stecken Sie den Netzadapter in die Stromeingangsschnittstelle von B9 ein. Auf dem Bildschirm des Hauptgeräts werden alle Grafiken angezeigt, und es ertönt ein Signalton.
- Page 24 Raddy PT-3 Manual [DE] Netzwerke Wenn das Hauptgerät nicht automatisch in den AP-Modus wechselt, wenn es zum ersten Mal eingeschaltet wird, kann es durch Drücken der " "-Taste für mehr als 3 Sekunden in den AP-Modus versetzt werden, und die Anzeige nach dem Wechsel ist die gleiche wie die Anzeige, die automatisch in den AP-Modus wechselt.
- Page 25 Raddy PT-3 Manual [DE] F.Y.I.: Wenn auf dem Kanal kein Funksensorsignal übertragen wird, wird die Temperatur oder Luftfeuchtigkeit auf der Funksensorleiste des Hauptgeräts angezeigt - -, Wenn das Batteriesymbol " " unter der Leiste des Funksensors des Hauptgeräts angezeigt wird, müssen Sie die Batterie des Funksensors Ihres Kanals so bald wie möglich anhand der Kanalanzeige...
- Page 26 Raddy PT-3 Manual [DE] beginnt. Verwenden Sie die Tasten "+" und "-", um die gewünschte Stunde einzustellen. ALARM ", um Ihre Einstellung zu bestätigen, die Minutenanzeige beginnt zu blinken. Drücken Sie die Taste " Verwenden Sie die Tasten "+" und "-", um die gewünschte Minute einzustellen.
- Page 27 Raddy PT-3 Manual [DE] sowie die Luftfeuchtigkeit umzuschalten: Einmal, um die maximalen Temperatur- und Luftfeuchtigkeitswerte anzuzeigen. Zweimalige Aussaat der Mindestwerte für Temperatur und Luftfeuchtigkeit Dreimal, um zur aktuellen Temperatur und Luftfeuchtigkeit zurückzukehren Um die maximale und minimale Temperatur und Luftfeuchtigkeit zurückzusetzen, halten Sie die Taste "MEM"...
- Page 28 Raddy PT-3 Manual [DE] Wenn das Netzteil des Produkts in den Netzadapter eingesteckt wird, wird die Batterie automatisch die Stromversorgung unterbrechen, und die Hintergrundbeleuchtung wird immer hell sein. Drücken Sie die SET/MODE ", um die Helligkeit der Hintergrundbeleuchtung einzustellen, können Sie den 4 Zustand Taste "...
- Page 29 Raddy PT-3 Manual [DE] Einstellung der Hauptschnittstelle Schnittstelle Geschichte Schnittstelle...
Need help?
Do you have a question about the PT-3 and is the answer not in the manual?
Questions and answers
wlan Verbindung herstellen
To establish a WLAN connection on the Raddy PT-3:
1. Plug the power adapter into the device.
2. Wait for the device to turn on. It will beep and display "AP01" after 3 seconds, indicating it is in Wi-Fi pairing mode.
3. If it does not enter pairing mode automatically, press and hold the "+" button for more than 3 seconds to manually activate AP mode.
4. The app will prompt you to add the device. Click "ADD."
5. Follow the app instructions:
- Step 2: Enter your 2.4GHz Wi-Fi network name and password.
- Step 3: Start the pairing process and click "NEXT."
- Step 4: Click "Done."
6. The device will return to the normal display and show the time with a network symbol, indicating a successful connection.
Note: The PT-3 supports only 2.4GHz Wi-Fi networks.
This answer is automatically generated