
Related Manuals for ready robotics YRC1000 Teach Mode


Summary of Contents for ready robotics YRC1000 Teach Mode
- Page 1 YASKAWA Startup Guide YRC1000 (Teach Mode) ........© COPYRIGHT READY Robotics ALL RIGHTS RESERVED ........1...
-
Page 2: Table Of Contents
Loading the Driver File Rebooting Checking Active Applications Adding Jobs Loading Tool Data Loading Speed Limit Data Loading IO Data Loading Safety Logic Data Rebooting Resetting the Safety Board Rebooting Finishing Device Configuration ........© COPYRIGHT READY Robotics ALL RIGHTS RESERVED ........2... -
Page 3: Yaskawa Yrc1000 (Teach Mode)
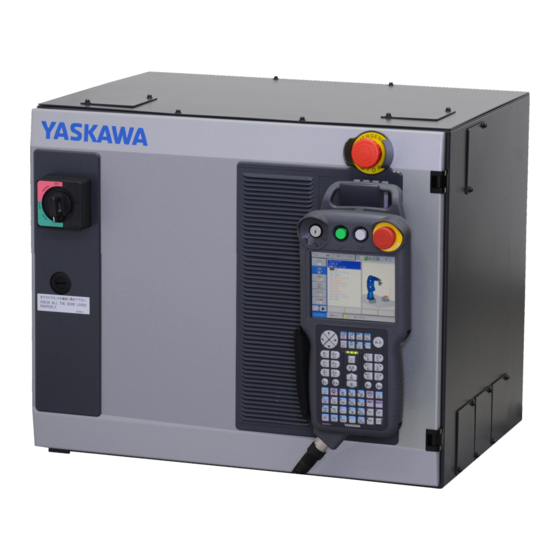
Yaskawa YRC1000 (Teach Mode) Hardware Reqs Image Name Description Controls the robot Robot in its native Controller software. Hosts ForgeOS. See IPC requirements you are not using a Forge/Hub or the legacy Forge/Ctrl........© COPYRIGHT READY Robotics ALL RIGHTS RESERVED ........3... - Page 4 READY interface for Pendant ForgeOS. See its specifications. Yaskawa Required for Standard ForgeOS to load Pendant and set tools (177716-1) (Payloads and TCPs). INFO The Smart Pendant is NOT supported........© COPYRIGHT READY Robotics ALL RIGHTS RESERVED ........4...
- Page 5 IN/40 OUT, 2 Safety IN/2 pendant safety features and Safety OUT (180700-1) fence. Connects the robot controller to Cat5e Shielded Ethernet the IPC and connects the READY Cables (x2) pendant to the IPC........© COPYRIGHT READY Robotics ALL RIGHTS RESERVED ........5...
-
Page 6: How To Check Hardware Reqs
If you don't see the cable headers or cable labeled CN222, you don't have the proper expansion board. You may see a General Purpose Safety I/O board, which will not work........© COPYRIGHT READY Robotics ALL RIGHTS RESERVED ........6... - Page 7 3. The Safety Unit I/O cable leads to the FSU Expansion Breakout Board on the Yaskawa controller door panel. Look for this Breakout Board with the connector labeled CN220........© COPYRIGHT READY Robotics ALL RIGHTS RESERVED ........7...
-
Page 8: Software Reqs
If you don't have the required hardware, contact a Yaskawa Motoman distributor. Software Reqs Part Requirement Description Number Minimum required version to run ForgeOS software on the Controller Version YAS 4.10 robot controller........© COPYRIGHT READY Robotics ALL RIGHTS RESERVED ........8... -
Page 9: How To Check Software Reqs
3. Follow these steps to find the firmware version: Select SYSTEM INFO, then select VERSION........© COPYRIGHT READY Robotics ALL RIGHTS RESERVED ........9... - Page 10 The system version information appears on the screen. Look for the version number at the top by SYSTEM:. CAUTION If your system version is older than the requirement, take a backup and contact your Yaskawa Motoman distributor to upgrade........© COPYRIGHT READY Robotics ALL RIGHTS RESERVED ........10...
- Page 11 4. Follow these steps to view Yaskawa options: Select SYSTEM INFO, then select CONTROLLER INFORMATION........© COPYRIGHT READY Robotics ALL RIGHTS RESERVED ........11...
- Page 12 For the YRC1000micro, look for the ASF30 board. Hold SHIFT and press the up/down arrows to scroll quicker. CAUTION If you don't see the FSU IO Module for your controller, contact your Yaskawa Motoman distributor to upgrade........© COPYRIGHT READY Robotics ALL RIGHTS RESERVED ........12...
- Page 13 Keep scrolling to look for 046 MotoPlus FUNC. and 049 Functional Safety in the list of options. CAUTION If you don't see these options in the list, contact your Yaskawa Motoman distributor to upgrade........© COPYRIGHT READY Robotics ALL RIGHTS RESERVED ........13...
-
Page 14: Backing Up The Controller
1. Insert a USB drive into the back of the Yaskawa pendant. INFO Use an empty USB drive (FAT-32 file format) with at least 2 GB of storage........© COPYRIGHT READY Robotics ALL RIGHTS RESERVED ........14... - Page 15 2. Turn the pendant key to TEACH mode. 3. In the Main Menu, select EX.MEMORY, then select SAVE........© COPYRIGHT READY Robotics ALL RIGHTS RESERVED ........15...
- Page 16 4. Scroll down to highlight SYSTEM BACKUP (CMOS.BIN), then press SELECT........© COPYRIGHT READY Robotics ALL RIGHTS RESERVED ........16...
- Page 17 5. At the Save? prompt, tap YES on the screen........© COPYRIGHT READY Robotics ALL RIGHTS RESERVED ........17...
- Page 18 8. Remove the USB flash drive from the pendant. Keep your USB backup drive in a secure location. You can save the backup files from the USB onto a workstation........© COPYRIGHT READY Robotics ALL RIGHTS RESERVED ........18...
-
Page 19: Wiring The Ready Pendant
Electric Shock Warning: Make sure to disconnect everything from power first. Remove one of the covering plates on the right side or back side of the YRC1000. Make a hole on the plate for the flying leads cable to enter........© COPYRIGHT READY Robotics ALL RIGHTS RESERVED ........19... - Page 20 12 safety signals long enough to reach their destinations in the table. Include ferrules at the end of your wiring to insert in the terminal blocks........© COPYRIGHT READY Robotics ALL RIGHTS RESERVED ........20...
- Page 21 Blue FSU Breakout - 28 Key Switch Circuit 2 White/Blue Not Connected INFO If you are using external safety fencing: Connect fence channel 1 to connector pins 41 and 42........© COPYRIGHT READY Robotics ALL RIGHTS RESERVED ........21...
-
Page 22: Connecting The Controller To The Ipc
Bridge pins 43 and 44 with a jumper wire. Connecting the Controller to the IPC 1. Find a Ethernet cable (Cat5e STP) long enough to reach from the IPC to the robot controller........© COPYRIGHT READY Robotics ALL RIGHTS RESERVED ........22... - Page 23 Install a cable gland for strain relief. 3. Feed the Ethernet cable through the plate. Refer to Yaskawa's YRC1000 Instructions for proper cable sealing and routing. 4. Mount the plate in place........© COPYRIGHT READY Robotics ALL RIGHTS RESERVED ........23...
- Page 24 CPU Unit inside the robot controller near the left wall of the enclosure. 6. Plug the other end of the Ethernet cable into a LAN port on the IPC or on a network switch you connect to the IPC........© COPYRIGHT READY Robotics ALL RIGHTS RESERVED ........24...
-
Page 25: Powering On
Make sure the robot controller door can shut without pinching or bending any cables. 8. Close the controller and use a flat-blade screwdriver to turn the door lock counterclockwise. Powering On 1. Plug the controller into a power source and turn it on........© COPYRIGHT READY Robotics ALL RIGHTS RESERVED ........25... -
Page 26: Configuring Yaskawa Pendant Settings
2. Plug your IPC's power cable into a power outlet and turn it on. 3. If there are issues, power off each device, disconnect from power supplies, and check your wiring. Configuring Yaskawa Pendant Settings ........© COPYRIGHT READY Robotics ALL RIGHTS RESERVED ........26... -
Page 27: Setting Parameters
3. Change the security mode to Safety Mode. INFO For steps on how to change to Safety mode, check out this. Setting Parameters Set S2C parameters........© COPYRIGHT READY Robotics ALL RIGHTS RESERVED ........27... - Page 28 From the Main Menu, find and select PARAMETER. Select the S2C option. Set the following values: Set S2C0425 to 0. Set S2C0430 to 4. Set S2C0701 to 1. Set S2C1419 to 1. Set S2C1586 to 1........© COPYRIGHT READY Robotics ALL RIGHTS RESERVED ........28...
- Page 29 SELECT button on the keypad. Then enter the number 0425 and press ENTER. Set S4C parameters. From the Main Menu, find and select PARAMETER. Select the S4C option........© COPYRIGHT READY Robotics ALL RIGHTS RESERVED ........29...
- Page 30 (Optional): If your controller has the SETUP > SPEED OVERRIDE SETTING menu, you can check if the parameters were correctly set: Verify that Setting Method = I/O. Verify that Continuous Cycle Operation = Valid........© COPYRIGHT READY Robotics ALL RIGHTS RESERVED ........30...
-
Page 31: Disabling The Crc Check Function
From the MAIN MENU, select SETUP, then choose FUNCTION ENABLE. Scroll down to highlight the field next to SAVE DATA CRC CHECK FUNC. (FSU) and press the SELECT button to set it to INVALID........© COPYRIGHT READY Robotics ALL RIGHTS RESERVED ........31... -
Page 32: Rebooting
For steps on how to enter Maintenance mode, check out this. Enter Safety mode. INFO For steps on how to change to Safety mode, check out this. Setting Option Functions From the Main Menu, select SYSTEM, then select SETUP........© COPYRIGHT READY Robotics ALL RIGHTS RESERVED ........32... - Page 33 Highlight OPTION FUNCTION and press the SELECT button........© COPYRIGHT READY Robotics ALL RIGHTS RESERVED ........33...
- Page 34 Highlight DETAIL next to LAN INTERFACE SETTING and press the SELECT button........© COPYRIGHT READY Robotics ALL RIGHTS RESERVED ........34...
- Page 35 Set the IP ADDRESS SETTING to MANUAL SETTING........© COPYRIGHT READY Robotics ALL RIGHTS RESERVED ........35...
- Page 36 Set the IP Address to 192.168.1.20 and set the Subnet Mask to 255.255.255.0. INFO If you are using the legacy Forge/Ctrl, set the IP Address to 172.16.255.251 instead........© COPYRIGHT READY Robotics ALL RIGHTS RESERVED ........36...
- Page 37 Back in the OPTION FUNCTION menu, highlight the field next to MOTOMAN DRIVER and make sure it's set to USED. If not, press the SELECT button. At the Modify? prompt, tap YES........© COPYRIGHT READY Robotics ALL RIGHTS RESERVED ........37...
- Page 38 Back in the OPTION FUNCTION menu, highlight the field next to MotoPlus FUNC and set it to USED........© COPYRIGHT READY Robotics ALL RIGHTS RESERVED ........38...
- Page 39 At the Modify? prompt, tap YES. At the Initialize related files? SRAMDRV.DTA prompt, tap YES........© COPYRIGHT READY Robotics ALL RIGHTS RESERVED ........39...
- Page 40 Select the field next to SAFETY I/O BOARD SETTING........© COPYRIGHT READY Robotics ALL RIGHTS RESERVED ........40...
- Page 41 Select the ASF02 board........© COPYRIGHT READY Robotics ALL RIGHTS RESERVED ........41...
-
Page 42: Resetting The Safety Board
Press the ENTER button on the keypad to apply this choice. At the Modify? prompt, tap YES. Resetting the Safety Board Save settings to the Safety I/O board: From the Main Menu, tap FILE, then tap INITIALIZE........© COPYRIGHT READY Robotics ALL RIGHTS RESERVED ........42... - Page 43 Highlight Safety Board FLASH Reset and press the SELECT button........© COPYRIGHT READY Robotics ALL RIGHTS RESERVED ........43...
- Page 44 At the Reset? prompt, tap YES. Wait for the flash reset to complete and the pendant to beep. This process takes up to 60 seconds to complete. The arrow buttons are disabled until the reset completes........© COPYRIGHT READY Robotics ALL RIGHTS RESERVED ........44...
-
Page 45: Signing Into Forgeos
The READY pendant automatically finds and pairs with the IPC. The three LEDs on the screen help you track the status: Pendant Network Connection: This condition is satisfied when the READY pendant has a valid network connection (i.e., the Ethernet cable is plugged in)........© COPYRIGHT READY Robotics ALL RIGHTS RESERVED ........45... - Page 46 When a condition is in the process of becoming satisfied, a spinner around a ForgeOS logo appears to the right of the text. When a condition becomes satisfied, the LED turns green........© COPYRIGHT READY Robotics ALL RIGHTS RESERVED ........46...
- Page 47 Tap Admin and sign in. The default Admin password is "forgeadmin". You must change this password when setting up ForgeOS. You can change it again any time later on in Settings > User Accounts........© COPYRIGHT READY Robotics ALL RIGHTS RESERVED ........47...
- Page 48 ........© COPYRIGHT READY Robotics ALL RIGHTS RESERVED ........48...
-
Page 49: Getting Config Files
If ForgeOS is inactive, it opens the Settings app and prevents you from opening other apps. If you see the screen below, follow this. Getting Config Files Open the Device Configuration app........© COPYRIGHT READY Robotics ALL RIGHTS RESERVED ........49... - Page 50 Use the Filter by dropdown to show only robots on the list. Select your controller model, then select your robot model. If applicable, also select your safety configuration. You can fill in the other information later........© COPYRIGHT READY Robotics ALL RIGHTS RESERVED ........50...
- Page 51 Insert a USB drive into the IPC. Tap Start Transfer ........© COPYRIGHT READY Robotics ALL RIGHTS RESERVED ........51...
-
Page 52: Transferring Config Files
Safety Security Mode. Loading the Driver File Follow these steps to load the Forge MotoPlus APL. Insert the USB drive with the ForgeOS config files into the Yaskawa pendant........© COPYRIGHT READY Robotics ALL RIGHTS RESERVED ........52... - Page 53 From the Main Menu, tap MotoPlus APL, then tap FOLDER to select the folder to load files from........© COPYRIGHT READY Robotics ALL RIGHTS RESERVED ........53...
- Page 54 Tap the forge-os folder to open it, then tap to open the yaskawa folder. At the top of the screen, the TARGET FOLDER should be yaskawa. From the Main Menu, tap MotoPlus APL, then tap LOAD (USER APPLICATION)........© COPYRIGHT READY Robotics ALL RIGHTS RESERVED ........54...
- Page 55 Highlight the MotoPlusYRC1..out file on the USB drive and press the SELECT button........© COPYRIGHT READY Robotics ALL RIGHTS RESERVED ........55...
-
Page 56: Rebooting
INFO An alarm may appear up to two minutes after restarting: ALARM 8001[10]; Speed FB enabled, reboot now. Do not reboot now, tap the RES button on the screen and ........© COPYRIGHT READY Robotics ALL RIGHTS RESERVED ........56... -
Page 57: Checking Active Applications
If you have loaded files onto this robot controller before, make sure the correct MotoPlus application is running and no other apps are running: From the Main Menu, select MotoPlus APL., then MotoPlus MONITOR........© COPYRIGHT READY Robotics ALL RIGHTS RESERVED ........57... - Page 58 If MotoPlusYRC1_5.out is in the "Inactive Application" section, highlight it and press "Add" to set the app as active. If you see any other apps listed under "Active Application," highlight them and press "Remove." ........© COPYRIGHT READY Robotics ALL RIGHTS RESERVED ........58...
-
Page 59: Adding Jobs
Safety Mode and check again to make sure the correct application is running. Adding Jobs From the Main Menu, tap EX. MEMORY, then tap FOLDER to select the folder to load files from........© COPYRIGHT READY Robotics ALL RIGHTS RESERVED ........59... - Page 60 Tap the forge-os folder to open it, then tap to open the yaskawa folder. At the top of the screen, the TARGET FOLDER should be yaskawa. From the Main Menu, tap EX. MEMORY and then tap LOAD........© COPYRIGHT READY Robotics ALL RIGHTS RESERVED ........60...
- Page 61 Highlight JOB and press the SELECT button........© COPYRIGHT READY Robotics ALL RIGHTS RESERVED ........61...
- Page 62 Teach Mode, go to Main Menu > JOB > SELECT JOB. Tap the JOB tab in the upper left toolbar and choose DELETE JOB. Then select the job to delete. Delete each job that starts with "RR" then try the above steps again........© COPYRIGHT READY Robotics ALL RIGHTS RESERVED ........62...
-
Page 63: Loading Tool Data
Loading Tool Data From the Main Menu, tap EX. MEMORY, then tap LOAD........© COPYRIGHT READY Robotics ALL RIGHTS RESERVED ........63... - Page 64 Highlight FILE/GENERAL DATA and press the SELECT button........© COPYRIGHT READY Robotics ALL RIGHTS RESERVED ........64...
- Page 65 Select TOOL DATA and press the SELECT button on the pendant keypad........© COPYRIGHT READY Robotics ALL RIGHTS RESERVED ........65...
- Page 66 Verify that the file is marked with a star........© COPYRIGHT READY Robotics ALL RIGHTS RESERVED ........66...
- Page 67 Press the ENTER button on the pendant keypad. At the Load? prompt, tap YES........© COPYRIGHT READY Robotics ALL RIGHTS RESERVED ........67...
- Page 68 The screen changes to the EXTERNAL MEMORY DEVICE screen, then to the EX. MEMORY screen........© COPYRIGHT READY Robotics ALL RIGHTS RESERVED ........68...
-
Page 69: Loading Speed Limit Data
Loading Speed Limit Data From the Main Menu, tap EX. MEMORY, then tap LOAD. Highlight FILE/GENERAL DATA and press the SELECT button........© COPYRIGHT READY Robotics ALL RIGHTS RESERVED ........69... - Page 70 Highlight the SPEED LIMIT DATA file and press SELECT. Make sure the file is marked with a star........© COPYRIGHT READY Robotics ALL RIGHTS RESERVED ........70...
- Page 71 Press ENTER. At the Load? prompt, tap YES. From the Main Menu, tap SAFETY FUNC, then choose SPEED LIMIT........© COPYRIGHT READY Robotics ALL RIGHTS RESERVED ........71...
- Page 72 Highlight 2 in the File column and press the SELECT button........© COPYRIGHT READY Robotics ALL RIGHTS RESERVED ........72...
- Page 73 Select the field next to FILE VALID COND and select SIGNAL (2) and press the SELECT button........© COPYRIGHT READY Robotics ALL RIGHTS RESERVED ........73...
- Page 74 Tap the READBACK button on the screen........© COPYRIGHT READY Robotics ALL RIGHTS RESERVED ........74...
- Page 75 Tap the WRITE button on the screen........© COPYRIGHT READY Robotics ALL RIGHTS RESERVED ........75...
- Page 76 At the Update the file? prompt, tap YES........© COPYRIGHT READY Robotics ALL RIGHTS RESERVED ........76...
-
Page 77: Loading Io Data
Repeat all sub-steps in the previous step for 3 in the File column (READYP-OFF). INFO The limit and input signal are different for READYP-OFF. This is normal. Loading IO Data From the Main Menu, tap EX. MEMORY, then tap LOAD........© COPYRIGHT READY Robotics ALL RIGHTS RESERVED ........77... - Page 78 Highlight I/O DATA and press the SELECT button........© COPYRIGHT READY Robotics ALL RIGHTS RESERVED ........78...
- Page 79 Highlight and press the SELECT button on C.IO PRGM (CIOPRG.LST). Highlight and press the SELECT button on YSF LOGIC FILE (YSFLOGIC.DAT)........© COPYRIGHT READY Robotics ALL RIGHTS RESERVED ........79...
-
Page 80: Loading Safety Logic Data
Press the ENTER button on the pendant keypad. At the Load? prompt, tap YES. Loading Safety Logic Data From the Main Menu, tap SAFETY FUNC., then tap SAFETY LOGIC CIRCUIT........© COPYRIGHT READY Robotics ALL RIGHTS RESERVED ........80... - Page 81 Tap the WRITE button on the bottom of screen........© COPYRIGHT READY Robotics ALL RIGHTS RESERVED ........81...
-
Page 82: Rebooting
Tap the CONFIRM button on the bottom of screen. At the Update the file? prompt, tap YES. Rebooting Reboot in Maintenance Mode. INFO For steps on how to enter Maintenance mode, check out this. Enter Safety mode. INFO ........© COPYRIGHT READY Robotics ALL RIGHTS RESERVED ........82... -
Page 83: Resetting The Safety Board
Resetting the Safety Board Save settings to the Safety I/O board: From the Main Menu, tap FILE, then tap INITIALIZE. Highlight Safety Board FLASH Reset and press the SELECT button........© COPYRIGHT READY Robotics ALL RIGHTS RESERVED ........83... - Page 84 At the Reset? prompt, tap YES. Wait for the flash reset to complete and the pendant to beep. This process takes up to 60 seconds to complete. The arrow buttons are disabled until the reset completes........© COPYRIGHT READY Robotics ALL RIGHTS RESERVED ........84...
-
Page 85: Rebooting
Rebooting Power off the Yaskawa robot controller and wait 10 seconds. Turn the Yaskawa pendant key to REMOTE........© COPYRIGHT READY Robotics ALL RIGHTS RESERVED ........85... -
Page 86: Finishing Device Configuration
For the IP Address, enter 192.168.1.20 or the IP address you assigned to the robot, if different. Tap SAVE. ForgeOS attempts to connect with the robot controller for up to 20 seconds........© COPYRIGHT READY Robotics ALL RIGHTS RESERVED ........86... - Page 87 If the robot controller fails to connect, you see this pop-up. Click DISMISS, do the following, then try to tap SAVE again: Check the Ethernet connection between the robot controller and IPC. Check the network settings on the robot controller........© COPYRIGHT READY Robotics ALL RIGHTS RESERVED ........87...
- Page 88 When the robot connects, you can add Tool Center Points (TCPs) and Payloads for the robot. You can come back to this later by editing the device's configuration. Tap SAVE to continue. INFO View more info of TCPs and Payloads here........© COPYRIGHT READY Robotics ALL RIGHTS RESERVED ........88...
- Page 89 Machining Cycle") to show what each signal does in other apps. If you want a signal to appear in the robot's Device Control page, check the DC box next to that signal........© COPYRIGHT READY Robotics ALL RIGHTS RESERVED ........89...
- Page 90 NOTE To use these I/O signals, integrate your I/O devices with the robot controller........© COPYRIGHT READY Robotics ALL RIGHTS RESERVED ........90...
Need help?
Do you have a question about the YRC1000 Teach Mode and is the answer not in the manual?
Questions and answers