Table of Contents
Advertisement
Available languages
Available languages
Quick Links
Advertisement
Table of Contents

Summary of Contents for Diloc DH.TELE006
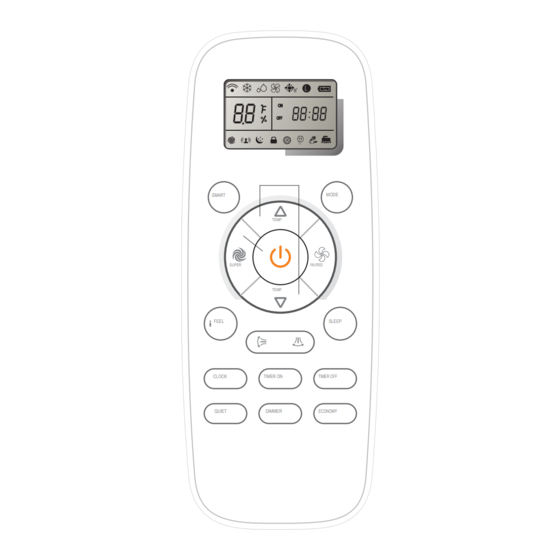
- Page 1 DH.TELE006 SMART MODE TEMP. SUPER FAN SPEED TEMP. FEEL SLEEP CLOCK TIMER ON TIMER OFF QUIET DIMMER ECONOMY NOTA BENE: Leggere attentamente questo manuale prima di installare e/o utilizzare il prodotto. Conservare presente manuale futura consultazione.
-
Page 2: Istruzioni D'uso Del Telecomando
Istruzioni d’uso del telecomando L1 - 12 Telecomando Istruzioni di funzionamento Modalità di funzionamento Controllo direzione del flusso d’aria Modalità smart Pulsante clock Modalità pulizia Modalità super Modalità di controllo della potenza Modalità 8°HEAT Modalità timer Modalità quiet Modalità economy Modalità... - Page 3 Telecomando Telecomando Questo telecomando trasmette i segnali di comando al sistema. SMART (non valida per alcuni modelli) TEMP + - Per avviare la selezione automatica della modalità, Per regolare la temperatura della indipendentemente se l’unità è camera e il temporizzatore, oltre accesa o spenta.
- Page 4 Telecomando Telecomando Come inserire le batterie Aprire il coperchio del vano della batteria osservando la direzione della freccia. Inserire le batterie nuove verificandone la corretta polarità. Rimontare il coperchio slittando il suo retro nella posizione desiderata. Nota: Utilizzare le 2 batterie LR03 AAA (1,5volt) . Non utilizzare mai le batterie ricaricabili. Sostituire le batterie con le nuove dello stesso tipo quando il display diventa scuro.
-
Page 5: Istruzioni Di Funzionamento
Istruzioni di funzionamento Modalità di funzionamento Selezionare la modalità di funzionamento MODE Premere il pulsante La modalità di funzionamento risultano cambiate in sequenza: Risultato : SOLA RISCALD DEUMIDIFI MODE RAFFREDDAMENTO Premere VENTILAZIONE AMENTO CATORE NON è disponibile la modalità riscaldamento per i condizionatori di solo raffreddamento. Modalità... - Page 6 Istruzioni di funzionamento Controllo direzione del flusso d’aria (non valida per alcuni modelli) Il flusso verticale(flusso orizzontale) viene regolato automaticamente secondo le modalità impostate e l’angolazione desiderata. TEMP. Modalità di Direzione del flusso d’aria funzionamento RAFFREDDAMENTO FEEL SLEEP Orizzontale , DEUMIDIFICATORE RISCALDAMENT Verso il basso O, SOLA...
- Page 7 Istruzioni di funzionamento Modalità SMART (non valida per alcuni modelli) Come impostare la modalità SMART? SMART Premere questo pulsante Attiva la modalità SMART (definizione automatica) Risultato: SMART MODE indipendentemente se l’unità è accesa o spenta. La temperatura e la velocità del ventilatore vengono definite Premere TEMP.
- Page 8 Istruzioni di funzionamento Modalità SMART (non valida per alcuni modelli) Funzioni della modalità SMART? Sensazione personale Pulsante Regolazione Non confortevole a causa del La velocità del ventilatore interno è selezionabile tra: volume del flusso d’aria non FAN SPEED Automatica, Alta, Media e Bassa. idoneo.
- Page 9 Istruzioni di funzionamento Modalità SUPER La modalità SUPER viene utilizzata per avviare o interrompere il raffreddamento o il riscaldamento rapido. Nella modalità SUPER, l'indicatore super verrà visualizzato sullo schermo LCD. La modalità SUPER può essere impostata quando l'apparecchio è in funzione o collegato all'alimentazione. Nella modalità...
-
Page 10: Modalità Timer
Istruzioni di funzionamento Modalità 8°HEAT La modalità 8°HEAT viene utilizzata per impostare la modalità di riscaldamento a 8°. Nella modalità 8°HEAT, la velocità del ventilatore è impostata automaticamente su "AUTO." Come impostare la modalità 8°HEAT? Appuyez simultanément sur les boutons pendant 2 secondes TEMP. - Page 11 Istruzioni di funzionamento Modalità ECONOMY (non valida per alcuni modelli) In questa modalità, il condizionatore funzionerà a basso consumo energetico. Nota: Il pulsante ECONOMY è inefficace in modalità di controllo SMART, SUPER e Power. Premere uno tra i pulsanti ON/OFF, MODE, TEMP , TEMP , FAN , SLEEP, QUIETo ECONOMY △...
-
Page 12: Modalità Sleep
Istruzioni di funzionamento Modalità SLEEP La modalità SLEEP può essere impostata nelle modalità di RAFFREDDAMENTO, RISCALDAMENTO o DEUMIDIFICATORE. Questa funzione offre un ambiente più confortevole per dormire. Il condizionatore si arresterà automaticamente dopo aver funzionato per 8 ore. La velocità del ventilatore è automaticamente impostata a bassa velocità. Come impostare la modalità... - Page 13 INFORMAZIONE AGLI UTENTI Ai sensi del deoreto legislativo 14 marzo 2014,n.49“Attuazione della direttiva 2012/19/ UE sui rifiuti di apparecchiature elettriche ed elettroniche(RAAE)”. ll simbolo del cassonetto barrato sull’apparecchiatura indica che il prodotto alla fine della propria vita deve essere raccolto separatamente dagli altri rifiuti. L’utente dovrà,pertanto,conferire l’apparecchiatura giunta a fine vita agli idonei centri di raccolta differenziata del rifiuti elettronici ed elettrotecnici,oppure riconsegnarla al rivenditore al momento dell’acquisto di una nuova apparecchiatura di tipo equivalente, in ragione di uno a uno.
- Page 14 In caso di guasto sul prodotto, fare richiesta d’intervento solo ed esclusivamente alla Naicon srl, compilando l’apposito modulo direttamente dal nostro sito internet www.naicon.com all’interno della pagina riguardante i prodotti del Brand Diloc nella sezione Service. I riferimenti per l’invio della richiesta d’intervento si trovano all’interno del modulo stesso.
- Page 15 DH.TELE006 SMART MODE TEMP. SUPER FAN SPEED TEMP. FEEL SLEEP CLOCK TIMER ON TIMER OFF QUIET DIMMER ECONOMY PLEASE NOTE: Read this manual carefully before installing and / or using the product. keep this manual for future reference.
-
Page 16: Remote Controller Instructions
Remote controller Instructions L1 - 12 Remote controller Operation instructions Operation modes Airflow direction control SMART mode CLOCK button CLEAN mode SUPER mode Power control mode 8℃ HEAT mode TIMER mode QUIET mode ECONOMY mode IFEEL mode Dimmer button LOCK mode SLEEP mode... -
Page 17: Remote Controller
Remote controller Remote controller The remote controller transmits signals to the system. SMART(invalid for some models Used to enter fuzzy logic operation directly, TEMP + - regardless of the unit is on or off. Used to adjust the room temperature and the timer, also real time. - Page 18 Remote controller Remote controller How to Insert the Batteries Remove the battery cover according to the arrow direction. Insert new batteries making sure that the (+) and (-) of battery are matched correctly. Reattach the cover by sliding it back into position. Note: Use 2 LR03 AAA(1.5volt) batteries.
-
Page 19: Operation Modes
Operation instructions Operation modes Selecting mode Press button once by once MODE The operation modes changed in sequence: Result : MODE COOLING FAN ONLY HEATING PRESS Heating mode is NOT available for cooling only air conditioner. FAN mode Press button once by once FAN SPEED The fan speed is changed in sequence: Result :... - Page 20 Operation instructions Airflow direction control (invalid for some models) Vertical airflow(Horizontal airflow) is automatically adjusted to a certain angle in accordance with the operation mode after turning on the unit. TEMP. Operation mode Direction of airflow FEEL SLEEP COOLING, DRY horizontal *HEATING, downward...
-
Page 21: Smart Mode
Operation instructions invalid for some models SMART mode( How to set SMART mode? SMART Press the button. Enters SMART mode(fuzzy logic operation) SMART MODE Result : directly regardless of the unit is on or off. PRESS TEMP. Temperature and fan speed are automatically set based on theactual room temperature. -
Page 22: Clock Button
Operation instructions SMART mode(invalid for some models What you can do in SMART mode? Your feeling Button Adjust Indoor fan speed alternates among Auto, High, Medium Uncomfortable because and Low each time this button is pressed. of unsuitable air flow FAN SPEED volume. -
Page 23: Super Mode
Operation instructions SUPER mode SUPER mode is used to start or stop fast cooling or heating. I n SUPER mode, the super indicator will display on LCD. SUPER mode can be set when the appliance is in operation or energized In SUPER mode, you can set temperature, airflow direction or timer. -
Page 24: Timer Mode
Operation instructions 8℃HEAT mode mode is used to set 8℃ heating mode 8℃ HEAT HEAT mode, the fan speed is set at "AUTO" automatically. 8℃ How to set 8℃HEAT mode? Press buttons together for about 2 seconds at the heating mode. TEMP. -
Page 25: Dimmer Button
Operation instructions ECONOMY mode (invalid for some models In this mode, the air conditioner will bring you energy saving performance by lower running currency. I Note: ECONOMY button is ineffective in SMART, SUPER and Power control mode. Press ON/OFF , MODE ,TEMP △ ,TEMP , FAN , SLEEP , QUIET or ECONOMY button cancel ECONOMY mode. -
Page 26: Sleep Mode
Operation instructions SLEEP mode SLEEP mode can be set in COOLING ,HEATING or DRYING mode. This function gives you a more comfortable environment for sleep. The appliance will stop operation automatically after operating for 8 hours. Fan speed is automatically set at low speed. How to set SLEEP mode ? SLEEP Each time... -
Page 27: Information For Users
INFORMATION FOR USERS In accordance with European Directive 2012/19/UE on electric and electronic equipment waste disposal. The barred symbol of the rubbish bin shown on the equipment indicates that, at the end of its useful life, the product must be collected separately from waste. Therefore, any products that have reached the end of their useful life must be given to waste disposal centres specialising in separate collection of waste electrical and electronic equipment, or given back to the retailer at the time of purchasing new similar equipment, on a one for one basis. - Page 28 CONVENTIONAL WARRANTY Dear Customer, Thank you for purchasing a Diloc brand product and we are sure you will be satisfied with it. We recommend that you carefully read and keep the use and maintenance manual present in each product. Conventional warranty Hereby, Naicon srl guarantees the product from any material or manufacturing defect for a period of 24 months and covers only the spare parts.
- Page 29 Naicon srl Via il Caravaggio, 25 Trecella I 20060 Pozzuolo Martesana - Milano (Italy) Tel. +39 02 95.003.1 Fax +39 02 95.003.313 www.naicon.com e-mail: naicon@naicon.com Made in P.R.C...
Need help?
Do you have a question about the DH.TELE006 and is the answer not in the manual?
Questions and answers