Advertisement
Advertisement
Table of Contents

Related Manuals for Kogan KAM44BEVFGA


Summary of Contents for Kogan KAM44BEVFGA
- Page 1 93L & 44L BAR FRIDGE KAM44BEVFGA & KAM93GLAFGA...
- Page 2 Safety & Warnings Overview Installation Operation Cleaning & Care Troubleshooting Notes...
-
Page 3: Safety And Warnings
• Children aged from 3 to 8 years are allowed to load and unload refrigerating appliances. • If the power cord is damaged, it must be replaced by the Kogan.com, its service agent or similarly qualified persons in order to avoid a hazard. Cease use immediately and contact help.Kogan.com for support. - Page 4 • Any replacement of maintenance of the LED lamps is intended to be made by the Kogan.com, its service agent or similar qualified person. • Warning: To avoid a hazard due to instability of the appliance, it must be fixed in accordance with the instructions.
- Page 5 Meaning of safety warning symbols Prohibition symbols The symbols indicate prohibited matters and those behaviours are forbidden. Non-compliance with the instructions may result in product damages or endanger the personal safety of users. Warning symbols The symbols indicate matters that must be followed and those behaviours must be strictly executed in line with the operation requirements.
- Page 6 • Do not arbitrarily disassemble or reconstruct this appliance, nor damage the refrigerant circuit; maintenance of the appliance must be conducted by a specialist. • Damaged power cord must be replaced by the Kogan.com, its maintenance department or related professionals in order to avoid danger. Contact help.Kogan.com for support.
- Page 7 Warnings for Energy • It is important to note that the appliance may not operate consistently if placed for an extended period below the minimum recommended temperature range for which the cooler appliance is designed. • Please adhere to the recommended storage times provided by beverage manufacturers for all types of beverages to prevent spoilage.
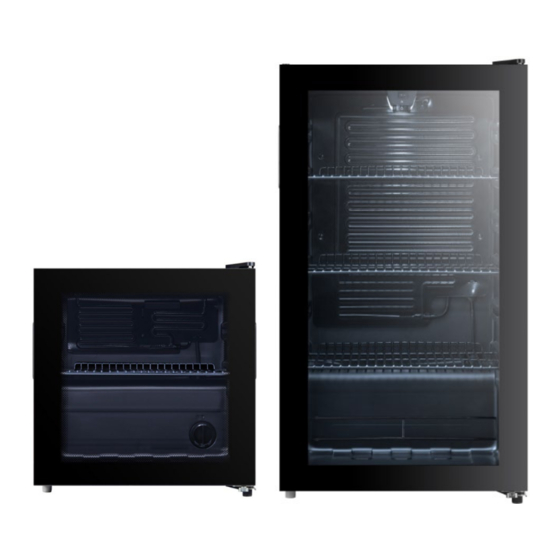
- Page 8 OVERVIEW 44L Model Evaporator Door handle Shelf Temperature- Steel column control knob strip Levelling foot 93L Model Light switch Temperature- Evaporator control knob Door handle Shelf Shelf Shelf Levelling foot Levelling foot...
-
Page 9: Installation
INSTALLATION Before First Use Before using the cooler, remove all packaging materials including bottom cushions and foam pads and tapes inside the cooler, tear off the protective film on the door and the cooler body. • Allow the appliance to settle for at least 2 hours after transportation before powering it on to prevent a decrease in cooling capacity or damage to the appliance. - Page 10 Recommended Layout for Beverages in the Fridge Ensure that cans do not touch the back side of the appliance to maintain proper air circulation within the cabinet. The capacity for storing beverage cans is calculated based on the standard size of a 355ml can (65mm x 125mm approx.). Note: Using oversized beverage cans may impact the total number of cans that can be stored in the cabinet.
- Page 11 44L Model: Inner row Outer row Total can storage: 48cans Top shelf: 12 Top shelf: 11 Base:9 Base:16 Temperature Zones Inside the Fridge Due to different temperature zones generated due to air circulation in the cooler, the upper area's temperature is higher than the low area. Energy saving Tips: •...
- Page 12 Reversing the Door Follow the following instructions for the change of the opening direction of the beverage cabinet's door (for instance: from right-handed door to left-handed door): Close the glass door of the beverage cabinet, use a blade to remove the axle sleeve (1) and rivet (2) carefully, loose the mounting cover (3) of the door hinge and three positioning bolts (4) and remove the upper hinge (5) and axle sleeve (6).
- Page 13 Dismantle the door axle sleeve (6) at lower part of the glass door, door stopper block screws (8) and door stopper (7) and fix them to left side. Dismantle the levelling foot (10), positioning bolts (4) and lower hinge (9), then exchange the parts of right and left sides and later use the reverse method to install the levelling foot and positioning bolts.
- Page 14 Put the aforesaid glass door on the lower hinge, install the door axle sleeve 6 back and fix the upper hinge (5). Align the door with the cabinet and check the tightness of gasket and then install all the fasteners (1), (2).
-
Page 15: Operation
OPERATION Temperature Control 44L Model • After powering-on the appliance, turn the temperature controlling knob to adjust temperature level. “Cold” is the warmest setting. “Colder” is the coldest setting. “OFF” means stop running. Note: Recommended setting: “normal” The setting range of Celsius temperature is 1°C~10°C (33°F~50°F). - Page 16 93L Model Light switch Temperature control knob • The temperature inside the appliance is adjusted using the temperature control knob. “1, 2, 3, 4, 5, 6, OFF” on the knob does not represent a specific temperature value. • The smaller the number, the higher the temperature •...
-
Page 17: Cleaning And Care
CLEANING & CARE • Unplug power plug to disconnect the appliance from power. • Dusts behind the beverage cooler and on the ground shall be timely to improve the cooling effect and energy saving. • Check the door gasket regularly to make sure there are no debris. Clean the door gasket with a soft cloth dampened with soapy water cleaned or diluted detergent. -
Page 18: Troubleshooting
TROUBLESHOOTING • Ensure the appliance is plugged and connected to power. • Low voltage. Appliance is not working • Check the temperature control knob is in the work area. • Power failure or tripped circuit. • It is normal that cooler operates for longer time in summer when the ambient temperature is higher. - Page 19 NOTES...
- Page 20 Need more information? We hope that this user guide has given you the assistance needed for a simple set-up. For the most up-to-date guide for your product, as well as any additional assistance you may require, head online to help.kogan.com...
Need help?
Do you have a question about the KAM44BEVFGA and is the answer not in the manual?
Questions and answers