Table of Contents
Advertisement
Quick Links
WEEE Warning Message
Symbol for Separate Collection in European Countries
This symbol indicates that this product is to be collected
separately.
The following apply only to users in European countries:
This product is designated for separate collection at an
appropriate collection point. Do not dispose of as
household waste.
For more information, contact the retailer or the local
authorities in charge of waste management.
FCC STATEMENT
This device complies with Part 15 of the FCC Rules. Operation is subject to the
following two conditions:
(1).
This device may not cause harmful interference, and
(2).
This device must accept any interference received, including interference that
may cause undesired operation.
Note:
This equipment has been tested and found to comply with the limits for Class B digital
devices, pursuant to Part 15 of the FCC rules. These limits are designed to provide
reasonable protection against harmful interference in a residential installation. This
equipment generates uses and can radiate radio frequency energy and, if not installed
and used in accordance with the instructions, may cause harmful interference to radio
communications.
However, there is no guarantee that interference will not occur in a particular
installation. If this equipment does cause harmful interference to radio or television
reception, which can be determined by turning the equipment off and on, the user is
encouraged to try to correct the interference by one or more of the following
measures:
Reorient or relocate the receiving antenna
Increase the separation between the equipment and receiver
Connect the equipment into an outlet on a circuit different from that to which the
receiver is connected
-1-
English
Advertisement
Table of Contents

Related Manuals for Genius DV5131


Summary of Contents for Genius DV5131
- Page 1 Note: This equipment has been tested and found to comply with the limits for Class B digital devices, pursuant to Part 15 of the FCC rules. These limits are designed to provide reasonable protection against harmful interference in a residential installation. This...
- Page 2 English Use of shielded cable is required to comply with Class B limits in Subpart B of Part 15 of the FCC rules. Do not make any changes or modifications to the equipment unless otherwise specified in the manual. If such changes or modifications should be made, you could be required to stop operation of the equipment.
- Page 3 Do not wrap the camera or place it in cloth or blankets. This might cause heat to build up and deform the case, resulting in fire. Use the camera in a well-ventilated place. Do not leave the camera in places where the temperature may rise...
- Page 4 As baterias poderão esquentar durante a utilização da câmera por um longo período ou do flash de forma contínua. Isso é normal e não caracteriza mau funcionamento. A câmera poderá esquentar durante a utilização contínua ou por um longo período.
-
Page 5: Table Of Contents
EFAULT ETTING AND ALIDATION ___________________________________________ 16 OVIE ETTING Movie Resolution ____________________________________________ 16 Possible recording time / sec (video clip) __________________________ 17 Exposure___________________________________________________ 17 Light ______________________________________________________ 18 Sharpness__________________________________________________ 19 White Balance_______________________________________________ 19 Motion Detection _____________________________________________ 20 Night Mode _________________________________________________ 21 _________________________________________ 21... - Page 6 PC _________________________________ 46 OTION OVIE ON JPEG M _____________________________________ 46 HARE OTION OVIE VIEWING PICTURES AND MOVIES ON A TV ________________________ 46 SYSTEM REQUIREMENT ________________________________________ 47 TRANSFERRING DATA TO A COMPUTER __________________________ 47 _____________________________ 47 NSTALLING THE IGITAL AMERA RIVER...
-
Page 7: Getting To Know Your Camera
This multi-function digital video camera with a 5.2 Mega Pixel CMOS sensor can take up to 11 mega pixel still images by interpolation. It also can take video in Motion JPEG format in VGA and QVGA resolution. Other features provided by this camera include the following: True 5.0 Mega pixels CMOS sensor... -
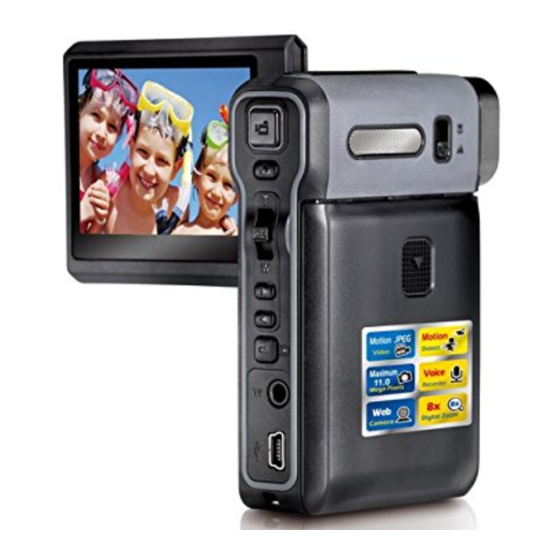
Page 8: Front View
Front View Lens LED light Power Button KeyPad illustration LCD Panel Green /Red LED Movie Shutter Button Picture Shutter Button Enter Button Tele/Wide Button Right Button Left Button TV Out /ear Phone Port Record/Play Button Mini USB 2.0 port Strap hole... -
Page 9: Side View
English Side View Speaker Focus setting Battery cover Microphone... -
Page 10: Getting Started
3. When the card pops out, gently remove it from its slot. NOTE When a memory card is being used, movies and pictures are saved on the card rather than on the built-in memory. Protecting Data on an SD Card SD card is read-only by locking the SD card. -
Page 11: Turning The Camera On And Getting Started
Record Mode. Turning the Camera Off To turn off the Camera, you can either press the Power Button for one second, or you can place the LCD panel back to its original position. -
Page 12: Record Mode
Right Button : Flash ON/OFF/Red-Eye Reduction/Light ON/Auto Left Button: Self-Timer ON/OFF RECORD/PLAY Button functions: 1. Switch between Record/Playback Mode. 2. Return to the previous page. LCD Monitor Information The indicators below will display on the LCD when movies and pictures are recorded: -12-... - Page 13 Resolution Movie : High / Standard/ Picture: High / Standard/ Number of images or recording time of movie that can still be taken at current resolution. SD card inserted Macro Position Focusing White Balance Battery indicator: full power, medium power...
-
Page 14: Movie Recording
The digital zoom magnifies the images when recording movies or taking pictures. 1. To zoom in/out, press the Tele/Wide Button. 2. The digital zoom can be set from 1x to 8x and the magnification ratio is shown on the LCD monitor. -
Page 15: Options For Record Mode
Movie Mode, Camera Mode, Voice Mode, Effect, and Setting Mode. The submenu will appear when you move to each main option. 3. Press Enter to validate the sub option you select. 4. Select Exit option to exit submenu. -
Page 16: Default Setting And Validation
Default Setting and Validation The following table indicates the camera’s default setting as well as its validation. Always: The settings always stay valid. One Time: The setting is only valid once or till camera power is off. Validation Default Factory Setting... -
Page 17: Possible Recording Time / Sec (Video Clip)
English 3. Use Tele/Wide Button to select Resolution then press Enter to switch to Resolution submenu. 4. Use Tele/Wide Button to move between three settings. 5. Press Enter to validate the setting and exit. Display screen Video Resolution Option Enter Button... -
Page 18: Light
There are two flash settings under Movie. To change flash settings, press the hot key (Right Button) or select from the option menu. On ( ): The LED will be turned on and provides light in a low light environment. Off: The LED is turned off. -
Page 19: Sharpness
2. Use Right/Left Buttons to select Movie Mode. The submenu of Movie Mode will appear on the screen. 3. Use Tele/Wide Button to select White Balance, then press Enter to switch to the White Balance submenu. 4. Use Tele/Wide Button to move between the four settings. The change can be previewed immediately. -
Page 20: Motion Detection
4. Use Tele/Wide Button to choose ON or OFF. 5. Press Enter to validate the setting and exit. 6. The camera will start to record video at once if there is movement for three consecutive seconds. It will stop recording if there is no movement for three seconds. -
Page 21: Night Mode
Display screen Night Mode Option Enter Button NOTE To avoid blurry pictures, place the camera on a flat, steady surface, or use a tripod. Camera Mode Setting Picture Resolution To change Picture Resolution: 1. In Movie/Picture Record Mode, press Enter to switch to record menu screen. -
Page 22: Possible Number Of Shots (Still Image)
2. Use Right/Left Buttons to select Camera Mode. The submenu of Camera Mode will appear on the screen. 3. Use Tele/Wide Button to select Two in One then press Enter to switch to the Two in One submenu. 4. Use Tele/Wide Button to choose ON or OFF. -
Page 23: Photo Frame (Camera Mode Only)
2. Use Right/Left Buttons to select Camera Mode. The submenu of Camera Mode will appear on the screen. 3. Use Tele/Wide Button to select Photo Frame option, then press Enter to switch to the Photo Frame submenu. 4. Use Tele/Wide Button to locate the preferred photo frame. Then select the Set option and press Enter to validate the setting and exit. -
Page 24: Flash
5. Press Enter to validate the setting and exit. NOTE The flash will be disabled automatically when battery power is low ( The LED light is available when you use the hot key to change the Flash setting. Display screen Flash Option... -
Page 25: Self-Timer (Camera Mode Only)
Self-timer using either the hot key (Left Button) or Option Setting. The self-timer LED on the front of the camera beneath the flash light will also blink. The speed of the blinking will increase just before the picture is taken. -
Page 26: White Balance
2. Use Right/Left Buttons to select Camera Mode. The submenu of Camera Mode will appear on the screen. 3. Use Tele/Wide Button to select White Balance, then press Enter to switch to the White Balance submenu. 4. Use Tele/Wide Button to move between the four settings. The change can be previewed immediately. -
Page 27: Backlight (Camera Mode Only)
Multi-Snap Option Enter Button Backlight (Camera Mode Only) With the camera set to backlight Mode, you can take shots when bright light is behind the subject. To enable Backlight: 1. In Movie/Picture Record Mode, press Enter to switch to record menu screen. -
Page 28: Night Mode
Use Night Mode for night scenes or low light conditions. A longer exposure captures more detail of background subjects. Display screen Night Mode Option Enter Button NOTE To avoid blurry pictures, place the camera on a flat, steady surface, or use a tripod. -28-... -
Page 29: Voice Mode
To enable voice recording: 1. In Movie/Picture Record Mode, press Enter to switch to record menu screen. 2. Use Right/Left Buttons to move to Voice Option. Then the Voice Submenu will appear on the screen. 3. Use Tele/Wide Button to move between the Enter and Exit Option. -
Page 30: Setting Menu
To change to advanced settings: 1. In Movie/Picture Record Mode, press Enter to switch to record menu screen. 2. Use Right/Left Buttons to move to Setting option, then the Setting Submenu will appear on the screen. 3. Use Tele/Wide Button to move between settings. -
Page 31: Time Setting
English Display screen Start-up Enter Button If you do not want to customize the start up screen, press Left/Right Buttons and select No Start-Up Screen. No Start-up screen Time Setting 1. Move between Date, Time, Set and Exit by using the Left/Right Buttons. -
Page 32: Format Memory
No (Default): Do not format SD Card / built in memory. NOTE All the data will be erased if the SD card is formatted. Make sure all the data is duplicated to the PC before formatting a SD card. TV System Ensure that the appropriate TV standard of your area is selected –... -
Page 33: Default Setting
English Display screen Default Setting To restore the default factory setting, select this option. Display screen Default setting option Enter Button -33-... -
Page 34: Playback Mode
The Playback Mode is for viewing and managing movies and pictures as well as listening to voice or music on the built-in memory or on an optional memory card. Press RECORD/PLAY Button to switch from Record Mode to Playback Mode Main Menu. -
Page 35: Lcd Monitor Information
English LCD Monitor Information Indicators on the LCD screen while in Playback Mode: Mode Indicator Movie Playback Mode Picture Playback Mode Resolution Indicator High Resolution Standard Resolution Low Resolution Indicates the selected movie/picture is locked. Indicates the single movie/voice/MP3 is being repeated. -
Page 36: Movie Playback
Magnification Indicator. Movie Playback Operation Display screen 1. Use Tele/Wide Button or Right/Left Buttons to select the Movie option. 2. Press Enter to go to Movie Playback Mode. 3. Use Right/Left Buttons to go to the next or last movie. -
Page 37: Delete Movies
6. Press Enter Button to exit. NOTE If a memory card is used, you can delete only those movies stored on the card. Movies on a written-protected memory card cannot be deleted. The delete function will only erase unlocked movies. Locked movies must be unlocked before being deleted. -
Page 38: Lock Movies
3. To play a movie, use Right/Left Buttons to select the movie and press Enter to view. Lock Movies Single or all movies can be locked. This function can prevent the movies from being deleted accidentally. Operation Display screen 1. -
Page 39: Repeat Movies
English Repeat Movies This function automatically repeats playing a single movie or all movies in order. Operation Display screen 1. Use Right/Left Buttons to select the Repeat One option or Repeat All option. 2. Press Enter to start repeating. -39-... -
Page 40: Picture Playback
English Picture Playback Operation Display screen 1. Use Tele/Wide Button or Right/Left Buttons to select the Picture option. 2. Press Enter to go to Picture Playback Mode. 3. Use Right/Left Buttons to go to the next or last picture. 4. While the picture is selected, use Tele/Wide Button to magnify. -
Page 41: Thumbnail Function
6. Press Enter to exit. NOTE If you are using a memory card, you can delete only those pictures stored on the card. Pictures on a written-protected memory card cannot be deleted. The delete function will only erase unlocked pictures. Locked pictures must be unlocked before being deleted. -
Page 42: Lock Pictures
English Lock Pictures Single or all pictures can be locked. This function can prevent the pictures from being deleted accidentally. Operation Display screen 1. Use Right/Left Buttons to select the Lock option. 2. Press Enter to go to the Lock menu. -
Page 43: Voice Playback
English Voice Playback Tele/Wide and Right/Left Buttons Function In Voice Playback Mode, the Tele/Wide and Right/Left Buttons have the following functions: Right/ Left Buttons: Select the last or next voice. Tele/Wide Button: Adjust the voice playback volume. Enter Button: Switch to voice option menu. - Page 44 English Delete option Operation Display screen 1. In Voice Playback mode, press Enter to go to the voice playback option menu. 2. Use Tele Button to select Delete option. 3. Use Tele Button to delete all voice recordings and Wide Button to delete a single voice recording.
-
Page 45: Listening To Mp3 Music
Transfer MP3 Music to the camera 1. Connect your camera to the computer USB port. 2. The red LED will light when the camera is connected to the computer and is in Mass Storage Mode. 3. Transfer MP3 music to My Computer\Removable Disk\MP3. -
Page 46: Viewing Movie On Pc
3. The option menu of Earphone/TV pops out on the LCD Screen. 4. Choose TV option and press Enter to validate the setting. 5. The steps for viewing stored pictures and movie on a TV are exactly the same as for viewing them on the LCD monitor. -
Page 47: System Requirement
Connecting Your Camera to a Computer You can transfer pictures, movies or voice recordings stored on your camera to a computer and send them in emails to friends or post them on websites. To do this you should: 1. Install the camera driver on your computer. -
Page 48: Mass Storage Device Mode
To install the bundled software: 1. Insert the CD-ROM into your computer’s CD-ROM drive. The autorun screen appears. 2. Select the software you want to install from the list, then click it. Follow the on-screen instructions to complete the installation. NOTE To install the bundled software on Vista, please visit http://www.arcsoft.com/... -
Page 49: Burning The Recorded Clip Into Dvd
English Burning the Recorded Clip into DVD ArcSoft Showbiz DVD is for burning the movie clip into a DVD. You can preserve your precious movies on a DVD to share with family and friends. To create a DVD: 1. Install Arcsoft Showbiz DVD 2. - Page 50 English 5. Click ” Create ” 6. Click “ Start “ to start DVD burning -50-...
-
Page 51: Specifications
5.2 Mega Pixel CMOS Sensor Lens F3.2 (f=7.0mm) Focus Range Marco: center 20cm; Normal: 150cm~infinite LCD monitor 2.4” TFT LCD (480 x 240) Digital Zoom Shutter Type Electronic, 1/15000-1/8 sec Storage Media 64 MB built-in memory, SD Card expandable up to 2GB... -
Page 52: Troubleshooting
English Troubleshooting Refer to the symptoms and measures listed below before sending the digital video camera for repairs. If the problem persists, contact your local reseller or service center. Power Supply Symptom Cause Measure The power does not The battery is not loaded. - Page 53 Format the memory card in the The memory card is digital video camera before its unrecognized by the first use or when it was used digital video camera. other than this digital video camera. The auto power off Turn the power on again.
- Page 54 The image is too dark. The image was captured in Set the flash to a dark place while set to something other than flash off. flash off mode. Set the exposure It is under-exposed.
- Page 55 English Other Problems Symptom Cause Measure Cannot load the The card is facing the wrong Load correctly. memory card. way. Even when the digital Replace with a new set The battery is running low. video camera’s of batteries. buttons are pressed, it...
Need help?
Do you have a question about the DV5131 and is the answer not in the manual?
Questions and answers