Table of Contents
Advertisement
Quick Links
Advertisement
Table of Contents

Summary of Contents for Rovin MB3920
- Page 1 MB3920 12VDC 25A 8-Step Lead Acid and Lithium Battery Charger INSTRUCTION MANUAL...
-
Page 2: Table Of Contents
CONTENTS Warnings & Safety Information ..............3 Box Contents ......................5 Product Diagram ....................5 Before First Use....................6 Features ........................6 8-Stage Automatic Charging ...............6 Switchmode Technology ................10 Protective Features ...................10 Charge Status Indicator ..................12 Charging Instructions ..................14 Mounting Instructions ..................17 Permanent Wiring to Battery ...............18 Adjustable Charge Rates ................19 Troubleshooting ....................19 Frequently Asked Questions ................20... -
Page 3: Warnings & Safety Information
WARNINGS & SAFETY INFORMATION • Explosive gases may escape from the battery during charging. Prevent flames and sparks. Provide adequate ventilation. • Before charging, read the instructions. • For indoor use. Do not expose to rain. • For charging 12V Lithium-ion with LiFePO4 batteries and Lead Acid batteries ONLY. - Page 4 Safety • The charger is designed for charging 12V Lithium batteries and lead-acid batteries and provide power supply mode giving a constant voltage of 13.8V to provide power for appliances. Do not use the charger for any other purpose. • Check the charger cables prior to use. Ensure that the cable is in good repair.
-
Page 5: Box Contents
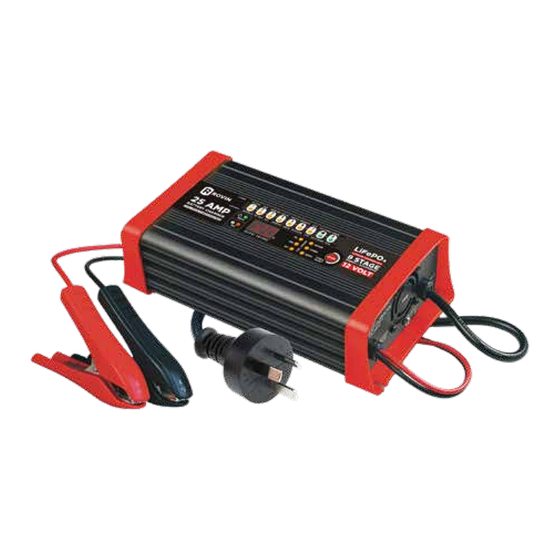
BOX CONTENTS 1x Battery Charger PRODUCT DIAGRAM 1. Mode button 8. Power Cord 2. Stage status display indicates 9. Thermostatically controlled power, charging and fully cooling fan. charged. 10. Ground terminal 3. Power indicator 11. Mounting flange 4. Fault indicator 12. -
Page 6: Before First Use
BEFORE FIRST USE Prior to using your product, please read all the safety and operating instructions thoroughly. Please ensure you follow the steps below before using the product. We recommend you keep the original packaging for storing the product when not in use. Please pay close attention to the section entitled Warnings &... - Page 7 STEP LIMIT 1. Soft Start 25% Current until 11V Max 30s 2. Bulk 100% Current until 13.8V Max 10h 3. Absorption Constant 13.8V until current drops 30 mins to 15% 4. Analyse Checks if voltage drops to 12V 3 mins 5.
- Page 8 Lead Acid Battery Mode STEP CALCIUM LIMIT Max 8h Desulphation 2. Soft Start Half the rated until 12.5V Max 8h 3. Bulk 100% current until Max 24h 14.1V 14.4V 14.7V 4. Absorption Constant until current drops to 15% 30 mins 14.1V 14.4V 14.7V...
- Page 9 STEP 1 DESULPHATION seconds to determine if the charge was successful. The Desulphation stage may break down sulphation that occurs in • 12V charger If the voltage is below batteries that have been left flat for 13.2 volts (fail), the charger will extended periods of time, returning initiate the Recondition stage.
-
Page 10: Switchmode Technology
battery at 100% charge without automatic charging cycle, the cycle overcharging or damaging the is repeated infinitely. If the terminal battery. This means the charger can voltage drops below a lower limit, be left connected to the battery the charger automatically goes back indefinitely. - Page 11 DISCONNECT PROTECTION The charger has entered the energy save mode. This happens if the charger isn’t connected to the battery in 2 minutes. OVER VOLTAGE PROTECTION Lithium battery mode The 12V lithium battery charger will automatically protection if the voltage is higher than 15.5V.
-
Page 12: Charge Status Indicator
CHARGE STATUS INDICATOR The LITHIUM BATTERY CHARGING and STAGE LIGHT will illuminate and flash in various patterns to indicate the different stages of charging. See below for flash / steady patterns. POWER STAGE LIGHT FAULT ON LIGHT LIGHT DISPLAY Power Off Power On 1. - Page 13 The Lead Acid battery CHARGING and STAGE LIGHT will illuminate and flash in various patterns to indicate the different stages of charging. See below for flash / steady patterns. POWER STAGE LIGHT FAULT ON LIGHT LIGHT DISPLAY Power Off Power On Flashing Flashing Flashing...
-
Page 14: Charging Instructions
CHARGING INSTRUCTIONS 1. Settings are made by pressing the MODE-button. After about two seconds the charger activates the selected program. The selected program will be restarted next time the charger is connected. 2. When the charging process is interrupted, press the ON/OFF button, and then restart the charger. - Page 15 A) Negatively earthed (most vehicles) Connect the RED lead (battery clip) from the charger to the Positive (+) battery terminal. Connect the BLACK lead (battery clip) from the charger to the vehicle’s chassis away from the fuel line or moving parts. B) Positively earthed Connect the BLACK lead (battery clip) from the charger to the Negative (-) battery terminal.
- Page 16 In a boat, connect to the boat’s grounding systems. In a fixed location, connect to earth. MB3920 STEP 3 CONNECT TO 220-240V AC MAINS POWER Connect the battery charger to the 220-240V AC mains powered socket and turn on the mains power.
-
Page 17: Mounting Instructions
MOUNTING INSTRUCTIONS 8-stage chargers are designed for indoor, out of weather use only. Ensure that both charger and battery are in a well-ventilated space during charging. The battery charger end plates include a mounting flange for easy mounting. If permanently fixed the charger should be mounted to a suitable horizontal or vertical panel, with at least 10cm clearance from the end plates to provide adequate ventilation for the cooling fan. -
Page 18: Permanent Wiring To Battery
PERMANENT WIRING TO BATTERY It is possible to hard wire the DC charging leads to the battery for permanent installations. You will need 2 x ring terminals, an inline fuse holder and a fuse with a rating equal to or more than twice of the chargers output. (See below) 13A = 26 Amp fuse 25A = 50 Amp fuse Connection: 1. -
Page 19: Adjustable Charge Rates
ADJUSTABLE CHARGE RATES BATTERY SIZE CHARGE RATE BATTERY SIZE (AH) CHARGER TIME (HRS) Lithium 12V 25Amp 50-250 2-14 Lead Acid Battery 12V 25Amp 200-600 7-24 TROUBLESHOOTING FAULT POWER STAGE FAULT CAUSE REMEDY LIGHT LIGHT LIGHT Polarity Lithium Short circuit or reverse Check clips are reverse (Flashing) -
Page 20: Frequently Asked Questions
FREQUENTLY ASKED QUESTIONS How do I know if the battery is charged? The charger’s FULLY STAGE LIGHT will illuminate (solid). Alternatively use a Battery Hydrometer A reading of 1.250 or more in each cell indicates a fully charged battery. I have connected the charger properly but the ‘STAGE LIGHT’ does not come on? In some cases batteries can be flattened to the point where they have very little or no voltage. -
Page 21: Specifications
SPECIFICATIONS Charger Type 8-stage Automatic Input Voltage 220-240V~, 50/60Hz Input Power 428W Output Voltage 12V DC Output Current Minimum Start Voltage Lead Acid: 2.0V Lithium: 1.0V Back Drain 1.5mA Current Fuse Rating 220-240V , T5A, 250V AC Lithium Battery Charge Control Soft Start 25% Current until 11V Bulk... - Page 22 Lead Acid Battery Charge Control Desulphation Pulse charge up to 11V Soft Start Half the rated set current up to 12.5V Bulk 25A up to 14.1V (GEL) 14.4V (AGM) 14.7V (WET) 14.7V (CALCIUM) Absorption Constant voltage until current drops to 3.75A Analyse Monitors voltage for 90 seconds Recondition...
- Page 23 Battery Range Deep Cycle 50-250Ah / 167-500Ah Types of Batteries Most types of 12VLithium-ion LiFePO4 batteries and LeadAcid batteries including WET, MF, Calcium, AGM and GEL Dimension (LXWXH) 217 X 116 X 62mm Weight 1.32Kg...
-
Page 24: Warranty Information
WARRANTY INFORMATION Our product is guaranteed to be free from manufacturing defects for a period of 12 Months. If your product becomes defective during this period, Electus Distribution will repair, replace, or refund where a product is faulty; or not fit for intended purpose.
Need help?
Do you have a question about the MB3920 and is the answer not in the manual?
Questions and answers