Advertisement
Advertisement
Table of Contents

Related Manuals for Packard Bell airFrame WS21500BK

Summary of Contents for Packard Bell airFrame WS21500BK
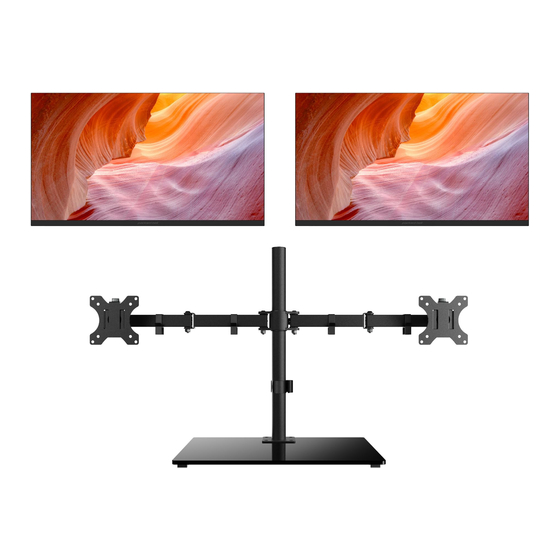
- Page 1 43” Dual Monitor Workstation Total Display Area WS21500BK Quick Start Guide...
- Page 2 In the Box 43” Dual Monitor Workstation Total Display Area WS21500BK Quick Start Guide 21.5” Monitor (x2) Quick Start Guide HDMI Cable (x2) Power Adapter (x2)
- Page 3 VESA Plates (x2) VESA Arms Pole Glass Base Wire Clips (x4) Wire Clip 3mm Hex Wrench With Tool Holder Phillips Screwdriver Phillips Head Screws (x8) Hex Flat Head Screws (x4)
- Page 4 Assembling the VESA Stand 1. Assembling the Base Stand F R O N T...
- Page 5 2. Mounting the VESA Arms to the Base Stand BACK Wire Clips VESA Arms Wire Clip With Tool Holder...
- Page 6 3. Tightening or Loosening the VESA Arms BACK Grab the lever and rotate clockwise to tighten or counter-clockwise to loosen the VESA arms. Rotate clockwise to tighten Rotate counter- clockwise to loosen...
- Page 7 Pull the lever outward, and while holding it in the outward position, rotate it clockwise or counter-clockwise to continue loosening or tightening the VESA arms. Where the lever rotation reaches its maximum limit Pull outward NOTE: Lock the VESA arms at the desired viewing height.
- Page 8 4. Attaching the VESA Plates to the Monitors Attach the VESA plates to the monitors as shown below.
- Page 9 5. Mounting the Monitors to the VESA Arms i) Unscrew the knobs Knob from the VESA arms. ii) Slide the monitors into the VESA arms.
- Page 10 iii) Screw the knobs back into the VESA arms. NOTE: To adjust the height of the VESA arms after assembly, please remove the monitors from the VESA arms and follow the instructions mentioned on pages 5-6.
-
Page 11: Buttons & Ports
Buttons & Ports Monitor (Back view) VESA Mount Power Button & Menu Navigation Monitor (bottom view) HDMI Port VGA Port Power Port... -
Page 12: Connecting The Power Cable
Connecting the Power Cable Insert the included power cable into the monitor's DC power port as shown below and connect the other end to a wall outlet. Monitor (bottom view) DC Power Port Wall Outlet Power Cable... -
Page 13: Connecting The Hdmi Cable
Connecting the HDMI Cable Monitor (bottom view) HDMI Port HDMI Port VGA Port You can also connect the monitor to the PC with a VGA cable using this port. HDMI Cable... - Page 14 Setting Up on Windows/Mac WINDOWS To get your PC to recognize multiple monitors, make sure your cables are connected properly to the new monitors, and follow these steps: 1. Select Start > Settings > System > Display. 2. Your PC should automatically detect your monitors and show your desktop. If you don't see the monitors, select ”Detect”.
- Page 15 When you connect one or more external displays to your Mac, you can choose what appears on each display. To do so, follow below steps: On your Mac, choose Apple menu � > System Settings, then click Displays � in the sidebar (You may need to scroll down).
-
Page 16: Legal Information
Legal Information FCC Information This device complies with Part 15 of the FCC Rules. Operation is subject to the following two conditions: (1) This device may not cause harmful interference, (2) This device must accept any interference received, including interference that may cause undesired operation. - Page 17 IC Statement CAN ICES-003(B) / NMB-003(B) This device contains license-exempt transmitter(s)/receiver(s) that comply with Innovation, Science and Economic Development Canada’s license-exempt RSS(s). Operation is subject to the following two conditions: 1. This device may not cause interference. 2. This device must accept any interference, including interference that may cause undesired operation of the device.
-
Page 18: Limited Warranty
Limited Warranty 1-Year Limited Warranty Territory: United States LIMITED WARRANTY TO ORIGINAL CONSUMER This product as supplied and distributed new by an authorized retailer is warranted by Southern Telecom, Inc. to the original consumer purchaser against defects in materials and workmanship (“Warranty”) as follows: To obtain warranty service: •... - Page 19 PERSON, FIRM OR ENTITY WITH RESPECT TO THE PRODUCT SHALL BE BINDING ON DISTRIBUTOR. REPAIR, REPLACEMENT, OR REFUND OF THE ORIGINAL PURCHASE PRICE - AT DISTRIBUTOR’S SOLE DISCRETION - ARE THE EXCLUSIVE REMEDIES OF THE CONSUMER. IN NO EVENT WILL DISTRIBUTOR OR ITS MANUFACTURERS BE LIABLE FOR ANY INCIDENTAL, DIRECT, INDIRECT, SPECIAL, PUNITIVE OR CONSEQUENTIAL DAMAGES (SUCH AS, BUT NOT LIMITED TO, DAMAGES FOR LOSS OF PROFITS, BUSINESS, SAVINGS, DATA OR RECORDS) CAUSED BY THE USE, MISUSE OR INABILITY TO USE THE...
Need help?
Do you have a question about the airFrame WS21500BK and is the answer not in the manual?
Questions and answers