Table of Contents
Advertisement
Quick Links
Open Acoustic Devices
AudioMoth Operation Manual
theteam@openacousticdevices.info
June 7, 2021
This operation manual is designed for both new and experienced AudioMoth users. It describes how to configure
an AudioMoth device and how to change its on-board firmware. It also presents general tips for deployment,
along with additional information, useful for maximising the utility of AudioMoth.
Contents
1.1 Support . . . . . . . . . . . . . . . . . . . . . . . . . . . . . . . . . . . . . . . . . . . . . . . . . .
1.2 Visual tour . . . . . . . . . . . . . . . . . . . . . . . . . . . . . . . . . . . . . . . . . . . . . . . . .
2.1 Purchasing SD cards . . . . . . . . . . . . . . . . . . . . . . . . . . . . . . . . . . . . . . . . . . .
2.2 Purchasing batteries . . . . . . . . . . . . . . . . . . . . . . . . . . . . . . . . . . . . . . . . . . .
3.1 Modes . . . . . . . . . . . . . . . . . . . . . . . . . . . . . . . . . . . . . . . . . . . . . . . . . . .
3.1.1 USB/OFF . . . . . . . . . . . . . . . . . . . . . . . . . . . . . . . . . . . . . . . . . . . . .
3.1.2 CUSTOM . . . . . . . . . . . . . . . . . . . . . . . . . . . . . . . . . . . . . . . . . . . . .
3.1.3 DEFAULT . . . . . . . . . . . . . . . . . . . . . . . . . . . . . . . . . . . . . . . . . . . . .
3.2 What do the flashing LEDs mean? . . . . . . . . . . . . . . . . . . . . . . . . . . . . . . . . . . . .
3.3 Recordings . . . . . . . . . . . . . . . . . . . . . . . . . . . . . . . . . . . . . . . . . . . . . . . . 10
3.4 Clock . . . . . . . . . . . . . . . . . . . . . . . . . . . . . . . . . . . . . . . . . . . . . . . . . . . . 10
4.1 AudioMoth Configuration App . . . . . . . . . . . . . . . . . . . . . . . . . . . . . . . . . . . . . . 11
4.2 Choosing a sample rate . . . . . . . . . . . . . . . . . . . . . . . . . . . . . . . . . . . . . . . . . . 11
4.3 Choosing a gain level . . . . . . . . . . . . . . . . . . . . . . . . . . . . . . . . . . . . . . . . . . . 12
4.4 Creating a schedule . . . . . . . . . . . . . . . . . . . . . . . . . . . . . . . . . . . . . . . . . . . . 12
4.5 Filtering . . . . . . . . . . . . . . . . . . . . . . . . . . . . . . . . . . . . . . . . . . . . . . . . . . 13
4.6 Advanced settings . . . . . . . . . . . . . . . . . . . . . . . . . . . . . . . . . . . . . . . . . . . . . 13
4.7 Amplitude threshold recording . . . . . . . . . . . . . . . . . . . . . . . . . . . . . . . . . . . . . 14
4.7.1 Usage . . . . . . . . . . . . . . . . . . . . . . . . . . . . . . . . . . . . . . . . . . . . . . . 14
4.7.2 Expanding amplitude threshold recordings . . . . . . . . . . . . . . . . . . . . . . . . . . . 15
4.7.3 Splitting recordings . . . . . . . . . . . . . . . . . . . . . . . . . . . . . . . . . . . . . . . . 17
4.8 Estimating lifespan . . . . . . . . . . . . . . . . . . . . . . . . . . . . . . . . . . . . . . . . . . . . 18
5.1 AudioMoth IPX7 Waterproof Case . . . . . . . . . . . . . . . . . . . . . . . . . . . . . . . . . . . . 20
6.1 AudioMoth Flash App . . . . . . . . . . . . . . . . . . . . . . . . . . . . . . . . . . . . . . . . . . . 21
6.4 Automatic bootloader updates . . . . . . . . . . . . . . . . . . . . . . . . . . . . . . . . . . . . . . 22
3
3
4
5
5
5
6
6
6
6
6
7
11
20
21
Advertisement
Table of Contents

Summary of Contents for Open Acoustic Devices AudioMoth
-
Page 1: Table Of Contents
5.1 AudioMoth IPX7 Waterproof Case ........ - Page 2 7.2 AudioMoth mobile app ........
-
Page 3: Audiomoth Overview
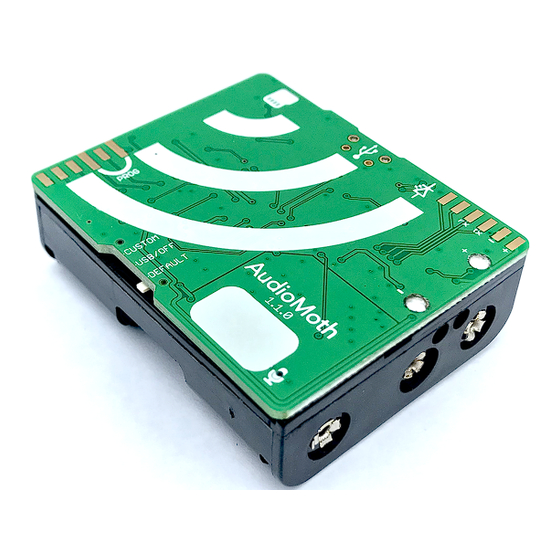
8,000 to 384,000 samples per second. Figure 1: AudioMoth 1.1.0: A low-cost, low-power acoustic monitoring device developed for a wide variety of conservation projects. Released in 2017, AudioMoth has received constant support in the form of hardware, firmware and supporting software updates from the Open Acoustic Devices team. -
Page 4: Visual Tour
Section 2.1. Programming header: A series of pins which can be used to apply firmware to the AudioMoth. Status LEDs: A green and a red LED used to communicate the status of the AudioMoth. See Section 3.2 for more information. -
Page 5: Preparation
From AudioMoth firmware version 1.2.2 onwards both FAT32 and exFAT file formats are fully supported. However, if you are using an earlier version of the AudioMoth firmware ensure that your SD card is reformatted as a MS-DOS (FAT32) card prior to use, or re-flash you AudioMoth to use the newer firmware (for instructions on how to do this, read Section 6). -
Page 6: Usage
3 Usage 3.1 Modes The switch on the side of the AudioMoth controls the current mode of the device. AudioMoth has three modes of operation: USB/OFF, CUSTOM, and DEFAULT. Figure 3: An AudioMoth plugged in and ready for communication with one of the many supporting applications. -
Page 7: What Do The Flashing Leds Mean
AudioMoth Operation Manual 3.2 What do the flashing LEDs mean? AudioMoth has two colour LEDs, visible on the side of the device. Various combinations of these two LEDs flashing represent different modes of operation or tasks it is carrying out. - Page 8 AudioMoth Operation Manual A long flash (500ms) of both LEDs occurs when there is a recording failure, due to an SD card write error or a low battery, that results in a recording being cut short. Short flashes (10ms) of both LEDs between recordings mean an earlier scheduled recording has been cut short due to a recording failure.
- Page 9 There are two battery level modes. The default one is intended for use with standard alkaline batteries (left), and a second more precise scale is available for use with NiMH and LiPo batteries (right). The second scale is selected using the “Use NiMH/LiPo voltage range for battery level indication” setting in the AudioMoth Configuration App (see Section 7).
-
Page 10: Recordings
UTC (Co-ordinated Universal Time). UTC is equivalent to GMT (Greenwich Mean Time) and does not change with daylight savings. Whether an AudioMoth uses local time or UTC time is a setting which is chosen when its configuration is applied (see Section 4.4). -
Page 11: Configuring A Device
4.2 Choosing a sample rate The first step to configuring an AudioMoth device is setting the sample rate. The sample rate is the number of audio samples captured per second. Higher sample rates result in recordings with a wider frequency bandwidth, but larger file sizes. -
Page 12: Choosing A Gain Level
4.4 Creating a schedule When configuring an AudioMoth for deployment you will likely wish to assign it a recording schedule. During the chosen recording periods an AudioMoth will either record constantly and produce files the length of the recording period or use the cyclic recording settings entered on the Recording Settings tab. -
Page 13: Filtering
CUSTOM mode. If this is checked, then when switched to CUSTOM, even if the time has been set, the AudioMoth will wait for an acoustic chime before commencing the configured schedule. This chime could come from an AudioMoth mobile app, or any application implementing the acoustic chime generation (such as the RFCx Companion). -
Page 14: Amplitude Threshold Recording
4.7 Amplitude threshold recording 4.7.1 Usage Amplitude threshold recording is a recording mode where an AudioMoth will only collect samples when their amplitude exceeds a certain value. By default, this range is displayed as between 0% and 100% of full-scale amplitude. -
Page 15: Expanding Amplitude Threshold Recordings
Figure 10: Duration-based expansion settings which would expand an AudioMoth T.WAV file to create a set of recordings up to 10 seconds in length, skipping any files which would contain only silence. - Page 16 Figure 13: File/folder selection for expansion targets. Finally, either one or more AudioMoth T.WAV files can be selected at once, or a directory containing multiple T.WAV files. When Expand Recordings is pressed the expansion process starts. Closing the progress bar window will cancel the operation.
-
Page 17: Splitting Recordings
(on Mac press Figure 14: Recordings produced by AudioMoth can be split into shorter, more manageable files using the inbuilt split utility. Select the max length each recording should be, then select a prefix to append to the resulting files and/or an alternate output destination (to prevent the original files from being overwritten). -
Page 18: Estimating Lifespan
Figure 15: Approximate energy and storage calculations produced by the AudioMoth Configuration App, given a recording schedule. Be sure to pick batteries and microSD cards with sufficient capacity for your deployment (see Sections 2.2 and 2.1). -
Page 19: Saving And Loading Configurations
With this you can produce a standard configuration and distribute it to anyone carrying out a deployment. AudioMoth configuration files use the “.config” file extension and can be read with a standard text editor. To save your current configuration, click Save Configuration in the File menu or press... -
Page 20: Cases And Protection
Producing your own bespoke protective case is one option, however special care must be take to avoid limiting the acoustic sensitivity of the AudioMoth’s microphone. It is for this reason that we recommend either deployment in grip-sealed plastic bags or an official AudioMoth IPX7 Waterproof Case, depending on the level of protection required. -
Page 21: Updating And Applying New Firmware
AudioMoth is supported with regular firmware updates which fix bugs as they are discovered and add additional functionality to the device. In order to receive these updates you will need to use the AudioMoth Flash App to download and apply new firmware versions. -
Page 22: Flashing With Custom Firmware
firmware implementation. Once the custom firmware has been compiled for distribution, the resulting .bin can be applied to a device using the AudioMoth Flash App by clicking the Use Local File tab. Figure 18: The AudioMoth Flash App can apply custom firmware using binaries you have downloaded or compiled yourself. - Page 23 AudioMoth Operation Manual 7 Setting the clock For most users with the default AudioMoth firmware, setting the clock on an AudioMoth device is done using the AudioMoth Configuration App (described in Section 4). However, non-standard firmware is not required to support the Configuration App, meaning it may not be possible to set the clock this way.
- Page 24 7.2 AudioMoth mobile app The AudioMoth mobile app can be used to set the clock of a device using a short acoustic chime. This chime is encoded with the current time and can be used to set the clock without a USB cable or computer. Download the app from either the iOS or Google Play store, set an AudioMoth without a set clock to CUSTOM mode, and press “Play Chime”.
- Page 25 This operational manual was produced by Open Acoustic Devices. Thanks to Tessa Rhinehart who produced an early AudioMoth guide which has helped the AudioMoth community greatly and informed which topics are useful for a new AudioMoth user to include in this guide.
Need help?
Do you have a question about the AudioMoth and is the answer not in the manual?
Questions and answers