Advertisement
Quick Links
PHl[TG@
RADIO
SERVICE BULLETIN
No.
363
liloil*
4/-agg,
4/-goo
SPECIFICATIONS
llodelr 4l-2Od rnd
41-8OO
are alterne.tlng current (--\.
C.)
operated super-heterodyne
radios incorporatlng Electrle
Push-
Button
and
ilanun.l
Tunlnxg,
and
the
new Philco
Bullt-ln A[rerl-
crn rnd olef$eaa -i\erlal il'item.
These models are
also
designed
to
receive
the
sound
of a televlrlon
progiralrr
tuned
irt
by
special
type Philco television
radlos.
The
models
ale
excep-
tlonelly sensltlve and selective on all tuning
frequencics
covered.
fn general,
these urodels
are similar with the exception
of
the ninrber of tuber used and cnltlnet derlfrr. Model
4l-295
employs eleven (11) tubes and Model
11-300,
twelve (12)
tubes.
Other
featur:es
of design included in each model are:
Philco
Loktal tubes; new
noise-reducing
converter tube (xxl,),
four'
(4)
tuninEi bands;
two I. F.
stag:es;
continuously variable
tone
control; audio bass
compensatlon
ln the volume control cir-
cuit:
de8:enerative
l)ush-pull
pentode audlo
output.
operated
by
a push-pull driver
stage: movable band
indicator: off-on
power
swltch controlled by a push-button and a new
1.1" balanced
fleld electro-dyrlamic
speaker,
ELECTRIC PUSII-BUT'rON TtiNlN(;t
The automatic
tUning
mechanism
of
each model
ls ldentical and conslsts of
eight
(8) electric tuning push-buttons;
seven
(7) of the
push-but-
tons are
used
for
selecting:
broadcast stations,
and,
one
as
the
power
contt'ol
(On-Off swltch).
The
lowest
frequency
statlon
push-button labeled "Televislon"
can
be adJusted
for receptlon of the
sound
channel of a
tele-
vlaion
prog:ram received
by Philco television sets. This
push-
button may
also
be
used
ln conjunctlon with a Philco
Wlreless
Record Player.
AEIIIAL
CONNECI'TONS:
The built-ln loop aerlal system
is
designed
to operate
without
an
outslde aerlal or ground,
and
to
give exceptionally sensitive
receiving:
performance
on
stationb
on standard and shortwave
frequencles.
Another
featur,e
is
its noise-reducing characteristic. The loop can be tutned
to
the position in rvhich it picks up a mlnlmurrl amount
of
To adjust
the
electric
push
buttons accurately
for
reception
of
broadcast
stations,
a vacuum tube
voltmeter
such as Philco
Models 027
and 028 should be
used.
In
addition, an
insulated
padding screw
driver, Part No.
45-2610,
and
Loktal
aligning
adapter,
Part No.
45-2767,
are required.
With this
equipment
at
hand
proceed as
follows:
Select
seven
of
the most popular stations
received
in
the
locality.
Insert the station call letters into the
spaces above
the
buttons.
The station
with
the
lowest frequency
is
placed
in
the
second
button
on
the
left
and
the
highest frequency
is
placed
in the
eighth
push
button
on
the
right.
Each push
but-
ton is
adjusted
by two
adjusting
screws located on
the
rear
of
the
chassis. Each set
of
screws
is numbered
and labeled
"Ant.",
"Osc,"
and covers
a
frequency range as follows:
lntelfelence, or if interference is not
present,
the loop
may
be
set in ttre positlon whele best reception is
obtained.
\\rhen
oDerating
the ladlo in steel reinforced buildings
and
other
shie.lded
loaations, the Phllco
1941
Outdoor Aerial Part
No.
15-2817,
is
recommended
for
rnaximum qeceiving perform-
ance.
The
outdool'
aelial tan be easily
connected
to the
radio
by inserting the plug attached to the transfornrer unit
into
t[e socl(et-Drovidtd-at
the rear of the
chassie.
This
aerial
uan
be obtained flunr your local Philco distributor'. A
8:round
connection
is not required wlth either type of installation.
PO\VITR SUPPI.YT 115
volts,
60
cycle
^{.
C.
'lhese
models
can alco
be oDerated rrn
25
cycle
current.
To
do
this it is
necessary
to
replace
the
60
cycle power
transformer
with a
25
cycle transforncr
&s
indiceted
in the parts
lists,
t,owER
(:ONgur[PTlON3
Model
41-295
-
110
watts
Model
41-300-110 watts
M. C.:
9.0
to
12.0
M. C.:
13.5
to
18.0
M.
C.
IN'IIIR,DIEDI-{TE
FR,EQUENCYT
465
K.
C.
AUDIO
OUTPUTT
5
wetts,
PIiILCO
TUBES USEDr
Moalel
4l-2e{t,
l)lcveD
ttbes! XXL,
R.
tr'.
Mixei; XXL, oscillator; two ?87, I. F. empliflers;
7C6,
znd
detector, 1st audio,
A, V.
C.;
two
3?,
audio
drlvers;.
37, phase
inverter: two
42,
audio output; and an
80,
rectifier.
Model
41-3OO,
'lwelve tuberr XXL, R.
tr',
Mixer; XXL,
oscil-
lator; two
787,
I. F. amplifiers;
?^4.6,
znd detector,
A. V.
C,;
7C6,.1st audio; 3?,
pha.se
inverteri two 37, audio
drivers;
two
42,
audio output; and an
80,
rectiffer.
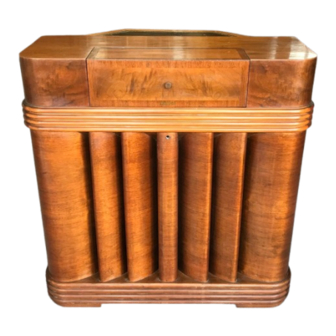
C.lllINET
DIMENSIONST
Model
Heisht
4l-296
36r/2'
41-300
35rk"
Width
Depth
36,
t37/e,'
35y2,
14,
nEuovnrc
cHAssIs
To
remove
the
chassis
from the
cabinet,
it
will
be necessary
to take off
the
bezel
and
remove
the two
screws
which
hold
the
front of
the
chassis
to
the
cabinet.
In
addition,
the
four
shipping
bolts
underneath
the
chassis
shelf must
also
be
removed.
ADIUSTnTG ELECTRIC PUSH BUTTON
TUNTNC
Looking
at
the
front of the
cabinet,
the
second
button
on
the
left is
adjusted
by adjusting
screw
No.
1.
The
next
push
button
by adjusting
screw No.
2
and
the remaining
push
but-
tons
in
order.
1.
Remove
the
7C6
A. F.
tube
from
its
socket and insert
the aligning adaptor, then
replace
the.tube
in
the
adaptor.
Connect
the
negative
terminal
of
the
vacuum tube voltmeter
to the wire
which protrudes
from the
side
of the
adaptor.
Attach the
positive
terminal
of
the voltmeter
to the
chassis.
2.
Press
in
"Off-On"
push
button.
Turn "Band
Selector"
to
"broadcast"
position.
3.
Set
up
the
Model 077
Station Setter
near
the
receiver
and
connect
a
loop
aerial
(made
from
a
few turns
of wire
1.2
inch
in
diameter)
to
the
high
and ground output jacks
of
the
signal
generator.
Turn the output
controls
to
maximum
and
set
the
modulation control
to "MOD.
ON,"
4.
Manually
tune'in the
station
to
be
set
up
on
the first
push button.
After
doing
this set the
indicator
of
the
077
Signal
Generator
to the
frequency
of the
station being
re-
ceived.
As
the
indicator
approaches
the
frequency
of the
sta-
tion
a
whistle
will
be
heaiil;
leave
the
indicator
it
this
point.
5.
Turn "Band Selector"
down
to
the position
where
the
call letters
are
illuminated. Using
the insulated
screw
driver,
turn the "Osc."
screw
until
the
broatlcast
station
identified
by the
signal generator
is heard; at this
point,
turn
the indi-
cator
of
the signal
generator away
from the
frequency of
the station.
Readjust
No, 1 "Osc." and "Ant."
screws
for
maximum
deflection
of
the
vacuum
tube voltmeter
pointer.
The push
button
is
adjusted
properly
to
the station
at
this
point.
After
setting up
the first
station
the
same procedure
as
outlined
above
is
used
for the
remaining stations.
If
these
models
are
set
up to
receive
the
sound
of
a
television program
tuned
in by
special
type
Philco Television Sets
or
to
be
used
in
conjunction
with a
Philco
Record
Player,
the
lowest fre-
quency push
button
should be
used.
To
set
up
these programs,
the
same procedure
as given
for
broadcast stations
above
is
used.
Further details
for
setting
up
this
receiver
for
operation
with
Philco Television Sets
or
-Record
Players are
lupplied
with the
instruments.
Push Button
1,2,3
4,
5,
6,7
Frequency
Range
540-1030
K.
C.
650-1160
K.
c.
900-1600
K.
c.
Advertisement


Need help?
Do you have a question about the 41-295 and is the answer not in the manual?
Questions and answers