
Summary of Contents for DELTA DORE Pack TYMOOV Solar 10
- Page 1 Pack TYMOOV Solar 10 / 15 Solar roller shutter motor packs ................2...
- Page 2 - Before installing the motor, remove all superfluous cords and receivers. take out of service any equipment not required for the motor to They are only compatible with remote controls from the DELTA DORE operate. X3D range: TYXIA 1701, TYXIA 2331 and TYXIA 1716.
- Page 3 France France Par la présente, DELTA DORE déclare sous sa seule responsabilité que le produit ci-dessus est en conformité avec la Par la présente, DELTA DORE déclare sous sa seule responsabilité que le produit ci-dessus est en conformité avec la operations, so the motor automatically compensates for any apron législation d'harmonisation de l'Union Européenne :...
- Page 4 - After storage in excess of 6 months, only use the Delta Dore - Handle with caution. Do not subject to mechanical impact. 6357034 (x1) to recharge the batteries.
-
Page 5: Table Of Contents
• Power supply: 12 Vcc 2/ Use ..........................10 CR2430, TYMOOV solar motors can only be used 3/ Installation .......................11 with the DELTA DORE batteries supplied - Class III insulation, with the motors: 3.1 Installing the tube ......................11 • Maximum wireless power < 10 mW, TYMOOV 10 SO - 15 SO: 10S1P1 2200 Ni- 3.2 Installing the motor ...................... -
Page 6: 1/ Pack Composition
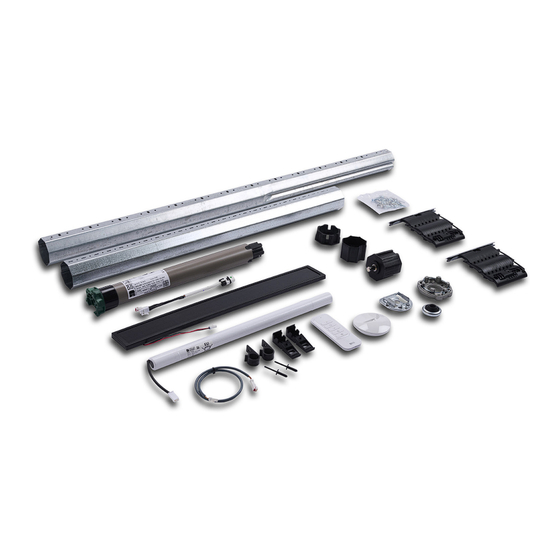
1/ Pack composition 3/ Installation Contents of the Tymooc Solar 10 PACK: 1 TYMOOV SO 10 Nm wireless motor 3.1 Installing the tube 2 telescopic tubes 1 TYXIA 1701 remote control ❶ Fully lower the shutter. 1 mount for remote control 1 tube plug 2 fasteners connecting the roller shutter to the tube 1 tube mounting screw kit + fasteners... -
Page 7: Installing The Motor
3/ Installation 3.2 Installing the motor ❻ Détermine the length of the new tube. - Measure the distance between the 2 mounts. - Calculate the length of the tube. • Never strike the motor head or output shaft to fit the motor into the tube. Never pierce the tube when the motor is installed. -
Page 8: Installing The Fasteners
3/ Installation 3.2.3 Motor head position 3.2.5 Telescopic assembly Drilling of the tubes Ø 4 The motor head should be positioned on the bracket so that the cable outlet is at the bottom in relation to the horizontal. Tube 2 Tube 1 8 NO 8 NO... -
Page 9: Photovoltaic.solar.panel.installation
3/ Installation 3.4 Photovoltaic solar panel installation Attach the fasteners to the tubes. Attach the fasteners using the screws provided. Recommendations: When installing and mounting the panels and battery, ensure Use holes 1 and 2. that the cables are running in the right direction and that they are positioned close to the motor head. -
Page 10: Replacing The Solar Panel (6357035)
3/ Installation For mono-block/refurbished roller shutters (sheet metal), adjust the roller shutters 3.6 Installing the battery to the down position. Use the template provided in the packaging (see drawing below) and place it on the front side of the casing, drill two 5 mm holes (A) for the Prior to installation, check that there is no damage to the battery. -
Page 11: 4/ Connection
4/ Connection 5/ Starting up for the first time 5.1 Pairing an initial remote control with a motor Recommendations: When installing and mounting the panels and battery, ensure When switched on for the first time, the motor runs a cycle to warn that no that the cables are running in the right direction and that they are positioned close transmitter is paired. -
Page 12: Stop.settings
5/ Starting up for the first time 5.2 Stop settings 5.2.1 Storing 2 automatic stops You can use Auto mode if there are both upper and lower physical stops. The motor will automatically detect its end of travel distances. If there are no upper physical stops and/or automatic locks, you must set the end ❶... - Page 13 5/ Starting up for the first time 5.2.2 Store 1 manual stop + 1 automatic stop 5.2.3 Store 2 manual stops ❶ Position the shutter ❶ Position the shutter Progress stepwise Progress stepwise Press the button to move the shutter to To progress stepwise, briefly press the Press the button to move the shutter to...
-
Page 14: Transport Mode
5/ Starting up for the first time 6/ Modifying stops The stops must first be removed then recorded again for them to be modified. 5.3 Transport mode Remove them by proceeding as follows: To limit the discharge of the battery, transport mode lowers the power consumption. -
Page 15: Setting.the.type.of.obstacle.detection
8/ Linking a smoke detector directly to the 9/ Obstacle detection motor The motors of the TYMOOV range include the obstacle detection feature. This fully protects the roller shutter mechanism. You want to control the opening of roller shutters if smoke is detected. After locking on an obstacle, the motor reverses direction by about 15 cm. -
Page 16: 10/ Erasing One Or More Pairings
10/ Erasing one or more pairings 12/ Pairing with an alarm control unit 10.1 Erasing the pairing of the remote control with the motor The pairing of the motor with an alarm control unit enables: - the anti-intrusion function attempt to raise the shutter), - Remove the front panel of the remote control. -
Page 17: Defining.the.motor's.operating.mode
12/ Pairing with an alarm control unit 13/ Mounting the base of the remote control Mounted on the wall or placed on a flat surface 12.2 Defining the motor’s operating mode Alarm Stopping activation of the alarm Mode 1 (default) The shutter closes The shutter remains in position The shutter opens... -
Page 18: 15/ Your Remote Control Is Lost Or Not Functioning
15/ Your remote control is lost or not 17/ Troubleshooting functioning • The motor does not work: - Check that the wiring corresponds to the diagrams in the "Connection" chapter. These procedures are used to set the motor to pending pairing mode for a new - Check that the motor is not in thermal protection mode;... - Page 19 www.deltadore.com...
Need help?
Do you have a question about the Pack TYMOOV Solar 10 and is the answer not in the manual?
Questions and answers