Table of Contents
Advertisement
Quick Links
Advertisement
Table of Contents

Related Manuals for PAL Video Panel System

Summary of Contents for PAL Video Panel System
- Page 1 Installation Instructions-V1.1 VPS – Video Panel System P a g e...
-
Page 2: Table Of Contents
Wall-mounted installation .............. 6 2.2. Flush-mounthed ................7 2.3. Installation Height ................8 Setup a new device ..................8 3.1. New device setup via the PalGate application ....... 8 3.2. New device Setup via the PAL Portal ..........10 P a g e... -
Page 3: Product Overview
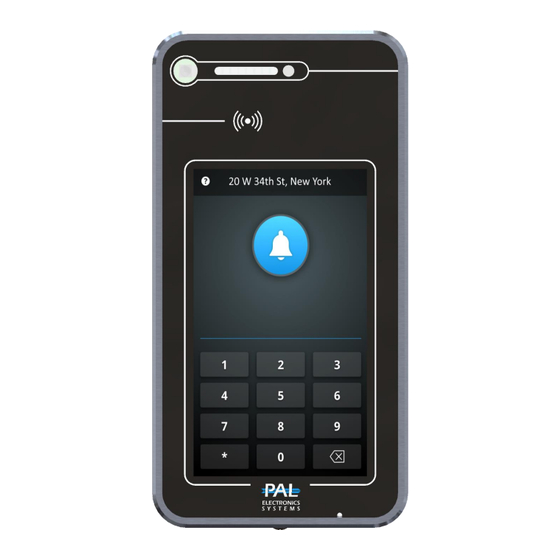
1. Product Overview 1.1. Introduction to Product Thank you for selecting our product, the VPS-Video Panel System, providing you with a wireless video intercom touch panel screen. Enjoy effortless and swift installation without the need for infrastructure. This system enables you to make video calls and manage settings conveniently through the PalGate App and WEB portal. -
Page 4: Features
1.3. Features Display Size 7-inch Display Resolution 720x1280 Touch Screen √ Anti vandal design √ Anti vandal glass √ camera 8M pixels View Angle 120° cellular network supported 4G / 3G / 2G Wi-Fi 802.11a/b/g/n 2400MHz~2482MHz 5180MHz~5825MHz Bluetooth BT4.2 LE 13.56 MHz Ethernet RJ45, 10/100Mbps... -
Page 5: Dimension
1.4. Dimension 1.5. Interface Introduction WIFI/BT Antenna 4G cellular network Antenna RJ45 connection network and PoE+ P a g e... -
Page 6: Installation Instructions
2. Installation instructions 2.1. Wall-mounted installation Step 2- Separate the panel from the back cover . Step 1- Please loosen the screw. Step 4- Stick the gasket to the rear of the unit, (to prevent Step 3 water from entering). Step 6 Step 5- Secure it by tightening the screws to the wall. -
Page 7: Flush-Mounthed
2.2. Flush-mounted. Step 1 - Stick the gasket to the rear of the unit, (to prevent water from entering). Step 2 P a g e... -
Page 8: Installation Height
2.3. Installation Height 1. meters The recommended installation height for the camera is 1.5 meters (4.9 feet) above the ground. 3. Setup a new device There are two options available for system setup: through the PalGate application or via the WEB portal. 3.1. - Page 9 Step2- Press on 'Add New Device . Step1- Launch the app and tap on the three horizontal lines located at the top-left corner of the screen . Step3- Press on the camera Step4-Proceed to scan the icon located at the top-right QR code displayed on the corner of the screen.
-
Page 10: New Device Setup Via The Pal Portal
This number will begin with VP followed by 9 digits and can be found on the sticker on the PAL packaging or on the back of the device. Step3- After you enter the Serial # you will be asked to enter a code and then click next. - Page 11 The system works via a cellular network using 4G technology. In addition, the system's performance is dependent on the existence of coverage by the cellular network. Pal Electronics Systems Ltd. is not responsible for non-coverage of the cellular network. The customer is responsible for ensuring that there is cellular...
Need help?
Do you have a question about the Video Panel System and is the answer not in the manual?
Questions and answers