
Summary of Contents for SPIDER GRILLS The Original HUNTSMAN
- Page 1 SMART KETTLE KAMADO POWERED BY THE SPIDER GRILLS VENOM CONTROLLER OWNER’S MANUAL MANUAL CODE: SGHU22-240327...
-
Page 3: Table Of Contents
INDEX Safety Info - - - - - - - - - - - - - - - - - - - - - - - - - - - - - - - - - - - - - - - - - - 2 Parts - - - - - - - - - - - - - - - - - - - - - - - - - - - - - - - - - - - - - - - - - - - - - - - 7 Hardware - - - - - - - - - - - - - - - - - - - - - - - - - - - - - - - - - - - - - - - - - - - 8 Assembly - - - - - - - - - - - - - - - - - - - - - - - - - - - - - - - - - - - - - - - - - - - 9... -
Page 4: Safety Info
SAFETY INFO A MAJOR CAUSE OF FIRES IS FAILURE TO MAINTAIN REQUIRED CLEARANCES (AIR SPACES) BETWEEN COMBUSTIBLE MATERIALS. IT IS OF UTMOST IMPORTANCE THAT THIS PRODUCT BE INSTALLED ONLY IN ACCORDANCE WITH THESE INSTRUCTIONS. IMPORTANT IMPORTANT: RETAIN FOR FUTURE REFERENCE. READ : RETAIN FOR FUTURE REFERENCE. - Page 5 Low blood oxygen levels can result in loss of • Only use your Spider Grills® consciousness and death. product outside on a non- combustible floor and away from •...
- Page 6 SAFETY INFO Electrical Hazard • Hazardous voltage is present, which can shock, burn, or cause death. Disconnect the power cord before servicing the grill unless otherwise noted in this Owner’s Manual. • Do not use in a wet location and avoid touching the power adapter and electrical cord if wet.
- Page 7 SAFETY INFO Fire Hazard • When operating your grill, maintain a MINIMUM distance of 18 inches (45.7 cm) from the grill to combustibles. • When operating your grill under overhead combustibles, a MINIMUM of 40 inches (102 cm) is required. •...
- Page 8 SAFETY INFO General Warnings • Keep the grill clean. See the cleaning instructions in this Owner’s Manual. • Do not use accessories not specified for use with your grill. • Even if there is ample room in the grill, be cautious of loading excessive amounts of food that can release large quantities of flammable grease (for example, more than a pound of bacon) especially if the grill has not been well-maintained.
-
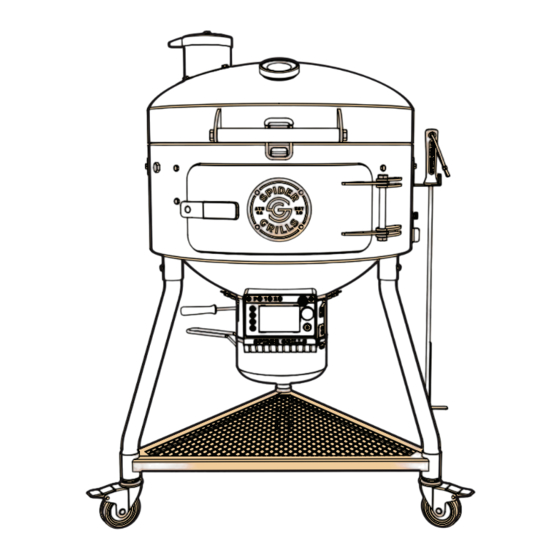
Page 9: Parts
PARTS 1. Huntsman Lid 8. Cook Surface (2) 15. Venom Controller 2. Huntsman Base 9. Spin Rack 16. Venom Ash Bucket 3. Legs 10. Port Cover 17. Tool Bag 4. Frame 11. Port Cover/Tool Rest 18. Hardware Package 5. Hinge 12. -
Page 10: Hardware
HARDWARE 1. M6x10 6. 8mm Hex Driver 2. M6x16 17mm Socket 3. M6 Washer 8. 10mm Socket 4. M6 Spring Lock Washer 9. Caster Wrench 5. Mini Socket Wrench... -
Page 11: Assembly
ASSEMBLY WARNING: Read these instructions carefully and follow them closely. Failure to do so could result in damage to your grill and void your warranty. Pre-Assembly Once all of the contents are removed from the Huntsman base, carefully flip the base upside down onto a padded surface as pictured below (have a second person assist you while lifting the grill). - Page 12 ASSEMBLY Step 1 Install the Venom by first inserting Open the draft door on the Venom the fixed tab on the back of the and feed the lower vent handle Venom into the fixed bracket at the through. rear of the grill. Step 2 Finish installing the Venom by tightening down the other...
- Page 13 ASSEMBLY Step 3 Insert each leg as shown. The legs are identical, but the bends should be facing outwards, and the pre-drilled bolt holes should align. Once the legs are positioned, use an M6x10 hex bolt with a washer to secure each leg, and hand-tighten the bolts.
- Page 14 ASSEMBLY Step 5 Install the caster wheels onto the bottom of the frame by locking the wheels and screwing them into the legs and tightening with included caster wrench. CAUTION: Be sure the wheels are in the locked position before proceeding to the next step.
- Page 15 ASSEMBLY Step 7 You may now install the ash bucket onto the Venom. Step 8 Grab the hinge for the next steps. WARNING: Do not remove the hinge-locking bracket before the grill is completely assembled.
- Page 16 ASSEMBLY Step 9 Using the longer M6x16 bolts and spring washers, attach the bottom bracket of the hinge to the Huntsman base, hand tightening the bolts into the pre-drilled holes. Note: Do not fully tighten the bolts until after the next step. Step 10 With the help of another person carefully lift the lid into position...
- Page 17 ASSEMBLY Step 11 Place the chimney cap onto the chimney. Make sure the cap is aligned with the crossbar inside the chimney. Step 12 Install the two port cover plates using the shorter M6x10 bolts and the 10mm socket wrench. You can decide which side of the grill the charcoal tool hangs on, depending...
- Page 18 ASSEMBLY Step 13 Install the other port cover plate, and hang your charcoal tool. Step 14 With the lid latched down, you may now remove the hinge- locking bracket to engage the hinge. Note: Keep your hinge tool after removing. Store the hinge tool in your tool bag in the event you need to lock...
- Page 19 ASSEMBLY Step 15 Your Huntsman has two pit probe ports; one on the dome and one on the base (to the left of the front door). Install your threaded pit probe in either location, by first removing the bolt covering the probe port, and then securing the probe with the included nut.
-
Page 20: Hinge Adjustment
HINGE ADJUSTMENT If your lid is not staying up, or is opening too quickly, slowly adjust the screw on the underside of the hinge using the provided 8mm Allen key socket. Tightening: Allows the lid to raise easier. Loosening: Allows the lid to lower easier. -
Page 21: Startup
STARTUP Before your first cook, use the provided seasoning kit on the inside surfaces of your grill (highlighted grey and pictured below). After coating the areas, add lit charcoal, and set the grill to 480°F for 1 hour. - Page 22 Pit Probe, as well as any Meat Probes that are plugged in. Get Connected: Download the Spider Grills App and follow the on-screen instructions to connect your Venom and monitor/control your grill from your phone. Note: The Venom is still 100% functional without the use of the app.
- Page 23 STARTUP Graph Screen and Meat Probes: At any time, press the Screen Cycle button to switch to graph view where you can see a visual log of your probe temperatures. Additional button presses will switch to any active Meat Probes, the Timer if one has been set, and then back to the main screen.
-
Page 24: Maintenance
MAINTENANCE Maintenance should always be performed with unit unplugged from any power source and completely cool. Maintaining the Inside the Grill • Once every six months, or if you have noticed rust or oxidation buildup, season your grill using the included seasoning kit. Cleaning the Outside •... -
Page 25: Warranty
Spider Grills will repair or replace parts returned by the customer for a warranty claim, freight prepaid, if they are found to be defective by Spider Grills upon examination. - Page 26 Contact Information: If you have questions about assembly, use, or maintenance, or if you find Spider Grills did not deliver on our promise, please reach out to us at Info@spidergrills.com, and we will do our best to assist you within the terms of our warranties and policies as we are able.
- Page 27 The Huntsman, you assume all responsibility for the safe operation of the grill and for following the safety instructions and guidelines provided by Spider Grills. You further acknowledge that failure to comply with safety instructions, improper use, or modifications to The Huntsman could result in serious injury or death.
-
Page 28: Contact Info
CONTACT INFO Further information about the Spider Grills product line-up may be found at: www.spidergrills.com All inquiries may be sent to: info@spidergrills.com... -
Page 29: Grilling Notes
GRILLING NOTES... - Page 30 GRILLING NOTES...
- Page 32 SPIDER GRILLS® and the associated logo/design are each trademarks of SPIDER GRILLS®, LLC. © 2024 SPIDER GRILLS, LLC. Weber is a trademark of Weber-Stephens Products, LLC. Spider Grills® are not affiliated or associated with Weber- Stephens Products, LLC or its products in any way.
Need help?
Do you have a question about the The Original HUNTSMAN and is the answer not in the manual?
Questions and answers