
Summary of Contents for FESTA PLQEL-816-20V
- Page 1 Air compressor Item number: 28075 Model No.: PLQEL-816-20V Manual for use Please read this manual carefully before using.
-
Page 2: Specifications
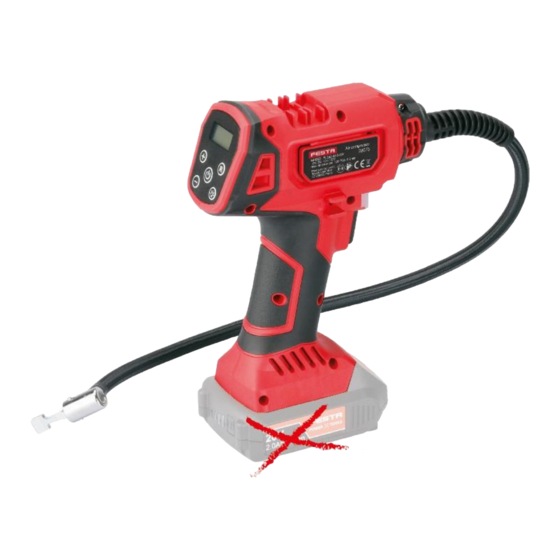
PARTS LIST AND SCHEMATIC DIAGRAM A. Digital display B. Start switch C. Set button D. Light switch E. Tire pressure increase/decrease button F. Rubber cover handle G. Battery H. LED lighting I. Switch J. Air hose buckle K. Air hose L. -
Page 3: How To Install The Battery
3. When using the tool, even after the tool has good performance, do not discharge excessively, and the battery power is reduced, When the performance of the tool begins to decline, please stop the tool and charge the battery for the best performance. HOW TO INSTALL THE BATTERY Step 1: Install battery pack or 12V car power adapter... - Page 4 Note: Improperly connected hoses or accessories may separate under pressure and pressure and cause serious injury. Possible air leaks can cause incorrect pressure readings. Ensure that all connections are secure. Note: When using the inflator, make sure that the hose is free of obstacles. If the hose is blocked, it may be overheated.
- Page 5 6. Press the " " button (on / unit), then press the " " button, the LED light is turned on. And press the " " button again, the LED light will be turn off. Note: the tolerance of inflator is + or - 2 psi. If it is used continuously every 10 minutes, a cooling time of 3 minutes is required.
-
Page 6: Product Maintenance
FUNCTION AND OPERATION INSTRUCTIONS Parts The accessories provided have a variety of functions: the conical adapter can be used on the smaller pinch valve to inflate small items such as children's toys. Usually, the user needs to blow air to inflate them. The sports ball needle can be used to inflate various types of balls or any other items that need to inflate the sports ball needle. -
Page 7: Important Safety Instructions
3. In order to maintain the best performance of the rechargeable battery, please prevent the battery from overheating, including overcharging and storage, and do not use the machine for a long time. The battery is charged for 7 hours every three months. IMPORTANT SAFETY INSTRUCTIONS Read and understand all instructions. - Page 8 4. Store idle inflators out of reach of children and other untrained personnel. Inflators are dangerous in the hands of untrained users. 5. Check whether the moving parts are misaligned or stuck, whether the parts are broken and any other conditions that may affect the operation of the inflator. If damaged, please repair the inflator before use.
- Page 9 11. Do not attempt to pull or carry the inflator through the hose. 12. In addition to all safety rules of the inflator, all safety regulations recommended by the inflator manufacturer must be observed. Following this rule will reduce the risk of serious personal injury.
- Page 10 Meaning of symbols on label Use certified eye and ear protection with a sufficient level of protection. Read the instruction before use. Meets relevant requirements. DC current/ voltage Electrical waste, below. Waste disposal PACKAGING Dispose of the packaging in the appropriate waste container. •...
- Page 11 This declaration is issued under the sole responsibility of the manufacturer. Subjects of declaration-product identification: Product: Air compressor Model No.: PLQEL-816-20V Item No.: 28075 comply with the following harmonized standards, including their amending annexes, if any, by which conformity with the following harmonization provisions is declared:...
Need help?
Do you have a question about the PLQEL-816-20V and is the answer not in the manual?
Questions and answers