Advertisement
FRX3
Top Buttons

- Alarm ON/OFF Button
- Tune Up Button
- Tune Down Button
- Alert Button
- Set Button
- Cell Button
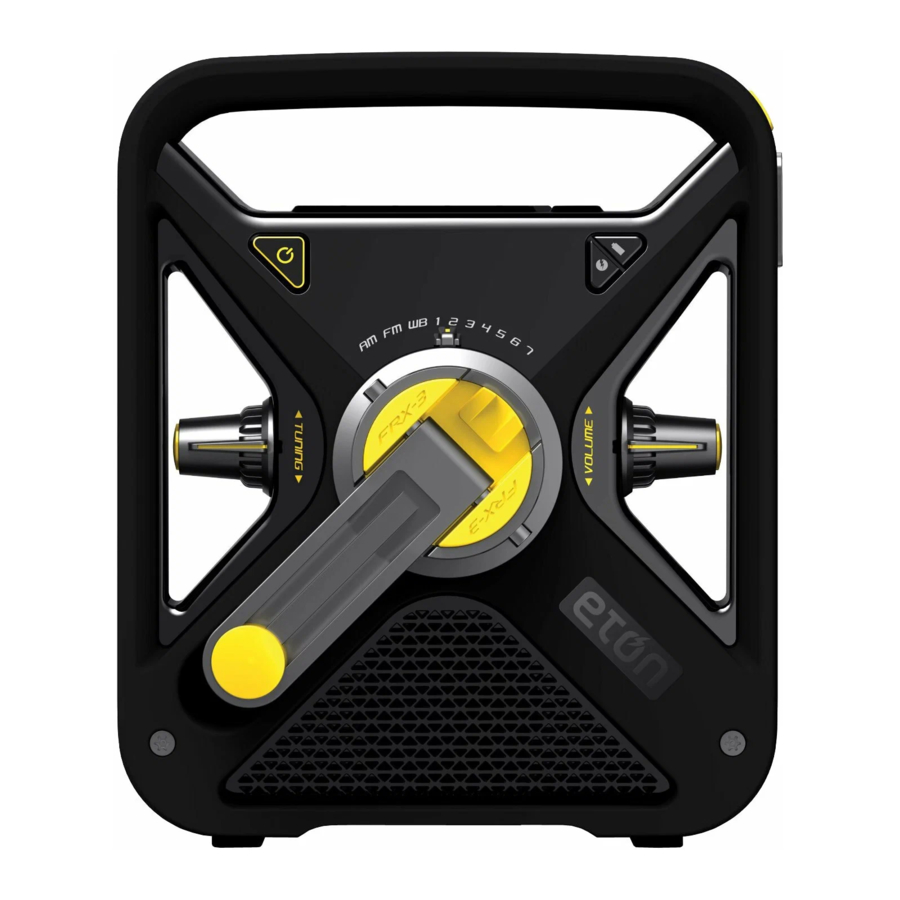
FRX3 Front

- Power/Standby Button
- AM/FM/WB Selector Dial
- Volume Knob
- Hand Turbine/Dynamo
- Battery (BATT) Button
(AAA batteries) - Dynamo/Solar (DYN) Button
NOTE: For rechargeable Ni-MH battery - Tuning Knob
- Speaker
Right Side

- Flashlight and Flashing Beacon Button
- Flashlight and Beacon
Top Side

- Strap Hole
- Glow in Dark Bezel
- Solar Panel
FRX3 Back

- Antenna
- Battery Compartment
NOTE: Rechargeable Ni-MH battery and AAA battery slot - AUX Port
- Earphone Port
- DC-input
- Cellphone Charge USB Port
TURNING ON THE FRX3
The FRX3 is powered with either the internal rechargeable Ni-MH battery (600mAh, 3.6V), 3 AAA batteries, the hand turbine and solar cell, or USB DC-in (included). Select the power source and press the Power Button < ![]() > to turn radio on.
> to turn radio on.
DYNAMO POWER
(RECHARGEABLE Ni-MH BATTERIES)
The rechargeable Ni-MH (nickel-metal-hydride) battery is in the battery compartment. To use it, plug the battery into the socket adjacent to it, then press the Dynamo Power button < ![]() >. Turn the dynamo to recharge the internal Ni-MH battery. The rechargeable battery will eventually lose its ability to hold a charge over time. Call Etón Corporation to order another one.
>. Turn the dynamo to recharge the internal Ni-MH battery. The rechargeable battery will eventually lose its ability to hold a charge over time. Call Etón Corporation to order another one.

NOTE: Before initial use, make sure the rechargeable Ni-MH battery pack (included) is connected to the unit's electric socket. The Ni-MH battery is rated at 3.6V/600mAh.
BATTERY POWER (3 AAA BATTERIES)
Install 3 AAA batteries using the polarity diagram inside the battery compartment (on the back of the radio). To turn on the radio using AAA batteries, press the Battery Power button < ![]() >.
>.
SOLAR POWER
When in Dynamo Power mode and the solar panels are in direct sunlight (not through a window or in the shade), the Ni-MH rechargeable battery recharges automatically. The LCD power status bar (under DYN) will show the recharging icon <  >.
>.
USB CABLE POWER
To charge the Ni-MH battery via the USB port (DC-in), make sure the unit is on Dynamo Power option. Plug the USB cable port into the computer, plug the other port into the mini USB jack. The recharge icon < > appears.
ANSWERS TO QUESTIONS REGARDING CHARGING
- How much operating time does 90 seconds of hand cranking provide for the radio to play and for flashlight?
About 5 to 7 minutes of radio, at low volume.
About 20 minutes of flashlight. - How long does it take to fully charge the radio's battery with the USB adapter?
About 2 hours. - How long will the radio play when the rechargeable battery is fully charged?
About 3 to 4 hours, at low volume. - How long does it take to fully charge the radio's battery with the solar panel?
About 10 hrs in direct sunlight (not through a window or in the shade).
CHARGING SMARTPHONES
If your cell phone has a USB charging cord, you can use it. If not, you can purchase one from www.iGo.com, ; or call 1-888-205-0093. To purchase a charging tip and cord for your cell phone, go to www.iGo.com, ; or call 1-888-205-0093.
Plug the USB cell phone charging cord into the USB PHONE CHARGER jack (located under the rubber cover on the back of the radio.). Plug the other end of the cord into the cell phone charging tip and then into the jack of the cell phone. Press the CELL button to start dump charge. Charging stops once the internal Ni-MH battery is out of power.
NOTE:
When the Ni-MH battery is out of power, the hand turbine may be used to recharge the battery. Disconnect the USB cable (to smartphone) before using the hand turbine. Turn the hand crank at a rate of 2 or more revolutions per second. Continue turning until the desired battery level has been reached. If you decide to stop cranking for whatever reason, please wait at least 5 seconds before beginning to crank again. Not following these instructions may cause damage to your cell phone for which Etón disclaims any liability and will not be held liable for any actual or consequential damages related to this matter.
FLASHLIGHT
Push the flashlight button to turn it ON/OFF.
VOLUME CONTROL
Turn the Volume Adjusting Knob (located on the front left knob) to adjust volume level. Always turn down the volume before using earphones.
TUNING CONTROL
Turn the tuning knob (located on the front right knob) to change frequencies.
LCD BACKLIGHT
To light the display for about 5 seconds, press the ANY button located in front if the unit.
ADJUST CLOCK TIME
- In the standard mode, press the SET button. The LCD display type will flash.
- Adjust the time by pressing the UP or DOWN button, then press SET to confirm. Repeat for the minute value.
![]()

ALARM ON/OFF
Press the alarm button to turn ON/OFF the alarm.
The word <ALARM> will appear on the display.
ADJUST ALARM
Make sure <ALARM> is ON, then press SET the button in the alarm model.

Adjust hour of alarm by pressing the UP or DOWN button, then press SET to confirm. Repeat for the minute value.
RECEPTION OF NOAA WEATHER BAND FREQUENCIES
To hear your local weather station, pull up the antenna, turn on the radio and select a channel. Turn up the volume and turn the WB dial to go through all 7 weather channels.

WB frequency appears on the display. You will only hear one channel, but if you hear a weather broadcast on more than one, select the strongest. The strongest one will usually be your local weather station. Below are the frequencies that correspond to the radio's channels:
WB1; Channel 1 162.400 MHz
WB2; Channel 2 162.425 MHz
WB3; Channel 3 162.450 MHz
WB4; Channel 4 162.475 MHz
WB5; Channel 5 162.500 MHz
WB6; Channel 6 162.525 MHz
WB7; Channel 7 162.550 MHz

- Do not expose this appliance to rain or moisture.
- Do not submerge or expose for extended period to water.
- Protect from high humidity and rain.
- Only operate within specified temperature range (0°C to 40°C).
- Unplug immediately if liquid has been spilled or any object has fallen into the apparatus.
- Clean only with a dry cloth. Do not use detergents or chemical solvents as this might damage the finish.
- Unplug and disconnect external antennas during lightning storms.
- Do not remove cover [or back].
- Refer servicing to qualified service personnel.
SERVICE FOR YOUR PRODUCT
To obtain service for your product, we recommend first contacting an Etón service representative at 800-872-2228 US, 800-637-1648 Canada or (650) 903-3866 for problem determination and troubleshooting. If further service is required, the technical staff will instruct how to proceed based on whether the radio is still under warranty or needs non-warranty service.
For service outside of North America, please refer to the distributor information included at time of purchase/receipt.
Etón Corporation
Corporate Headquarters
1015 Corporation Way
Palo Alto, California 94303 USA
tel +1 650-903-3866
tel +1 800-872-2228
fax +1 650-903-3867
Etón Canada
1 Yonge Street, Suite 1801
Toronto, Ontario M5E 1W7 Canada
tel +1 416-214-6885
www.etoncorp.com
Documents / Resources
References
![www.igo.com]() Steel Partners Holdings L.P. | A Global Diversified Holding Company
Steel Partners Holdings L.P. | A Global Diversified Holding Company![www.etoncorp.com]() Etón - The only American Red Cross approved radio manufacturer
Etón - The only American Red Cross approved radio manufacturer

Download manual
Here you can download full pdf version of manual, it may contain additional safety instructions, warranty information, FCC rules, etc.
Advertisement


Need help?
Do you have a question about the FRX3 and is the answer not in the manual?
Questions and answers