
Summary of Contents for Cardinal MULE 628T
- Page 1 M U L E Owner and Operation Manual Our Mules Deliver. 888.323.8737 info@cardinalmfg.net...
-
Page 2: Table Of Contents
Contents Mule 628T Overview ..................2 2. Remote Control Belly Pack Overview...............3 3. Basic Controls....................4 4. Basic Operation....................5 5. Dangers, Warnings, Cautions, & Notices............6 6. Service Schedule....................9 7. Track Installation Instructions................11 Rev 3/21... -
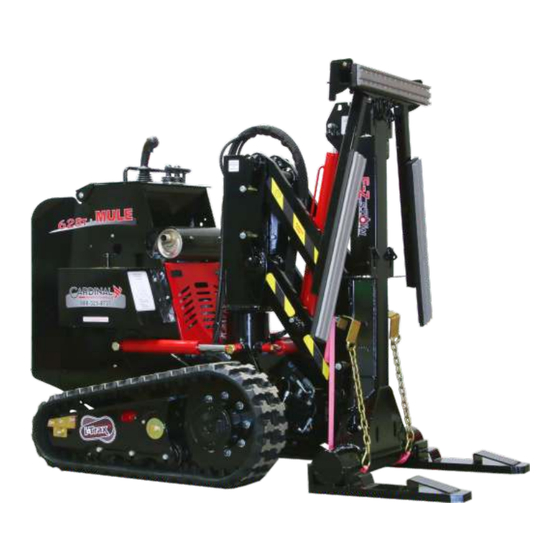
Page 3: Mule 628T Overview
1. Mule 628T Overview Description of Main Parts 1. Left Drive Control Lever 2. Right Drive Control Lever 3. Tail, Raise/ Lower 5 A&B 4. T-Bar, Raise/ Lower 5. Mast, (A)Raise/ Lower; (B)Tilt Left/Right 6. Throttle 7. Mast Float 8. Engine Key Switch 10. -
Page 4: Remote Control Belly Pack Overview
2. Wireless Remote Control Belly Pack Overview 5 A&B #1 Left Drive Control Lever #2 Right Drive Control Lever #3 Raise & Lower T-Bar Switch #4 Raise & Lower Tail Switch #5 A & B - Mast Raise / Lower, Tilt Right/Left Control Lever #7 Mast Float Switch #13 High/Low Travel Speed Switch* ON/OFF Switch... -
Page 5: Basic Controls
3. BASIC CONTROLS: (onboard controls) The two Drive Control Levers (1 & 2) control the driving functions of the machine. Moving the left Lever (1) forward causes the left track to turn forward; moving the left Lever (1) back causes the left track to turn in reverse. -
Page 6: Basic Operation
4. BASIC OPERATION: When operating machine unattached to any object, the Mast (24) should be raised just enough so that the Forks (20 & 21) clear the ground. The Mast should be kept as low as possible at all times to reduce the danger of tipping the machine on uneven terrain. -
Page 7: Dangers, Warnings, Cautions, & Notices
5. DANGERS, WARNINGS, CAUTIONS, & NOTICES Check all parts, including, but not limited to, bolts, welds, pins, plates, hydraulic components, etc., for leaks, misalignment of parts, broken parts, misalignment, looseness and anything that will impair the integrity of the machine and dolly wheels daily. Discontinue use immediately and make proper repairs before proceeding. - Page 8 DANGERS, WARNINGS, CAUTIONS, & NOTICE (Continued) Never overload machine or dolly wheels. Keep load centered on machine and dolly wheels. Slopes can greatly shift the center of gravity of the load to one side or the other. Do not use on slopes greater than 5%.
- Page 9 DANGERS, WARNINGS, CAUTIONS, & NOTICE (Continued) Make sure, daily, that all safety striping and decals are in place, legible, and heeded. All striping and decals that enhance or pertain to the safe use of the machine are available from the manufacturer. Be sure they stay in place! In case of failure of any component, discontinue use immediately until unit is repaired.
-
Page 10: Service Schedule
6. SERVICE SCHEDULE Check all parts, including, but not limited to, bolts, welds, pins, plates, hydraulic components, etc., for leaks, cracks, misalignment of parts, broken parts, misalignment, looseness and anything that will impair the integrity of the machine or dolly wheels daily. Discontinue use immediately and make the proper repairs before proceeding. - Page 11 Proper Belt Routing Relays, Fuses and Diagnostic Ports -located inside rear hood- CAN (0) Relays Fuses 1. Keyswitch System Wireless Remote Power 2. Main ECM Tether Port 3. (Engine Run) Engine Run/St. CAN (1) 4 Drive ECM 5. Dash Switches Engine Start 6.
-
Page 12: Track Installation Instructions
7. Track Installation Instructions T-Series Track Installation 2. Remove front lower hood below muffler (Image 1). to allow it to drop in, which will release track tension 4. Apply force to rear idler roller (image 3) to retract it fully toward drive sprocket 5.
Need help?
Do you have a question about the MULE 628T and is the answer not in the manual?
Questions and answers