
Summary of Contents for INIM AIR2 KF100/S
- Page 1 EN 50131-1 EN 50131-5-3 EN 50130-4 EN 50130-5 KF100/S,Pebble/S,Ergo/S Remote control keys Installation and programming manual...
-
Page 2: Table Of Contents
Table of contents 1. Description of the Air2 system 2. Description of Air2 wireless remote-controls 2.1 Description of parts 2.2 Technical specifications of Air2 remote-control keys 2.3 Air2 remote-control keys notifications 3. Installing the Air2 remote-control key 3.1 Enrolling a wireless device 3.1.1 Enrolling keys 3.2 Battery replacement 4. Programming the Air2 wireless remote-control keys 5. General information 5.1 About this manual 5.2 Manufacturer's details 5.3 Notes from the Manufacturer 5.4 Simplified EU Declaration of Conformity 5.5 Warranty 5.6 Limited warranty 5.7 Documents for the users 5.8 Disposal of the product Installation and programming manual- 111... -
Page 3: Description Of The Air2 System
RF output power 25mW e.r.p. Communication type Two-way Modulation GFSK Device monitoring from 12 to 250 minutes Note In order to comply with the EN 50131-1 standards the alarm system supervision time must be below 120 minu- tes. KF100/S, Pebble/S, Ergo/S | © 2021 Inim Electronics S.r.l. -
Page 4: Description Of Air2 Wireless Remote- Controls
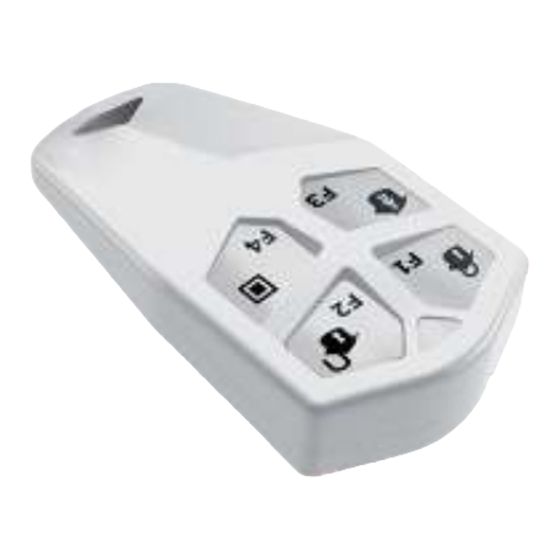
2. Description of Air2 wireless remote- controls The Air2 remote-control key has 4 buttons which can be programmed from the control panel. Each button can be associated with a control panel shortcut, which can be activated by pressing the button and is confirmed by a beep from the remote-control buzzer. Super keys If the ‘super keys’ function is enabled, by pressing and holding the button for at least 2 seconds, until a second beep is heard, you can activate a shortcut different from the one associated with simply pressing the key. In this way you can have up to 8 different shortcuts on each remote-control key. Note The ‘super keys’ function is not enabled for all Inim Electronics control panel models. Rolling-code authentication The wireless transmissions of Air2 wireless remote-controls is guaranteed by the use of a rolling-code algo- rithm. This allows the Air2-BS200 module to check the validity of each wireless keyfob transmission. If the result of the rolling code is negative, the red confirmation LED (800ms) lights up for a long period. To reset the transmissions and rolling code it is necessary to press and hold keys ‘F3’ and ‘F4’ simul- taneously. The function is active at default but can be disabled during the programming phase. Deactivation can be use- ful to the installer when the same wireless command device is used on several systems. Installation and programming manual- 111... -
Page 5: Description Of Parts
Security rating Environmental class Dimensions (W x H x D) 61 x 41 x 12mm 69 x 42 x 15 mm 72 x 41 x 16mm Weight 17 g 21 g 25 g 2 models: with icons 1 model (with icons and numbered buttons) with number buttons Rubber button cover Number of available PIN code combinations KF100/S, Pebble/S, Ergo/S | © 2021 Inim Electronics S.r.l. -
Page 6: Air2 Remote-Control Keys Notifications
2. Description of Air2 wireless remote-controls (EN IEC 62368-1) Terminal type BATTERY ES1, PS1 2.3 Air2 remote-control keys notifications Each version of the Air2 wireless remote-control is capable of notifying the user, via confirmation LEDs and a buzzer, of the successful/unsuccessful outcome of any requested operation thanks to two-way data tran- smission with the Air2-BS200 supervisor. Push button LED 1 LED 2 LED 3 LED 4 Buzzer signal Operation 1 flash beep Activates shortcut 1 ... -
Page 7: Installing The Air2 Remote-Control Key
a key, for a remote control device, selecting as the associated reader the one simulated by the transceiver 3. Set the device as ‘Wireless’. 4. Start the learning phase from the control panel. 5. Press simultaneously buttons F3 and F4 on the remote-control key. Via Prime/STUDIO software application Once the solution for the system to be designed has been opened, click on the System Layout button on the menu on the left. Then in the section on the right click on the Add device on BUS button. A window opens where you can select the devices to be configured and add them to the configuration. In the section on the left you can increase the number using the button corresponding to the selected device type. To remove a device from the structure, work through the Add device procedure, but instead deselect the device you want to remove KF100/S, Pebble/S, Ergo/S | © 2021 Inim Electronics S.r.l. -
Page 8: Enrolling Keys
3. Installing the Air2 remote-control key Alternatively, you can access the programming section by clicking on the relevant button on the menu on the left, and from the list that appears click on the Delete button that corresponds to the line of the device to be removed. Via SmartLeague software application Once the solution of the system to be designed [A] has been opened, in the right ‘Design’ tab [B], it is pos- sible to select an icon of the type of peripheral to be configured and drag it to the relevant part of the tree structure on the left [C]. Alternatively, you can double-click on the device icon to add it to the configuration. In the tree structure on the left, the number corresponding to the selected device type increases. To remove a component from the tree structure, select it and press CANC on the computer keyboard. Via keypad Enrolling of wireless devices is possible by enabling the menu options in the installer menu section: In this section it is possible to add the device to the configuration or delete it, by means of keys ‘ ’ and ‘ ’. As soon as the device is enabled it must be configured as ‘Wireless’: Once the OK button has been pressed, it is necessary to work through the menu options in order to enroll it. 3.1.1 Enrolling keys The key enrolling procedure is carried out in this section: Via keypad Type-in Code (Installer) , PROGRAMMING Keys, Enroll ... -
Page 9: Battery Replacement
Type-in Code (Installer) , PROGRAMMING Keys, Enable/disable This section allows you to enable/disable the digital keys. These operations are not irreversible: 1. Use t he ‘up’ and ‘down’ buttons to select the key in question. 2. Use keys ‘ ’ and ‘ ’ to enable/disable the key. 3. Press ‘OK’ to confirm and exit. 3.2 Battery replacement When replacing the power supply batteries of the equipment, the installer must use only non-rechargeable lithium batteries compliant with IEC 60086-4 standard. In the case of battery replacement, it is advisable to press button and at the same time keys F3 and F4 in order to ensure that the device is synchronized with the wireless transceiver. KF100/S, Pebble/S, Ergo/S | © 2021 Inim Electronics S.r.l. -
Page 10: Programming The Air2 Wireless Remote- Control Keys
4. Programming the Air2 wireless remote-control keys 4. Programming the Air2 wireless remote- control keys After enrolling the wireless remote-control devices on the control panel, it is possible to set some para- meters during the programming phase. This is possible by accessing the programming section of the system keys and selecting from them the ones with the ‘wireless’ attribute. The available parameters are the following: Wireless key parameters Parameter Software section Description This is an editable field for the key name/description. Configured keys, selected wireless key Partitions This section allows the installer to establish which partitions the key can control. This section allows you to associate a timer with the key in order to filter the operability of Timers the key on a time basis. In this section it is possible to set up the shortcuts (with any related parameter) that the key will be able to activate when the buttons are pressed: Shortcut 1 - pressing the F1 button Shortcut 2 - pressing the F2 button ... -
Page 11: General Information
5.3 Notes from the Manufacturer The Air2 devices are certified by IMQ-Sistemi di sicurezza (Italian certification body). The information relating to the power-supply batteries required by Air2 devices is shown in the Technical Specification table that follows. The manufacturer cannot guarantee the declared battery life. Attention! Do not use batteries other than those indicated by the manufacturer as they may explode. 5.4 Simplified EU Declaration of Conformity Hereby, Inim Electronics S.r.l. declares that the radio equipment type KF100/S, Pebble/S, Ergo/S is in com- pliance with Directive 2014/53/EU. The full text of the EU declaration of conformity is available at the fol- lowing internet address: www.inim.biz. KF100/S, Pebble/S, Ergo/S | © 2021 Inim Electronics S.r.l. -
Page 12: Warranty
5. General information 5.5 Warranty Inim Electronics S.r.l.. (Seller, Our, Us) warrants the original purchaser that this product shall be free from defects in materials and workmanship under normal use for a period of 24 months. As Inim Electronics does not install this product directly, and due to the possibility that it may be used with other equipment not approved by Us;Inim Electronics does not warrant against loss of quality, degradation of performance of this product or actual damage that results from the use of products, parts or other repla- ceable items (such as consumables) that are neither made nor recommended by Inim Electronics. Seller obligation and liability under this warranty is expressly limited to repairing or replacing, at Seller's option, any product not meeting the specifications. In no event shall Inim Electronics be liable to the purchaser or any other person for any loss or damage whether direct of indirect or consequential or incidental, including without limitation, any damages for lost profits, stolen goods, or claims by any other party caused by defec- tive products or otherwise arising from the incorrect or otherwise improper installation or use of this product. This warranty applies only to defects in parts and workmanship relating to normal use. It does not cover damage arising from improper maintenance or negligence, damage caused by fire, flood, wind or lightning, vandalism, fair wear and tear. Inim Electronics S.r.l. shall, at its option, repair or replace any defective products. Improper use, that is, use for purposes other than those mentioned in this manual will void the warranty. Contact Our authorized dea- ler, or visit our website for further information regarding this warranty. 5.6 Limited warranty Inim Electronics S.r.l. shall not be liable to the purchaser or any other person for damage arising from impro- per storage, handling or use of this product. Installation of this Product must be carried out by qualified persons appointed by Inim Electronics. Instal- lation of this Product must be carried out in accordance with Our instructions in the product manual. 5.7 Documents for the users Declarations of Performance, Declarations of Conformity and Certificates concerning to Inim Electronics S.r.l. products may be downloaded free of charge from the web address www.inim.biz, getting access to Extended Access and then selecting "Certifications" or requested to the e-mail address info@inim.biz or requested by ordinary mail to the address shown in this document. Manuals may be downloaded free of charge from the web address www.inim.biz, getting access to the reser- ved area, after the login, and then to the section of each product. - Page 13 5.8 Disposal of the product discarded equipment, its treatment and its environmentally compatible disposal helps to avoid possible negative effects on the environment and on health and favours the re-use and/or recycling of the materials it is made of. Information about disposal of batteries and accumulators (applicable in Countries with sepa- rate collection systems) This marking on batteries and/or their manual and/or their packaging, indicates that batteries of this products, at the end of their working life, should not be disposed of as unsorted municipal waste, but must be object of a separate collection. Where marked, the chemical symbols Hg, Cd o Pb indicate that the bat- tery contains mercury, cadmium or lead above the reference levels of the directive 2006/66/EC. If batteries are not properly disposed of, these substances, together with other ones contained, can cause harm to human health and to the environment. To protect human health and the environment, to facilitate treatment and recycling of materials, separate batteries from other kind of waste and use the collection scheme stated in your area, in accordance to current laws. Before disposing of the above, it's appropriate to remove them from their holders avoiding to damage them or causing short circuits. KF100/S, Pebble/S, Ergo/S | © 2021 Inim Electronics S.r.l.
- Page 14 5. General information Installation and programming manual- 111...
- Page 15 5.8 Disposal of the product KF100/S, Pebble/S, Ergo/S | © 2021 Inim Electronics S.r.l.
- Page 16 Inim Electronics S.r.l. Via dei Lavoratori 10, Loc. Centobuchi 63076 Monteprandone (AP) I TALY Tel. +39 0735 705007 _ Fax +39 0735 704912 info@inim.biz _ www.inim.biz DCMIINE0A2KF8E-111-20210526...
Need help?
Do you have a question about the AIR2 KF100/S and is the answer not in the manual?
Questions and answers