
Related Manuals for Hisense HRBC137


Summary of Contents for Hisense HRBC137
- Page 1 USER’S OPERATION MANUAL Before operating this unit, please read this manual thoroughly, and retain for future reference HRBC137 English...
-
Page 2: Table Of Contents
Contents Thank you for choosing Hisense. We are sure you will find your new beverage cooler a pleasure to use. However, before you use the appliance, we recommend that you carefully read the instructions, which provide details about installing and using the product. Please keep this manual for future reference. -
Page 3: Brief Introduction
Brief Introduction Thank you for choosing Hisense. We hope you find your new appliance a pleasure to use. Before you use the appliance, we recommend that you read through these instructions carefully, which provide details about its usage and functions. -
Page 4: Safety And Warning Information
Safety and warning information General safety and daily use The appliance is intended to be used exclusively for the storage of beverage as explained in this instruction booklet. WARNING The WARNING alert means a potentially hazardous situation. Serious injury or death may occur if not avoided. - Page 5 Safety and warning information General safety and daily use WARNING •This appliance is not intended for use by persons (including children) with reduced physical, sensory or mental capabilities, or lack of experience and knowledge, unless they have been given supervision or instruction concerning use of the appliance by a person responsible for their safety.
- Page 6 Safety and warning information General safety and daily use WARNING •The appliance must not be located close to radiators or gas cookers. •Avoid prolonged exposure of the appliance to direct sunlight. •There must be adequate ventilation around the appliance and any damage to the refrigerant circuit must be avoided.
- Page 7 Safety and warning information General safety and daily use WARNING •If the cord is damaged, it must be replaced by the manufacturer, its service agent or similar qualified person in order to avoid hazard. •Do not store explosive substances such as aerosol cans with a flammable propellant in this appliance.
- Page 8 Safety and warning information General safety and daily use WARNING •Do not use electrical appliances inside the appliance, unless they are of the type recommended by the manufacturer. WARNING Risk of child entrapment. Before you throw away your old beverage cooler or freezer: •Take off the doors.
- Page 9 Safety and warning information General safety and daily use WARNING •This appliance can be used by children aged from 8 years and above and persons with reduced physical, sensory or mental capabilities or lack of experience and knowledge if they have been given supervision or instruction concerning use of the appliance in a safe way and understand the hazards involved.
- Page 10 Repairs carried out by inexperienced persons may cause injury or more serious malfunctioning. Refer to your local Service Center, and always insist on genuine Hisense spare parts. •This appliance contains hydrocarbons in its cooling unit; maintenance and recharging must therefore only be carried out by authorized technicians.
- Page 11 Safety and warning information refrigerants to carry out servicing or repairs which involve removal of covers. •The beverage cabinet is designed to be used specifically for the storage of potable beverage only. •Best performance is obtained with ambient temperature as follows: Ambient Temperature Range +10°C (50°F ) to + 43°C (109°F ) The class of your appliance is shown on its rating plate.
- Page 12 Safety and warning information •The inner lining of the appliance has channels through which the refrigerant passes. Should the channels be punctured the unit could become damaged beyond repair. Do not use sharp instruments to scrape off frost or ice. Frost may be removed by using a scraper period. Under no circumstances should solid ice be forced off the liner.
- Page 13 Safety and warning information •Transmitting frequency band(s) and max allowed transmitting power in the operating frequency band(s): 2400-2483.5MHz, less than or equal to 20dbm. •This equipment should be installed and operated with minimum distance 20cm between the radiator & your body.
- Page 14 Safety and warning information •There are working parts in this product which heat up. Always ensure that there is adequate ventilation as a failure to do this will result in component failure and possible loss. See installation instructions. •Parts which heat up should not be exposed. •Wherever possible the back of the product should be near the wall.
- Page 15 Safety and warning information Electrical Connection 1. The appliance requires a single phase 220V~240V/50Hz power supply. It has a power cord that has a 3-prong grounding plug that minimizes the possibility of electrical shock. This appliance must be grounded. Do not remove the grounding prong or modify the power plug.
- Page 16 8. Do not operate the appliance without the cover over the interior lighting. 9. Any electrical component must be replaced or repaired by a qualified electrician or Hisense authorized service technician. Only genuine replace- ment parts should be used. 10. To avoid eye injury, do not look direct into the LED light located in the beverage cooler compartment.
- Page 17 Safety and warning information Cleaning the interior Before using the appliance for the first time, wash the interior and all internal accessories with lukewarm water and some neutral soap so as to remove the typical smell of a brand-new product, and then dry naturally and thoroughly.
-
Page 18: Installing Your New Appliance
Installing your new appliance Before using the appliance for the ≥35mm first time, you should be informed of the following tips. Ventilation of appliance In order to improve efficiency of the cooling system and save energy, it is necessary to maintain good ventilation around the Position your appliance in a dry appliance for the dissipation of... - Page 19 Installing your new appliance Note Electrical Connection Caution! Any electrical work required •Avoid locating the appliance in to install this appliance should be damp areas. Too much moisture in carried out by a qualified person or the air will cause frost to form authorized service technician.
-
Page 20: Description Of The Appliance
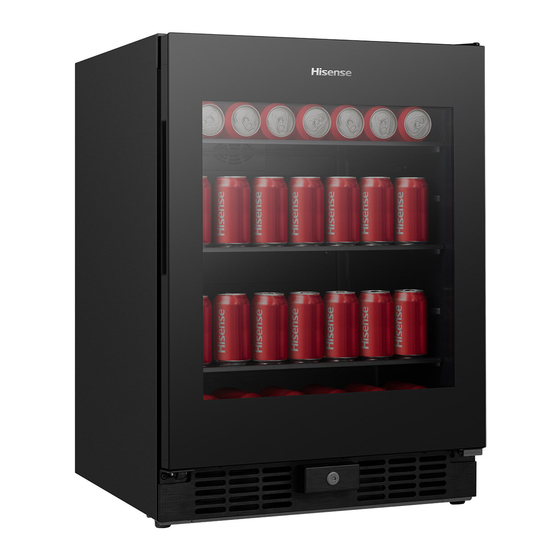
Description of the appliance Description of the appliance equipped with glass shelves ① control panel ⑤ Adjustable foot ② LED light ⑥ gasket part ③ shelf part ⑦ door ⑧ handle part (Optional, configuration-based) ④ lock(Optional) NOTE •The appliance can keep 140 cans of beverage at the same time, please place the beverage cans as shown above. -
Page 21: Display Controls
Display controls 1. Standby key 5. Temperature control key - Down 2. Light key 6. Lock and unlock key 3. Temperature control key -Up 7. Cancel alarm key 4.Temperature Indicator 8. Wi-Fi key Unlock •Each time the power turns on, the display panel will light everything All the keys are locked if the icon “... - Page 22 Display controls •Each valid button press emits a Light key short sound. •When the door opened, the lighting •The corresponding temperature automatically lights up. The door setting is reflected in the display, closed, and the lighting is delayed and the setting takes effect and is for 30 seconds to turn off.
- Page 23 Display controls Temperature Measure Change Sabbath mode You can change the temperature In the unlocked state ,touch and hold display setting from Celsius to the“ ” key that is on the right side of Fahrenheit degrees by touch the control panel and the“ ”...
- Page 24 Display controls Over Temperature Alarm Door Alarm In order to avoid the temperature The door alarm will sound once the problem that could affect the quality fridge door is open over 1 minutes. In of the beverage, the appliance has case of door alarm, the buzzer will an over temperature alarm function.
-
Page 25: Connecting Your Beverage Cooler To Wi-Fi
Connecting your beverage cooler to Wi-Fi ConnectLife app NOTE ConnectLife is a smart home app •The distance between your that allows you to communicate appliance and the Wi-Fi router can with your smart appliances using a impact the performance. If they are smartphone or tablet. - Page 26 Connecting your beverage cooler to Wi-Fi 2. Put the beverage cooler in pairing •To factory reset your network mode by holding the Wi-Fi key for 3 settings, press and hold the Wi-Fi seconds. You will hear a beep and key for 6 seconds. You will hear two see the Wi-Fi light flashing after it is beeps once the appliance is reset.
-
Page 27: Using Your Appliance
Using your appliance This section tells you how to use most You can also place bottles in the 14 of the useful features. We cans which are located at the recommend that you read through bottom of the beverage cooler. them carefully before using the appliance. - Page 28 Using your appliance NOTE: If required you may lay the WARNING beverage cooler on its back in order to gain access to the base, you When reversing the door, the should rest it on soft foam packaging appliance must not be or similar material to avoid connected to power.
- Page 29 Using your appliance 2. Using a Phillips head screwdriver, 4. Lay the door flat and use a Phillips remove the two screws on the left head screwdriver to remove the side. Then use the 4mm Allen screw holding the limit block at the Wrench to remove the two screws bottom of the door and replace the on the right side that hold the upper...
- Page 30 Using your appliance 6.2 Transform the bottom right hinge 9. Reattach the right two screws, into bottom left hinge, relax the axis then attach the door to the lower of the hinge and install it on the left hinge and upper left hinge to the hole, screw up the axis .
- Page 31 Using your appliance 11. Handle WARNING installation(configuration-based) (1) First of all, find the handle and When disposing of your screws in the spare parts bag; appliance, use an approved (2) Align the screw holes on the disposal site. Remove the plug handle with the corresponding and ensure that any locks or holes on the door body;...
-
Page 32: Cleaning And Care
Cleaning and care For hygienic reasons the appliance (including exterior and interior accessories) should be cleaned regularly. WARNING Before cleaning, the appliance must be powered off and unplugged. Danger of electrical CAUTION shock! ·Don’ t use sharp objects as they are likely to scratch the Exterior Cleaning surface. - Page 33 Cleaning and care Cleaning The Beverage Cooler To clean the beverage cooler, you should follow these steps: Unplug the appliance and remove everything. - Wash the inside with a warm water and baking soda solution. The solution should be about 2 tablespoons of baking soda to 4 cups of water.
-
Page 34: Troubleshooting
Troubleshooting If you experience a problem with your appliance or are concerned that the appliance is not functioning correctly, you can carry out some easy checks before calling for service, please see below. WARNING Don’ t try to repair the appliance yourself. If the problem persists after you have made the checks mentioned below, contact a qualified electrician, authorized service technician or the store where you purchased the product. - Page 35 Troubleshooting Problem Possible cause & Solution 1. Appliance is not level. 2. The appliance is touching the wall or other objects. 3. A component, e.g. a pipe, on rear of the appliance is touching another part of the appliance or the wall. Unusual noises.
-
Page 36: Disposal Of The Appliance
Disposal of the appliance It is prohibited to dispose of this appliance as house hold waste. Please check for with your local government for proper disposal procedures. Packaging Materials Packaging materials with the recycle symbol are recyclable. Dispose of the packaging into a suitable waste collection container to recycle it. - Page 37 Disposal of the appliance Correct Disposal of this product This symbol on the product or in its packing indicates that this product may not be treated as household waste. Instead, it should be taken to the appropriate waste collection point for the recycling of electrical and electronic equipment.
- Page 38 4332499...
Need help?
Do you have a question about the HRBC137 and is the answer not in the manual?
Questions and answers