Advertisement
Quick Links
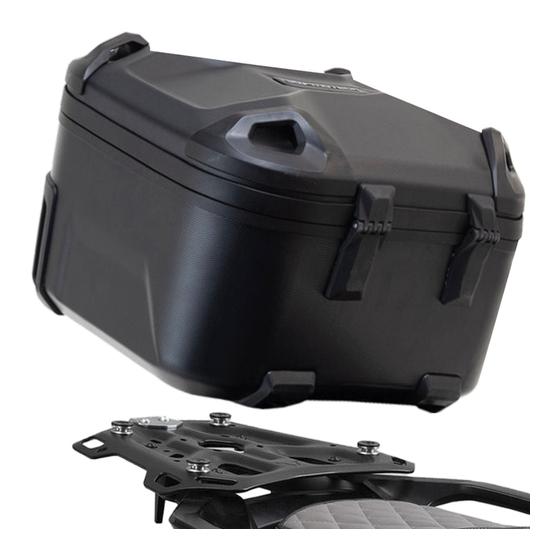
ANBAUANLEITUNG
mounting instructions • instructions de montage • instrucciones de montaje • istruzioni di montaggio
GPT.05.876.65000/B
beinhaltet • contains • contient • contiene • contiene
GPT.05.876.16001/B
GPT.00.152.54900/B
HSK.00.745.11000/B
LOC.00.745.10100
Advertisement

Subscribe to Our Youtube Channel
Related Manuals for SW-Motech GPT.05.876.65000/B


Summary of Contents for SW-Motech GPT.05.876.65000/B
- Page 1 ANBAUANLEITUNG mounting instructions • instructions de montage • instrucciones de montaje • istruzioni di montaggio GPT.05.876.65000/B beinhaltet • contains • contient • contiene • contiene GPT.05.876.16001/B GPT.00.152.54900/B HSK.00.745.11000/B LOC.00.745.10100...
- Page 2 ~ 0.5 h. EASY DIFFICULT ENGLISH ·Thank you for choosing this premium product from SW-MOTECH. PREPARATION: Read the mounting instructions carefully and make sure Visit our online shop for more information (e.g. model assignments). Required that all parts on the parts list are available.
- Page 3 Indicates the tightening torque of a part specified by SW- strength; M (MEDIUM): medium strength; L (LOW): MOTECH or the vehicle manufacturer (OEM). low strength. The content translation is automated. Errors and omissions excepted © SW-MOTECH GmbH & Co. KG Subject to technical and design changes.
- Page 4 Ø 25 / ø 8.4 / h 5 GPT.05.876.901.02.11 GPT.05.876.902.02.11 KES.RD.213.0850.02.GLZ SC.ST.08.025.02.7380.109 DB.ST.0250.0084.0050.02 M8 x 20; DIN 7991 ø 8.4 GPT.00.277.050.11 SC.ST.08.020.02.7991.088 SE.00.084.02 The content translation is automated. Errors and omissions excepted © SW-MOTECH GmbH & Co. KG Subject to technical and design changes.
- Page 5 WARNING: Always use the proper tools! Remove the seat from the vehicle. Then remove the indicated screws and rack from the vehicle. The content translation is automated. Errors and omissions excepted © SW-MOTECH GmbH & Co. KG Subject to technical and design changes.
- Page 6 MOUNTING STEP · READ AND KEEP MOUNTING INSTRUCTIONS! NOTE: If you are installing the SW-MOTECH side carrier at the same time, × spacers (5) are not required. Mount the side carrier and crossbar in their place. Insert the plastic plugs (3) into the ends of mounting struts (1) and (2).
- Page 7 When all components have been loosely attached, tighten screws (4) and (7) as specified in the mounting instructions. × 18 Nm × The content translation is automated. Errors and omissions excepted © SW-MOTECH GmbH & Co. KG Subject to technical and design changes.
- Page 8 TÜV regulations. After assembly, parts that are subject to registration should be entered in the vehicle documents by your test center. The content translation is automated. Errors and omissions excepted © SW-MOTECH GmbH & Co. KG Subject to technical and design changes.
- Page 9 ~ 0.25 h. EASY DIFFICULT ENGLISH ·Thank you for choosing this premium product from SW-MOTECH. PREPARATION: Read the mounting instructions carefully and make sure Visit our online shop for more information (e.g. model assignments). Required that all parts on the parts list are available.
- Page 10 Indicates the tightening torque of a part specified by SW- strength; M (MEDIUM): medium strength; L (LOW): MOTECH or the vehicle manufacturer (OEM). low strength. The content translation is automated. Errors and omissions excepted © SW-MOTECH GmbH & Co. KG Subject to technical and design changes.
- Page 11 M6 x 14; ISO 7380 M6 x 25; DIN 7991 GPT.00.152.502.01.02 HSK.00.745.025.35GR SC.ST.06.014.02.7380.109 GPT.00.152.035.02 GPT.00.152.010.35 SC.ST.06.025.02.7991.088 M6; DIN 985 MU.A4.06.01.985.70 The content translation is automated. Errors and omissions excepted © SW-MOTECH GmbH & Co. KG Subject to technical and design changes.
- Page 12 Tighten the screws as specified in the mounting instructions. × × 9 Nm × × × 9 Nm × The content translation is automated. Errors and omissions excepted © SW-MOTECH GmbH & Co. KG Subject to technical and design changes.
- Page 13 Figure [D]: To loosen the adapter plate (1), simply pull the latch buckle up and turn it to its original position. The content translation is automated. Errors and omissions excepted © SW-MOTECH GmbH & Co. KG Subject to technical and design changes.
- Page 14 TÜV regulations. After assembly, have parts that are subject to registration entered in the vehicle documents by your test centre. The content translation is automated. Errors and omissions excepted © SW-MOTECH GmbH & Co. KG Subject to technical and design changes.
- Page 15 ~ 0.25 h. EASY DIFFICULT ENGLISH ·Thank you for choosing this premium product from SW-MOTECH. PREPARATION: Read the mounting instructions carefully and make sure Visit our online shop for more information (e.g. model assignments). Required that all parts on the parts list are available.
- Page 16 Tighten by hand: Indicates that the attachment must be thread lock should be used at this point. carefully tightened by hand. The content translation is automated. Errors and omissions excepted © SW-MOTECH GmbH & Co. KG Subject to technical and design changes.
- Page 17 PARTS LIST · READ AND KEEP MOUNTING INSTRUCTIONS! HSK.00.745.80000/B HSK.00.745.027.02 4 x 10; WN 1452 HSK.00.745.047.02 SC.ST.040.010.48.1452.109 TRX.T20 The content translation is automated. Errors and omissions excepted © SW-MOTECH GmbH & Co. KG Subject to technical and design changes.
- Page 18 1.1 - Press the DUSC release button (1) and pull the lid latch buckle to the open position. 1.2 - Remove the latch buckle from the corresponding bracket and open the lid. The content translation is automated. Errors and omissions excepted © SW-MOTECH GmbH & Co. KG Subject to technical and design changes.
- Page 19 When closing the lid, make sure that the lid limiters (2) are not trapped between the lid and the case body. The content translation is automated. Errors and omissions excepted © SW-MOTECH GmbH & Co. KG Subject to technical and design changes.
- Page 20 WARNING: Over-tightening the screws may damage the lock casing! NOTE: Ensure that the locking mechanism is in working order! The content translation is automated. Errors and omissions excepted © SW-MOTECH GmbH & Co. KG Subject to technical and design changes.
- Page 21 4.2 - Press the DUSC (1) with the two locking openings onto the mushroom- shaped supports of your SW-MOTECH rack. 4.3 - Press the DUSC (1) with the locking opening onto the locking lug of your SW-MOTECH rack.
- Page 22 5.2 - Press the DUSC (1) with the two locking openings onto the mushroom- shaped supports of your SW-MOTECH side carrier. 5.3 - Press the DUSC (1) with the locking opening onto the locking lug of your SW-MOTECH side carrier.
- Page 23 NOTE: Surface materials may be subject to fluctuations in color (fading) in the event of prolonged and intensive exposure to sunlight and the elements (e.g. smog, acid rain, etc.)! SW-MOTECH is not responsible for this type of wear! The content translation is automated.
- Page 24 DANGER: The maximum vehicle load defined by the vehicle manufacturer may NOT be exceeded. The maximum permissible load of the SW-MOTECH rack/side rack may NOT be exceeded; make sure to take into account the dead weight of the product.
- Page 25 ~ 0.25 h. EASY DIFFICULT ENGLISH ·Thank you for choosing this premium product from SW-MOTECH. PREPARATION: Read the mounting instructions carefully and make sure Visit our online shop for more information (e.g. model assignments). Required that all parts on the parts list are available.
- Page 26 ASSEMBLY section, the vehicle manufacturer's our online shop: specifications must be observed and applied. www.sw-motech.com The content translation is automated. Errors and omissions excepted © SW-MOTECH GmbH & Co. KG Subject to technical and design changes.
- Page 27 PARTS LIST · READ AND KEEP MOUNTING INSTRUCTIONS! HSK.00.745.500.04 TRX.T20 ALK.00.165.A63 ALK.00.165.562.01 The content translation is automated. Errors and omissions excepted © SW-MOTECH GmbH & Co. KG Subject to technical and design changes.
- Page 28 1.1 - Press the DUSC release button (*) and pull the lid latch buckle into the open position. 1.2 - Remove the latch buckle from the corresponding bracket and open the lid. The content translation is automated. Errors and omissions excepted © SW-MOTECH GmbH & Co. KG Subject to technical and design changes.
- Page 29 NOTE: Ensure that the locking mechanism is in working order! × NOTE: NEVER lubricate the lock cylinder with oil! Only use graphite powder! The content translation is automated. Errors and omissions excepted © SW-MOTECH GmbH & Co. KG Subject to technical and design changes.
- Page 30 Secure the lock (4) on the inside with the safety clip NOTE: NEVER lubricate the lock cylinder with oil! Only use graphite powder! The content translation is automated. Errors and omissions excepted © SW-MOTECH GmbH & Co. KG Subject to technical and design changes.
- Page 31 TÜV regulations. After assembly, have parts that are subject to registration entered in the vehicle documents by your test centre. The content translation is automated. Errors and omissions excepted © SW-MOTECH GmbH & Co. KG Subject to technical and design changes.
Need help?
Do you have a question about the GPT.05.876.65000/B and is the answer not in the manual?
Questions and answers