Table of Contents
Advertisement
Quick Links
Dent Instruments
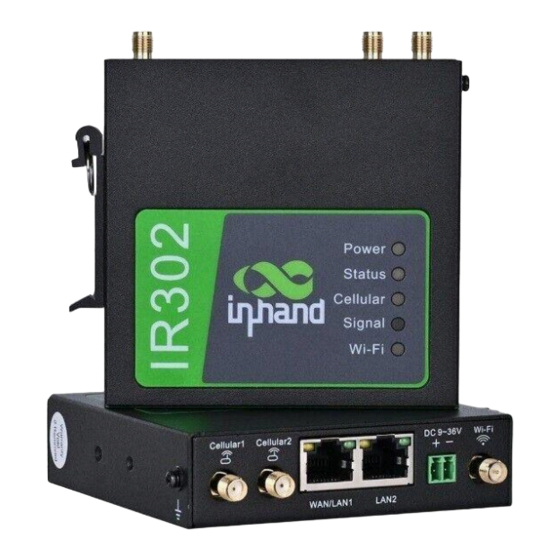
IR302
Quick Start Guide
Introduction
The IR302 is a cost-effective, compact, industrial 4G LTE router for flexible IoT connectivity.
It's equipped with two Ethernet ports, dual SIM holders, and a Wi-Fi interface. It provides
easy, flexible, and secure connectivity to our meters in nearly any situation.
The IR302 is small and lightweight; it comes with a variety of mounting options (DIN rail and
Panel) and can even be powered directly from the PS12HD, PS24HD, or the PS48HD's 12V
output.
It's compatible with all major cellular SIMs (AT&T, Verizon, T-Mobile, Bell, Free
Mobile, O2, and many more) so finding the right cell carrier is easy.
Revised 6/3/2024
Advertisement
Table of Contents

Summary of Contents for DENT Instruments IR302
- Page 1 flexible, and secure connectivity to our meters in nearly any situation. The IR302 is small and lightweight; it comes with a variety of mounting options (DIN rail and Panel) and can even be powered directly from the PS12HD, PS24HD, or the PS48HD’s 12V output.
- Page 2 Essential Connection (Fail-Over) When reliability is a must, the IR302 can be set up to fail-over to cellular networks when the local network is unreliable. This ensures there are no gaps in data.
-
Page 3: Sim Card Installation
Installation SIM Card Installation IR302 supports dual SIM cards. Pressing the SIM pop-up button will pop up the card holder. Load the SIM card(s). SIM Card Installation Antenna Installation Rotate the metal interface clockwise until the movable part cannot be rotated, do not hold the black glue stick to twist the antenna. -
Page 4: Power Installation
Chuck Antenna Installation IR302 supports dual antennas, ANT antenna and AUX antenna. The ANT antenna is the antenna which receives and transmits data, AUX antenna can only enhance the antenna signal degree and cannot receive and send data, so it can’t be used alone. Generally, only use ANT antenna. -
Page 5: Ground Installation
Power Supply Installation Ground Installation The steps are as follows: Step 1: Unscrew the ground nut; Step 2: Put the grounding ring of the cabinet ground wire into the ground stud; Step 3: Tighten the ground nut. Attention: in order to improve the anti-jamming ability of the router, the router must be grounded when it is used, and the ground wire is connected to the grounding stud of the router according to the actual use environment. - Page 6 Quick access to Internet Access Configuration Utility Step 1: Ensure that the device is powered, then connect LAN2 on the IR302 to your computer via an ethernet cable. Step 2: On your computer, open a web browser and go to 192.168.2.1. The Web Configuration utility should load.
-
Page 7: Cellular Setup
Cellular setup Step 1: With the IR302 powered off, insert SIM card into slot 1 Step 2: Power up the IR302 and go to (Status) > Modem Step 3: Wait until it connects and Status displays “modem is ready” Step 4: Go to (Status) > Network Connections and confirm Cellular 1 has been assigned... -
Page 8: Wan Setup
WLAN Mode Switch Selecting SSID from the List WAN setup Step 1: Connect Ethernet cable from network router/switch to the WAN/LAN1 Port Step 2: Go to (Network) -> WAN/LAN Switch Step 3: Change Interface Mode to WAN Step 4: Change Type to DHCP to get an address from the local network DHCP server and click Apply Step 5: Go to (Status) ->... - Page 9 Step 3: Enable the IP Passthrough checkbox, keep the DHCP Dynamic setting, then click Apply Step 4: Power cycle IR302, then plug your DENT Meter enabled for DHCP into LAN2 Link Backup (failover) Step 1: Go to (Network) -> Link Backup...
-
Page 10: Resetting The Device
This will reset the device to the factory defaults. Step 1: With the IR302 powered on, use a paper clip to press and hold the reset button for approximately 20 seconds. During this time, the Status light will go off (for 6-10 seconds), then come back on (for another 10 seconds), then turn off... - Page 11 Panel Introduction and Mounting Equipment Panel...
-
Page 12: Din-Rail Installation
DIN-Rail Installation The steps are as follows: Step 1: Select the installation location of the device and make sure there is enough space. Step 2: Tilt the equipment to the right 45°, so that the upper part of the DIN-rail seat is stuck on the DIN-rail, holding the lower end of the equipment, up slightly to rotate the equipment, the DIN-rail seat can be stuck on the DIN-rail. -
Page 13: Wall Hanging Installation
Wall Hanging Installation The steps are as follows: Step 1: Fix the hanging ear to both sides of the device with screws Step 2: Fix the hanging ear to the wall with screws. Wall Hanging Installation LED Indicator / Troublesho ing Led Indicator Description... - Page 14 Equipment LED Light Description Table: Power( Status( Cellular( red) Green) Wong) Definition Off Off Off No Power Off Off System Fault Off Module or SIM Card not identified Flash Dialing Dialing Success Flash System Upgrade Off Finalized Writing -> Finalized Flash ->...
Need help?
Do you have a question about the IR302 and is the answer not in the manual?
Questions and answers