
Related Manuals for REMEHA GTW-21


Summary of Contents for REMEHA GTW-21
- Page 1 Assembly Instruction GTW-21(BACnet) Instructions de montage Montageanleitung Manual de montaje Istruzioni di montaggio Instruções de montagem Montage-instructie GTW-21...
- Page 2 AD-2000051-01 AD-2000058-01 7775038 - v.01 - 07022023...
- Page 3 AD-2000059-01 AD-2000052-01 AD-2000053-01 7775038 - v.01 - 07022023...
- Page 4 AD-2000054-01 192.168.0.100 Fixed-IP IPv4 192.168.0.99 255.255.255.0 http://192.168.0.100 http://192.168.0.100 192.168.0.│ AD-2000055-01 RESET AD-2000056-01 AD-2000057-01 7775038 - v.01 - 07022023...
- Page 5 Register as a Foreign Device Enable foreign registration: Registration status: Not registered (-1) 10.50.16.80 BBMD IP address: 47808 BBMD Port: Time-to-live (s): Register as a Foreign Device Registration status: Registered 10.50.16.1 BBMD IP address: 47808 BBMD Port: Time-to-live (s): AD-200XXXXXX-01 7775038 - v.01 - 07022023...
-
Page 6: Installation
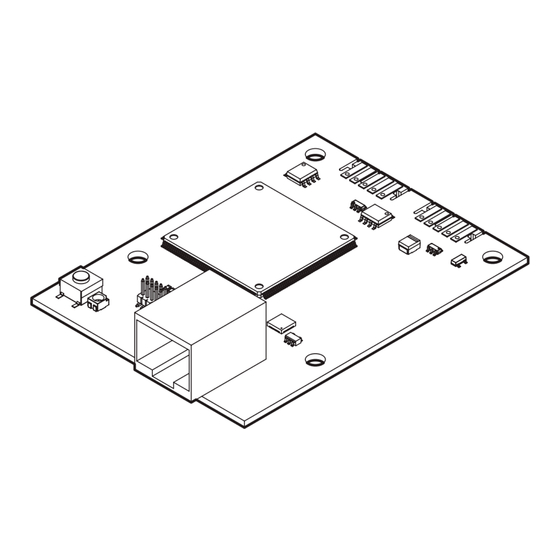
1. Set contents (S1) 6. Configure the IP address of the gateway: • Default IP setting: Fixed-IP A Gateway PCB E Fasteners • Default IP address: 192.168.0.100 B L-Bus cable F USB flash drive 6.1. In Windows, navigate to Network Connections > C L-Bus terminator G Documentation Properties >... - Page 7 1. Contenu du colis (S1) 4.1. Connecter la carte de communication au câble L-Bus disponible, ou : A Carte électronique de D Vis KB30 x 8 4.2. Connecter la carte de communication à l’Unité de communication E Clips de fixation commande (UC) avec le câble L-Bus (pièce B), ou B Câble L-bus F Clé...
-
Page 8: Eu-Konformitätserklärung
1. Inhalt des Sets (S1) Control Board - SCB) und: 4.4. Stellen Sie sicher, dass nur ein L-Bus-Abschluss A Gateway-Leiterplatte E Befestigungselemente am Ende des L-BusKabels angeschlossen ist. B L-Bus-Kabel F USB-Stick C L-Bus-Abschluss G Dokumentation 5. Schließen Sie das Gateway (Teil A) über den RJ45- D Schrauben KB30 x 8 Anschluss an einen Laptop an. -
Page 9: Instalación
1. Contenido establecido (S1) (parte C) a través de los conectores L-Bus: 4.1. Conectar la pasarela para el cable L-Bus A Pasarela de la placa D Tornillos KB30 x 8 disponible, o: electrónica E Sujeciones 4.2. Conectar la pasarela para la unidad de control B Cable L-Bus F Memoria flash USB (CU, por sus siglas en inglés) con cable L-Bus... - Page 10 1. Conteúdo do conjunto (S1) o cabo L-Bus (parte B) ou: 4.3. Ligue a interface ao Sistema de Controlo A Placa eletrónica da D Parafusos KB30 x 8 Inteligente do Quadro (SCB) com o cabo L-Bus interface E Fixadores (parte B) e: B Cabo L-Bus F Pen USB 4.4.
- Page 11 1. Conteúdo do conjunto (S1) C) através de • conectores L-Bus: A Placa eletrónica da D Parafusos KB30 x 8 4.1. Ligue a interface ao cabo L-Bus disponível ou: interface E Fixadores 4.2. Ligue a interface à Unidade de Controlo (CU) com B Cabo L-Bus F Pen USB o cabo L-Bus (parte B) ou:...
-
Page 12: Eg-Conformiteitsverklaring
1. Setinhoud (S1) (CU) met L-bus-kabel (onderdeel B) of: 4.3. Verbind de gateway met de uitbreidingsprint (SCB) A Gateway-print E Bevestigingsmiddelen met L-bus-kabel (onderdeel B) en: B L-bus-kabel F USB-stick 4.4. Controleer of slechts één L-bus-afsluitweerstand is C L-bus-afsluitweerstand G Documentatie verbonden aan het einde van de L-buskabel. - Page 13 Original instructions - © Copyright All technical and technological information contained in these technical instructions, as well as any drawings and technical descriptions supplied, remain our property and shall not be multiplied without our prior consent in writing. Subject to alterations. Notice originale - ©...
Need help?
Do you have a question about the GTW-21 and is the answer not in the manual?
Questions and answers