Advertisement
Available languages
Available languages
Quick Links
IN231000091V01_GL_840-259V00_840-259V01_840-259V02
EN_IMPORTANT, RETAIN FOR FUTURE REFERENCE: READ CAREFULLY.
FR_IMPORTANT:A LIRE ATTENTIVEMENT ET À CONSERVER POUR CONSULTATION
ULTÉRIEURE.
ES_IMPORTANTE, LEA Y GUARDE PARA FUTURAS REFERENCIAS.
PT_IMPORTANTE, RETER PARA REFERÊNCIA FUTURA: LEIA ATENTAMENTE.
DE_WICHTIG! SORGFÄLTIG LESEN UND FÜR SPÄTER NACHSCHLAGEN AUFBEWAHREN.
IT _ IMPORTANTE! CONSERVARE IL PRESENTE MANUALE PER FUTURO RIFERIMENTO E
LEGGERLO ATTENTAMENTE.
IN231000091V01_GL_840-
US_CA
US_CA
Advertisement

Subscribe to Our Youtube Channel
Summary of Contents for Outsunny 840-259V00
- Page 1 IN231000091V01_GL_840- IN231000091V01_GL_840-259V00_840-259V01_840-259V02 EN_IMPORTANT, RETAIN FOR FUTURE REFERENCE: READ CAREFULLY. FR_IMPORTANT:A LIRE ATTENTIVEMENT ET À CONSERVER POUR CONSULTATION ULTÉRIEURE. ES_IMPORTANTE, LEA Y GUARDE PARA FUTURAS REFERENCIAS. PT_IMPORTANTE, RETER PARA REFERÊNCIA FUTURA: LEIA ATENTAMENTE. DE_WICHTIG! SORGFÄLTIG LESEN UND FÜR SPÄTER NACHSCHLAGEN AUFBEWAHREN. IT _ IMPORTANTE! CONSERVARE IL PRESENTE MANUALE PER FUTURO RIFERIMENTO E LEGGERLO ATTENTAMENTE.
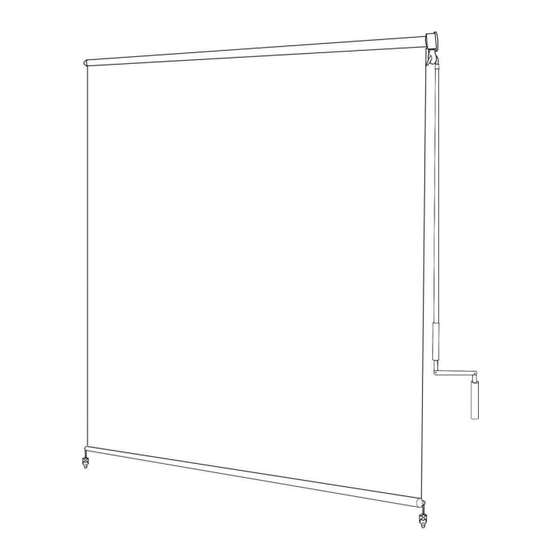
- Page 3 PART ① ② ③ ④ ⑤ ⑥ ⑦ ⑧ Installation Personnel: 2 People be required Approximate Installation Time: 20 minutes Tools required: screwdriver, leveling device (laser level, standard level, etc.), and power drill(if pre-drilling the holes). Your shade comes standard with the clutch on the right side of the shade (Fig.1) and ready to be mounted on the inside or outside of your window frame.
- Page 4 (the above measurements are for stock shades) IDLE UNIT BRACKET CLUTCH UNIT BRACKET CLUTCH END PLUG SNAP END PLUG INTO END UNIT 1. Install Brackets Install the Clutch and Idle End Brackets(Fig.3). The Clutch Unit Bracket will be on the right side, and the Idle End Unit Bracket should be on the left for standard installation.
- Page 5 3. Install Tie Downs (if desired) Tie Downs have been provided to secure your sun shade in mild to moderate wind conditions. End Cap Ring NOTE: In severe wind or prolonged exposure to wind, sun shades should be rolled up to prevent damage.
- Page 6 PART ① ② ③ ④ ⑤ ⑥ ⑦ ⑧ Personnel d'installation : 2 personnes sont nécessaires Durée approximative de l'installation : 20 minutes Outils nécessaires : tournevis, dispositif de mise à niveau (niveau laser, niveau standard, etc.) et perceuse électrique (si les trous sont prépercés). Votre store est livré...
- Page 7 (les mesures ci-dessus sont celles des teintes en stock) SUPPORT DE L'UNITÉ SUPPORT DE L'UNITÉ DE RALENTI D'EMBRAYAGE BOUCHON D'EMBRAYAGE ENCLENCHER LA FICHE D'EXTRÉMITÉ DANS L'UNITÉ D'EXTRÉMITÉ 1. Installer les supports Installer les supports d'embrayage et de ralenti (Fig.3). Le support de l'unité d'embrayage sera du côté...
- Page 8 3. Installer les sangles d'arrimage (si désiré) Des attaches ont été fournies pour sécuriser votre parasol en cas de vent léger à modéré. REMARQUE : En cas de vent violent ou Anneau d'obturation d'exposition prolongée au vent, les parasols doivent être enroulés pour éviter tout dommage.
- Page 9 PART ① ② ③ ④ ⑤ ⑥ ⑦ ⑧ Personal de instalación: se necesitan 2 personas Tiempo aproximado de instalación: 20 minutos Herramientas necesarias: destornillador, dispositivo de nivelación (nivel láser, nivel estándar, etc.) y taladro eléctrico (si se han pretaladrado los orificios). Su sombrilla viene de serie con el embrague en el lado derecho de la sombrilla (Fig.1) y lista para ser montada en el interior o exterior del marco de su ventana.
- Page 10 (las medidas indicadas corresponden a los tonos de serie) SOPORTE DE LA SOPORTE DE LA UNIDAD DE RALENTÍ UNIDAD DE EMBRAGUE TAPÓN FINAL DEL EMBRAGUE ENCAJE LA CLAVIJA FINAL EN LA UNIDAD FINAL 1. Instalación de los soportes Instale los soportes del embrague y del ralentí (Fig.3). El soporte de la unidad de embrague estará...
- Page 11 3. Instale los anclajes (si lo desea) Los anclajes se han suministrado para asegurar la sombrilla en condiciones de viento leve a moderado. Anillo de la tapa NOTA: En caso de viento fuerte o exposición prolongada al viento, las sombrillas deben enrollarse para evitar daños.
- Page 12 PART ① ② ③ ④ ⑤ ⑥ ⑦ ⑧ Pessoal de instalação: 2 pessoas serão necessárias Tempo aproximado de instalação: 20 minutos Ferramentas necessárias: chave de fendas, dispositivo de nivelamento (nível laser, nível normal, etc.) e berbequim elétrico (se os furos tiverem sido feitos previamente).
- Page 13 (as medidas acima indicadas referem-se a tons de stock) SUPORTE DA UNIDADE SUPORTE DA UNIDADE DE MARCHA LENTA DE EMBRAIAGEM BUJÃO DA EXTREMIDADE DA EMBRAIAGEM ENCAIXAR A FICHA DE EXTREMIDADE NA UNIDADE DE EXTREMIDADE 1. Instalar os suportes Instale os suportes da embraiagem e da unidade de ralenti (Fig.3). O suporte da unidade de embraiagem ficará...
- Page 14 3. Instalar os suportes de fixação (se pretendido) As amarras foram fornecidas para fixar o seu para-sol em condições de vento ligeiro a moderado. Anel da tampa da extremidade NOTA: Em caso de vento forte ou exposição prolongada ao vento, os toldos devem ser Bungee enrolados para evitar danos.
- Page 15 PART ① ② ③ ④ ⑤ ⑥ ⑦ ⑧ Installationspersonal: 2 Personen werden benötigt Ungefähre Installationszeit: 20 Minuten Erforderliches Werkzeug: Schraubenzieher, Nivelliergerät (Laser, Wasserwaage usw.) und Bohrmaschine (wenn die Löcher vorgebohrt werden). Ihr Sonnenschutz wird standardmäßig mit der Kupplung auf der rechten Seite des Sonnenschutzes geliefert (Abb.
- Page 16 (die oben genannten Maße gelten für Standardtöne) HALTERUNG DER HALTERUNG DER LEERLAUFEINHEIT KUPPLUNGSEINHEIT KUPPLUNGSENDSTOPFEN ENDSTECKER IN ENDEINHEIT EINRASTEN 1. Halterungen montieren Montieren Sie die Kupplungs- und Leerlaufendhalterungen (Abb.3). Die Halterung der Kupplungseinheit befindet sich auf der rechten Seite, und die Halterung der Leerlaufeinheit sollte bei der Standardinstallation auf der linken Seite sein.
- Page 17 3. Befestigen Sie die Befestigungselemente (falls gewünscht) Zur Sicherung Ihres Sonnenschutzes bei leichtem bis mäßigem Wind sind Haltevorrichtungen vorgesehen. Endkappenring HINWEIS: Bei starkem Wind oder längerer Exposition gegenüber Wind sollten die Sonnenschirme aufgerollt werden, um Schäden Bungee zu vermeiden. Abb. 6 Empfänger Fädeln Sie das Bungee durch den Endkappenring und wieder zurück und machen...
- Page 18 PART ① ② ③ ④ ⑤ ⑥ ⑦ ⑧ Personale addetto all'installazione: sono necessarie 2 persone Tempo approssimativo di installazione: 20 minuti Strumenti necessari: cacciavite, strumento di livellamento (livella laser, livella standard, ecc.) e trapano elettrico (se i fori sono già stati praticati). Il paralume viene fornito di serie con la frizione sul lato destro del paralume (Fig.
- Page 19 (le misure sopra riportate si riferiscono alle tonalità di serie) STAFFA DEL GRUPPO STAFFA DEL GRUPPO DEL MINIMO FRIZIONE TAPPO TERMINALE DELLA FRIZIONE TAPPO A SCATTO NELL'UNITÀ TERMINALE 1. Installazione delle staffe Installare le staffe del gruppo frizione e del gruppo folle (Fig. 3). La staffa del gruppo frizione si trova sul lato destro, mentre la staffa del gruppo folle si trova sul lato sinistro per l'installazione standard.
- Page 20 3. Installare i tiranti (se si desidera) I tiranti sono stati forniti per fissare il parasole in condizioni di vento lieve o moderato. NOTA: in caso di vento forte o di esposizione Anello di chiusura prolungata al vento, le tende parasole devono essere arrotolate per evitare danni.
Need help?
Do you have a question about the 840-259V00 and is the answer not in the manual?
Questions and answers