
Summary of Contents for HAUTURE WX-968E
- Page 1 MODEL: WX-968E AC220-240V 50Hz 700W Read this booklet thoroughly before using and save it for future reference...
- Page 3 Hauture – We Care What You Care. Hauture is one of the most loved baby lifestyle brand in the world. We committed to creating modern and thoughtful baby products that let parents enjoy the parenthood. We are always passionate and devote to making the ideal products that show love and care.
-
Page 4: Important Safety Instructions
IMPORTANT SAFETY INSTRUCTIONS WHEN USING ELECTRICAL APPLIANCES, PRECAUTIONS SHOULD ALWAYS BE FOLLOWED TO REDUCE THE RISK OF FIRE, ELECTRKAL SHOCK AND INJURY TO PERSONS, INCLUDING THE FOLLOWING: 1. Read all instructions carefully before use, and save them for future reference. 2. -
Page 5: Parts Description
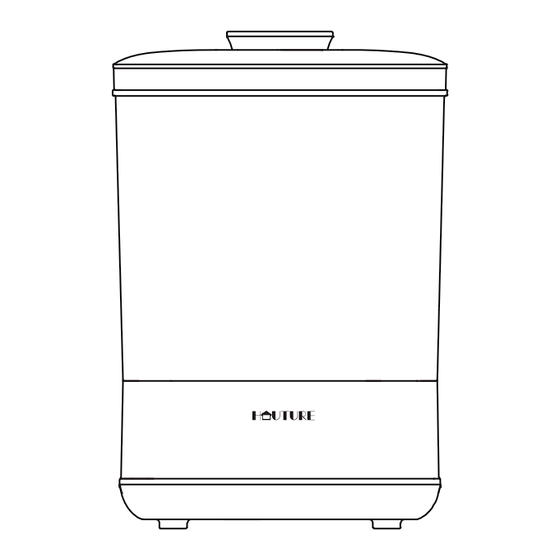
PARTS DESCRIPTION Top Lid Upper Rack Lower Rack Heating Plate Sterilizer Base Control Panel Model: WX-968E Power Supply: AC220-240V 50Hz Power: 700 Watt CONTROL PANEL - 3 -... -
Page 6: Setup And Use
SET-UP AND USE IMPORTANT: 1. Before running the appliance, it is important that all bottles, bottle parts and other accessories are clean. They must be washed, rinsed and empty. 2. Position the appliance on a flat surface and out of reach of children where it cannot be knocked or moved during operation. - Page 7 Note: Up to 6 bottles can be placed at the same time. 4.Place the Upper Rack onto the Lower Rack (pic 4) and arrange bottle accessories (e.g. nipple, collar, cap, etc.) on the Upper Rack. (pic 5) - 5 -...
- Page 8 5.Cover the Top Lid. 6.Plug the power cord into an electrical outlet and press the “On/Off” Button. Note: 1. When plug in, the appliance will beep one time and the indicators above all buttons will light up 1s. Then the appliance will switch off automatically.
-
Page 9: Function Instructions
FUNCTION INSTRUCTIONS AUTO: Press the “Auto” button, the auto button indicator will light up, the sterilizer will start working automatically in 3 seconds after you finished selecting function. It will start Sterilizing first, then Drying, and then enter Storage mode. The Sterilization will finish once water dry out. - Page 10 DRY: Press the “Dry” button, the Dry button indicator will light up, the sterilizer will start working automatically in 3 seconds after you finished selecting function. Note: The default drying time is 60 minutes, press the “-” or “+” to adjust the drying time, the adjustable range is 15-90 minutes.
- Page 11 After setting the preset time, select the "Auto", "Sterilize", and "Drying" function, the "Preset" button indicator and the corresponding function button indicator will light up at the same time, it will start to countdown after 3 seconds, the corresponding function will start to work when time is up. Note: 1.
-
Page 12: Troubleshooting
DESCALING : It is recommended to descale the sterilizer every four weeks to ensure it continues to work efficiently. 1. Mix 20g citric acid cleaner with 140ml of cold water to descale the sterilizer. Turn on the sterilizer, select the “Sterilize” function then wait for 2-3 minutes after boiling, the descaling is completed. -
Page 13: Warranty & Customer Support
If you have any issues at all, please contact us directly and we will help you out. REGISTER WARRANTY At Hauture we only use the highest quality product standard. But please don’t forget to register your free 12 months warranty just in case... www.hauturedirect.com/warranty... - Page 14 Dampfsterilisator und Trockner BEDIENUNGSANLEITUNG MODELL: WX-968E AC220-240V 50Hz 700W Bitte lesen Sie diese Bedienungsanleitung vor dem Gebrauch sorgfältig durch und bewahren Sie es zum späteren Nachschlagen auf...
- Page 15 Engagement dabei, die Produkte mit Liebe und Sorgfalt zu schaffen. Kundenzufriedenheit steht an erster Stelle. Bei Problemen bitte kontaktieren Sie uns direkt per E-Mail: service@hauturedirect.com Oder besuchen Sie: www.hauturedirect.com/warranty Hauture stellt Babyprodukte her und wir stehen Ihnen immer zur Verfügung. Fred Gründer von Hauture - 1 -...
-
Page 16: Wichtige Sicherheitshinweise
WICHTIGE SICHERHEITSHINWEISE VERWENDUNG ELEKTROGERÄTEN SIND STETS VORSICHTSMASSNAHMEN ZU TREFFEN, UM DIE GEFAHR VON BRÄNDEN, ELEKTRISCHEN SCHLÄGEN UND VERLETZUNGEN ZU VERRINGERN: 1. Lesen Sie alle Anweisungen vor dem Gebrauch sorgfältig durch und bewahren Sie sie zum späteren Nachschlagen auf. 2. Stellen Sie sicher, dass die Stromversorgung den Angaben auf dem Typenschild entspricht. -
Page 17: Bezeichnung Der Teile
WARNUNG: Die Oberflächen können bei der Benutzung heiß werden. BEZEICHNUNG DER TEILE Deckel Oberer Deckel Oberer Korb Unterer Korb Heizplatte Sterilisator-Sockel Bedienfeld Modell: WX-968E Stromversorgung: AC220-240V 50Hz Leistung: 700W BEDIENFELD - 3 -... - Page 18 EINSTELLUNG & VERWENDUNG WICHTIG: 1.Bevor das Gerät in Betrieb genommen wird, reinigen Sie immer alle Flaschen, Flaschenteile und anderes Zubehör. Sie müssen gewaschen, ausgespült und entleert werden. 2.Platzieren Sie das Gerät auf einer ebenen Fläche und außerhalb der Reichweite von Kindern auf, damit es während des Betriebs nicht umgestoßen oder bewegt wird.
- Page 19 Hinweise: Es können bis zu 6 Flaschen gleichzeitig platziert werden. Abb.2 Abb.3 4. Setzen Sie den oberen Korb auf den unteren Korb (Abb. 4) und ordnen Sie das Flaschenzubehör (z. B. Babyschnuller, Babyhalsbänder, Flaschen - verschlüsse usw.) auf dem oberen Korb an. (Abb. 5) Abb.4 Abb.5 - 5 -...
- Page 20 5. Decken Sie den oberen Deckel ab. Abb.6 6. Stecken Sie das Netzkabel in eine Steckdose und drücken Sie die Power-Taste. Abb.7 Hinweise: 1. Beim Einstecken des Netzsteckers gibt das Gerät einen Signalton ab und die Kontrollleuchten über allen Tasten leuchten 1 Sekunde lang auf. Dann schaltet sich das Gerät automatisch aus.
- Page 21 VERWENDUNG DER FUNKTION AUTO: Drücken Sie die Taste „Auto“ und die Kontrollleuchte für Auto-Modus leuchtet auf. Der Sterilisator beginnt 3 Sekunden nach Abschluss der Funktionsauswahl automatisch zu arbeiten. Es wird zunächst sterilisiert, dann getrocknet und dann in den Lagermodus versetzt. Die Sterilisation wird beendet, sobald das Wasser ausgetrocknet ist.
- Page 22 TROCKNEN: Drücken Sie die Taste „Dry“ und die Kontrollleuchte für Trocknen-Modus leuchtet auf. Der Sterilisator beginnt 3 Sekunden nach Abschluss der Funktion- sauswahl automatisch zu arbeiten. Hinweise: Die standardmäßige Trocknungszeit beträgt 60 Minuten. Drücken Sie die Taste „-“ oder „+“, um die Trocknungszeit einzustellen. Der einstell- bare Bereich beträgt 15 - 90 Minuten.
- Page 23 Hinweise: Die Standardzeit beträgt 3 Stunden und kann auf bis zu 24 Stunden eingestellt werden. Der einstellbare Bereich beträgt 10 Minuten bis 72 Stunden. Drücken Sie kurz die Taste „+/-“, um jeweils 10 Minuten zu ändern. Drücken Sie lange die Taste, um 1 Stunde zu ändern. Nach dem Einstellen der voreingestellten Zeit wählen Sie die Funktionen „Auto“, „Sterilize“...
- Page 24 mineralische Rückstände ablagern, insbesondere in Gebieten mit hartem Wasser. Um Kalkablagerungen zu vermeiden, wischen Sie die Oberflächen nach jedem Betrieb mit einem weichen, feuchten Tuch ab. 9.Ablagerungen können mit einem speziellen Entkalkungsmittel oder einer Mischung aus Wasser und Essiglösung entfernt werden. ENTKALKEN : Es wird empfohlen, den Sterilisator alle vier Wochen zu entkalken, damit er weiterhin effizient arbeitet.
-
Page 25: Fehlerbehebung
Kunden Produkte mit Liebe und Fürsorge zu liefern. Beim Problem kontaktieren Sie uns bitte direkt und wir stehen Ihnen gerne zur Verfügung. REGISTRIERUNG FÜR GARANTIE Bei Hauture herstellen wir nur Produkte von höchster Qualität. Aber vergessen Sie bitte nicht, sich für Ihre kostenlose einjährige Garantie zu registrieren. www.hauturedirect.com/warranty... -
Page 26: Manuel D'instructions
Stérilisateur à Vapeur et Séchoir pour Biberons MANUEL D’INSTRUCTIONS MODÈLE: WX-968E AC220-240V 50Hz 700W Lisez attentivement ce livret avant utilisation et conservez-le pour référence future... - Page 27 Hauture - Nous Nous Soucions De Ce Dont Vous Vous Souciez. Hauture est l'une des marques de mode de vie pour bébés les plus appréciées au monde. Nous nous sommes engagés à créer des produits pour bébés modernes et réfléchis qui permettent aux parents de profiter de la parentalité.
-
Page 28: Consignes De Sécurité Importantes
CONSIGNES DE SÉCURITÉ IMPORTANTES LORS DE L'UTILISATION D'APPAREILS ÉLECTRIQUES, LES PRÉCAUTIONS DOIVENT TOUJOURS ÊTRE RESPECTÉES AFIN DE RÉDUIRE LES RISQUES D'INCENDIE, DE CHOC ÉLECTRIQUE ET DE BLESSURE AUX PERSONNES, Y COMPRIS LES SUIVANTES: 1. Lisez attentivement toutes les instructions avant utilisation et conservez-les pour référence future. -
Page 29: Description Des Pièces
DESCRIPTION DES PIÈCES Couvercle Couvercle Supérieur Panier Supérieur Panier Inférieur Plaque Chauffante Base de Stérilisateur Panneau de Commande Modèle: WX-968E Alimentation Électrique: AC220-240V 50Hz Puissance: 700 Watts PANNEAU DE COMMANDE - 3 -... -
Page 30: Configuration Et Utilisation
CONFIGURATION ET UTILISATION IMPORTANT: 1. Avant de faire fonctionner l'appareil, il est important que toutes les bouteilles, pièces de bouteilles et autres accessoires soient propres. Ils doivent être lavés, rincés et vidés. 2. Placez l'appareil sur une surface plane et hors de portée des enfants où il ne peut pas être heurté... - Page 31 Remarque: Jusqu'à 6 bouteilles peuvent être placées en même temps. Image2 Image3 4. Placez le Panier Supérieur sur le Panier Inférieur (image 4) et disposez les accessoires du biberon (par exemple, tétine, collier, capuchon, etc.) sur le Panier Supérieur. (image 5) image4 image5 - 5 -...
- Page 32 5. Couvrez le Couvercle Supérieur. Image6 6. Branchez le cordon d'alimentation dans une prise électrique et appuy- ez sur le bouton «On/Off». Image7 Remarque: 1. Lorsque l’appareil est branché, il émettra un bip et les indicateurs au-dessus de tous les boutons s'allumeront pendant 1 s. Ensuite, l'appareil s'éteindra automatiquement.
- Page 33 INSTRUCTIONS DE LA FONCTION AUTO: Appuyez sur le bouton «Auto», l'indicateur du bouton auto s'allumera, le stérilisateur commencera à fonctionner automatiquement en 3 secondes après que vous avez fini de sélectionner la fonction. Il commencera d'abord la Stérilisation, puis le Séchage, puis entrera en mode de Stockage. La Stérilisation se terminera une fois l'eau sèche.
- Page 34 SÉCHER: Appuyez sur le bouton «Dry», l'indicateur du bouton Sécher s'allumera, le stérilisateur commencera à fonctionner automatiquement en 3 secondes après que vous avez fini de sélectionner la fonction. Remarque: La durée de séchage par défaut est de 60 minutes, appuyez sur «-» ou «+» pour ajuster la durée de séchage, la plage réglable est de 15 à...
- Page 35 Remarque: La durée par défaut est de 3 heures et la plus longue peut être réglée à 24 heures. La plage réglable est de 10 minutes à 72 heures. Appuyez brièvement sur «+/-» pour changer 10 minutes à chaque fois, appuyez longuement pour changer 1 heure. Après avoir réglé...
- Page 36 sur la plaque chauffante après quelques cycles de stérilisation. Pour éviter l'accumulation de tartre, essuyez les surfaces avec un chiffon doux et humide après chaque opération. 9. Les dépôts peuvent être éliminés avec des détartrants exclusifs ou un mélange d'eau et de solution de vinaigre. DÉTARTRAGE : Il est recommandé...
-
Page 37: Dépannage
Enregistrement de Garantie Chez Hauture, nous n'utilisons que les normes de produits de la plus haute qualité. Mais n'oubliez pas d'enregistrer votre garantie gratuite de 12 mois au cas où... - Page 38 Sterilizzatore a Vapore e Asciugatrice LIBRETTO DI ISTRUZIONI MODELLO: WX-968E AC220-240V 50Hz 700W Leggere attentamente il presente libretto di istruzioni prima dell'uso e conservarlo per eventuali future consultazioni.
- Page 39 Grazie mille per il vostro acquisto e per la vostra fiducia nel nostro marchio. Hauture - Ci Interessa Quello che Vi Interessa. Hauture è uno dei marchi più amati nel mondo per lo stile di vita dei bambini. Ci impegniamo a creare prodotti per bambini moderni e premurosi che permettono ai genitori di godersi la genitorialità.
-
Page 40: Importanti Istruzioni Di Sicurezza
IMPORTANTI ISTRUZIONI DI SICUREZZA QUANDO SI UTILIZZANO APPARECCHI ELETTRICI, SI DEVONO RISPETTARE SEMPRE LE PRECAUZIONI PER RIDURRE IL RISCHIO DI INCENDIO, FOLGORAZIONE E DANNI A PERSONE, INCLUSE LE SEGUENTI: 1. Prima di utilizzare l'apparecchio, leggere attentamente tutte le istruzioni e conservarle con cura per future consultazioni. -
Page 41: Descrizione Delle Parti
DESCRIZIONE DELLE PARTI Coperchio Coperchio Superiore Cestello Superiore Cestello Inferiore Piastra Riscaldante Base dello Sterilizzatore Pannello di Controllo Modello: WX-968E Alimentazione: AC220-240V 50Hz Potenza: 700W PANNELLO DI CONTROLLO - 3 -... -
Page 42: Istruzioni Per L'uso
ISTRUZIONI PER L'USO IMPORTANTE: 1. Prima di mettere in funzione l'apparecchio, controllare che tutti i biberon, le parti dei biberon e gli altri accessori siano puliti. Si devono lavarli, sciacquarli e svuotarli. 2. Collocare l'apparecchio su una superficie piana e tenerlo fuori dalla portata dei bambini, dove non può... - Page 43 Nota Bene: Si possono mettere fino a 6 biberon contemporaneamente. Fig. 2 Fig. 3 4. Mettere il Cestello Superiore sul Cestello Inferiore (Fig. 4) e disporre gli accessori per biberon (ad es. tettarella, bavaglini, cappucci, ecc.) sul Cestello Superiore. (Fig. 5) Fig.
- Page 44 5. Mettere il Coperchio Superiore. Fig. 6 6. Collegare il cavo di alimentazione a una presa di corrente e premere il Tasto "On/Off". Fig. 7 Nota Bene: 1. Una volta collegato all'alimentazione, l'apparecchio emetterà un bip una volta e le spie sopra tutti i tasti si accenderanno 1s. Poi l'apparecchio si spegnerà...
-
Page 45: Descrizione Delle Funzioni
DESCRIZIONE DELLE FUNZIONI AUTO: Premere il tasto "Auto", la spia del tasto "Auto" si accenderà. Una volta comple- tata la selezione della funzione, lo sterilizzatore inizierà a funzionare automatica- mente in 3 secondi. Inizierà prima la sterilizzazione, poi l'asciugatura e poi andrà in la Modalità... - Page 46 Nota Bene: 1. Il tempo di sterilizzazione dipende dalla quantità d'acqua e non è regolabile. 160 ml 14 minuti, meno acqua significa meno tempo. 2. NON versare l'acqua ad un livello superiore al livello massimo, poiché ciò potrebbe causare l'ingresso di liquido nell'apparecchio! ASCIUGATURA: Premere il tasto "Dry", la spia del tasto "Dry"...
- Page 47 PROGRAMMAZION: Premere il tasto "Preset", la spia del tasto "Preset" si accenderà, lo sterilizzatore andrà in Modalità Programmazione, si può impostare il tempo di programmazi- one premendo "-/+". Nota Bene: Il tempo predefinito è di 3 ore e può essere regolato fino a 24 ore. La gamma di regolazione va da 10 minuti a 72 ore.
- Page 48 iare l'apparecchio e la superficie della piastra riscaldante. con tamponi abrasivi. 6. Pulire la base e il pannello di controllo con un panno morbido e umido. 7. Si possono pulire il coperchio, il cestello superiore e il cestello inferiore con saponata calda.
-
Page 49: Risoluzione Dei Problemi
GARANZIA & ASSISTENZA CLIENTI HAUTURE si impegna a creare prodotti facili da usare per la casa. Il nostro obiettivo non è solo quello di creare un prodotto, ma anche un articolo che sia pieno di amore e cura da parte nostra verso i nostri clienti. In caso di eventuali problemi, contattateci direttamente e vi aiuteremo a risolvere i problemi. - Page 50 Esterilizador y Secador al Vacío MANUAL DE INSTRUCCIONES MODELO: WX-968E AC220-240V 50Hz 700W Lea este manual con atención antes de usar y guárdelo para la futura referencia...
- Page 51 Gracias por comprar de nosotros y depositar su confianza en nuestra marca. HAUTURE - Nos Importa Lo Que A Usted Le Importa HAUTURE es una de las marcas de estilo de vida infantil más populares en el mundo. Estamos comprometidos con crear productos infantiles modernos y considerados que dejan que los padres disfruten de la paternidad.
-
Page 52: Instrucciones Importantes De Seguridad
INSTRUCCIONES IMPORTANTES DE SEGURIDAD AL USAR LOS APARATOS ELÉCTRICOS, DEBERÁ SEGUIR SIEMPRE LAS PRECAUCIONES PARA REDUCIR EL RIESGO DE INCENDIO, CHOQUE ELÉCTRICO Y LESIONES A PERSONAS, INCLUYENDO LAS SIGUIENTES: 1. Lea todas las instrucciones con cuidado antes del uso, y guárdelas para la futura referencia. 2. -
Page 53: Descripción De Las Piezas
DESCRIPCIÓN DE LAS PIEZAS Tapa Tapa Superior Rejilla Superior Rejilla Inferior Placa calefactora Base del Esterilizador Panel de Control Modelo: WX-968E Fuente de Alimentación: AC220-240V 50Hz Potencia: 700 Vatios PANEL DE CONTROL - 3 -... -
Page 54: Configuración Y Uso
CONFIGURACIÓN Y USO IMPORTANTES: 1.Antes de funcionar el aparato, es importante asegurarse de que todas las botellas, piezas de botellas y otros accesorios sean limpios. Deben estar lavados, enjuagados y vacíos. 2.Coloque el aparato en una superficie plana y fuera del alcance de los niños donde no puedan golpearse o moverse durante la operación. - Page 55 Nota: Se pueden colocar hasta 6 botellas simultáneamente. Fig. 2 Fig. 3 4. Coloque la Rejilla Superior en la Rejilla Inferior (fig. 4) y coloque los accesorios de botella (p. ej., chupete, collar, tapa, etc.) en la Rejilla Superior. (fig. 5) Fig.
- Page 56 5. Cubra la Tapa Superior. Fig. 6 6. Enchufe el cable de alimentación en un tomacorriente y presione el botón “On/Off”. Fig. 7 Nota: 1. Cuando esté enchufado, el aparato emitirá un solo pitido y los indicadores en todos los botones se encenderán durante 1s. Luego el aparato se enciende automáticamente.
- Page 57 INSTRUCCIONES DE FUNCIÓN AUTO: Presione el botón “Auto”, su indicador correspondiente se encenderá, el esterilizador comenzará a funcionar automáticamente en 3s después de finalizar la selección de función. Comenzará primero la Esterilización, luego Secado, finalmente, ingrese al modo de Almacenamiento. La Esterilización se finalizará...
- Page 58 SECADO: Presione el botón “Dry”, el indicador del botón Dry se encenderá, el esterilizador comenzará a funcionar automáticamente en 3s después de finalizar la selección de función. Nota: El tiempo de secado predeterminado es de 60 minutos, presione “-” o “+” para ajustar el tiempo de secado, el rango ajustable es de 15-90 minutos.
- Page 59 Nota: El tiempo predeterminado es de 3 horas, se puede ajustar hasta 24 horas. El rango ajustable es de 10 minutos a 72 horas. Presione brevemente “+/-” para cambiar 10 minutos cada vez. Presione prolon- gadamente para cambiar 1 hora. Después de configurar el tiempo preconfigurado, seleccione la función “Auto”, “Sterilize”...
- Page 60 evitar la acumulación de cal, limpie las superficies con un paño mojado suave después de cada operación. 9. Las cales se pueden quitar con removedores de sarro especiales o mezcla de agua y vinagre. DESCALCIFICACIÓN : Se recomienda descalcificar el esterilizador cada cuatro semanas para garantizar su funcionamiento posterior eficiente.
-
Page 61: Solución De Problemas
GARANTÍA Y SOPORTE AL CLIENTE HAUTURE se esfuerza por producir los productos amigables con usuarios para los recién nacidos y los artículos domésticos. Aspiramos no solo crear un producto, sino también un artículo que está lleno de cuidado y amor de nosotros para darlo a nuestros clientes.
Need help?
Do you have a question about the WX-968E and is the answer not in the manual?
Questions and answers
My sterilizer will not stream anything now. Just goes straight to storage mode then beeps a ton.