Advertisement
Quick Links
Advertisement

Summary of Contents for Century 1530
- Page 1 Electric Cabinet Installation Guide...
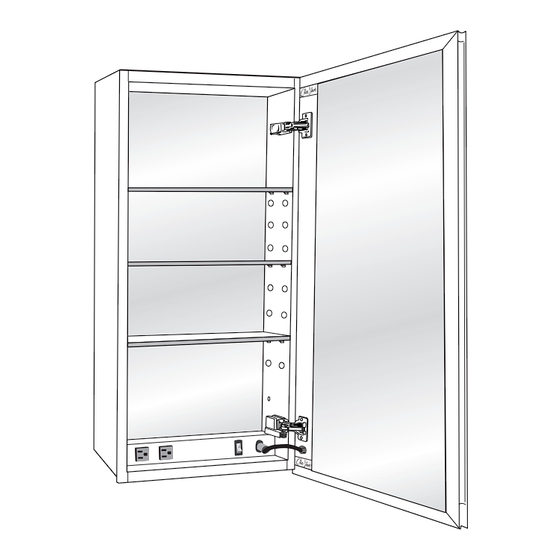
- Page 2 Installation of Model 1530-4-BL-F-0-R-E-CB Shown “For Household/Residential Use Only” Installation Instructions Medicine Cabinet IMPORTANT SAFETY INSTRUCTIONS WARNING- To reduce the risk of burns, fire, electric shock, or injury to persons: IF YOU NEED REPLACEMENT PARTS 1-Use this furnishing only for its intended use as described in these instructions. Do not use OR HAVE INSTALLATION attachments not recommended by the manufacturer.
- Page 3 ELECTRICAL HOOK UP AND SPECIFICATIONS WARNING! 1- CBW CABINET WITH “E” OPTION * USE A 120 VAC 20 AMP. GFI “E” OPTION CABINETS CIRCUIT. MUST BE WIRED TO A 2- UP TO 4 CABINETS CAN BE WIRED TO THE CIRCUIT. 20-AMP GFI CIRCUIT BREAKER 3- INCLUDES TWO OUTLETS.
-
Page 4: Tools Required
TOOLS REQUIRED For installation of your Century Bathworks cabinet the following tools will be needed. 1-Safety Glasses 2-Measuring Tape 3-Level 4-Power screw driver or a Phillips head screw driver 5-A # 2 Phillips head screwdriver 6-Electric drill 7-Drill bit 8mm... - Page 5 RECESS MEDICINE CABINET INSTALLATION Follow steps 1,2,3 Determine correct Rough Opening using Place Cabinet Box into Rough Opening.Make Formula Provided.Make sure Opening is sure cabinet flange covers rough opening PLUMB and LEVEL. evenly all around.Shim as needed. FINISHED WALL 2X4 FRAMING ROUGH OPENING Insert (4) # 10 x 1 1/2”...
- Page 6 MEDICINE CABINET INSTALLATION SURFACE MOUNT Follow steps 5,6,7,8, Determine correct height and draw a level horizontal line as shown in Sketch 5. At least 1” Clearance Draw A Level Line Level...
- Page 7 Determine hole location on Mounting Bracket as shown in Sketch 6 and drill 7/32” holes. At least (2) Two locations. Place bottom of wall bracket on horizontal line and at correct position Left to Right and mark hole location as shown in Sketch 7. Wall Bracket Level Line Mark hole location...
- Page 8 Drill 8 mm holes for wall anchors provided. Insert wall anchors and mount wall bracket as shown in Sketch 8 & 9. Insert Surface mount Z clips as shown in Sketch 10 & 11 Place Cabinet onto Wall bracket as shown in Sketch’s 12 &13. Mark hole locations of Z clips. Remove Cabinet and drill 8mm holes for Z Clips.Insert wall anchors, remount Cabinet, and attach with screws provided as shown in Sketch 14.
- Page 9 Cabinet Connector Installation Connect Two or more cabinets together using Cabinet Connectors Part # 11 & 10-32 x 1/2” machine screws Part # 12 as Shown in Sketch 15.
- Page 10 If connecting more than Two (2) cabinets together and you are recessing them, it is recommended that at approximately the center of the combined cabinets that you drill a # 7 hole in the inside top of cabinet and place a # 10 wood screw part # 9 as shown in sketchs 16 &...
- Page 11 Side Kit Installation Using 10-32 x 1/2” Machine screws attach Side Kit Mounting Bracket as shown. Clean back of side kit mirror with alchole pad then place foam pads to mirror as shown. Peel tape off of Brackets and place Mirrored Side kit as shown.
-
Page 12: Door Installation
When Cabinet installation is completed Door Installation follow instructions on how to install door to cabinet Sketch 18 Mounting Plate Attach Slide Hinge onto Mounting Plate as shown Mounting Plate Push and Snap into Mounting Plate Mounting Plate Pull Release To Remove, pull on release as shown BLUM Hinge Adjustment Remove Cover Cap for Hinge Adjustment. - Page 13 After door and cabinet are installed, Peel Release from Name Plate & Door and Place Name Plates as shown in Sketch 19 & 20 Place 130 Deg limit Clips as Shown in Sketch 21 & 22 If required 130 Deg Limit Clip Blum Hinge...
- Page 14 Shelf Clip Installation Note: Shelf Holder must be installed before cabinets are installed.Remove exsting screws in the cabinet body as shown in Sketch A. Using removed screws Place Shelf Holder into position and insert screws as shown in Sketch B. (Caution Do Not Overtighten Screws) Insert Nylon Set Screws as shown in Sketch C.
- Page 15 EXAMPLE: Two (2) 1530 Cabinets Center mirror is 30” wide. locate vertical center line at center of desired location on wall see Sketch A. Note:The bottom of shelf is 13/16” from Mirror Width Less 5” bottom of desired height see Sketch B.(Make sure to allow...
-
Page 16: Limited One Year Warranty
Glass Shelves 5/16” Thick (4) Mounting Bracket (For Surface Mount) (1) Century Bathworks in writing within one year from the date of delivery. Century Surface Mount Top Z Clips (2) Bathworks is not responsible for installation cost.
Need help?
Do you have a question about the 1530 and is the answer not in the manual?
Questions and answers