Advertisement
Video Conference Camera
User Manual
Thank you for purchasing our product. If there are any
questions, or requests, do not hesitate to contact the
dealer.
This manual may contain several technical mistakes or
printing errors, and the content is subject to change
without notice. The updates will be added to the new
version of this manual. We will readily improve or update
the products or procedures described in the manual.
Questo manuale d'istruzione è fornito da trovaprezzi.it. Scopri tutte le offerte per
cerca il tuo prodotto tra le
migliori offerte di Webcam
User Manual
01000020221201
Hikvision DS-U102
o
Advertisement
Table of Contents

Related Manuals for HIKVISION DS-U102


Summary of Contents for HIKVISION DS-U102
- Page 1 Questo manuale d’istruzione è fornito da trovaprezzi.it. Scopri tutte le offerte per Hikvision DS-U102 cerca il tuo prodotto tra le migliori offerte di Webcam Video Conference Camera User Manual User Manual Thank you for purchasing our product. If there are any questions, or requests, do not hesitate to contact the dealer.
- Page 2 DOCUMENTATION, WHETHER BASED ON BREACH OF CONTRACT, TORT (INCLUDING NEGLIGENCE), PRODUCT LIABILITY, OR OTHERWISE, IN CONNECTION WITH THE USE OF THE PRODUCT, EVEN IF HIKVISION HAS BEEN ADVISED OF THE POSSIBILITY OF SUCH DAMAGES OR LOSS. YOU ACKNOWLEDGE THAT THE NATURE OF THE INTERNET...
-
Page 3: Regulatory Information
IN THE EVENT OF ANY CONFLICTS BETWEEN THIS MANUAL AND THE APPLICABLE LAW, THE LATTER PREVAILS. Regulatory Information FCC Information Please take attention that changes or modification not expressly approved by the party responsible for compliance could void the user’s authority to operate the equipment. -
Page 4: Safety Instructions
your supplier or to a designated collection point. For more information, see: www.recyclethis.info. Industry Canada ICES-003 Compliance This device meets the CAN ICES-3 (A)/NMB-3(A) standards requirements. This device complies with Industry Canada licence- exempt RSS standard(s). Operation is subject to the following two conditions: 1.this device may not cause interference, and 2.this device must accept any interference, including... - Page 5 Keep the device in original or similar packaging while transporting it. DO NOT drop the product or subject it to physical shock. Power Supply Refer to the device label for the standard power supply. Please make sure your power supply matches with your device.
- Page 6 To achieve a better product experience, please visit https://www.hikvision.com/sg/support/download/sof tware/hikin/ to download the HIK IN installation package. 1 Introduction 1.1 Product Features The main features are as follows: High performance CMOS sensor Varifocal lens Clear imaging against strong back light due to WDR ...
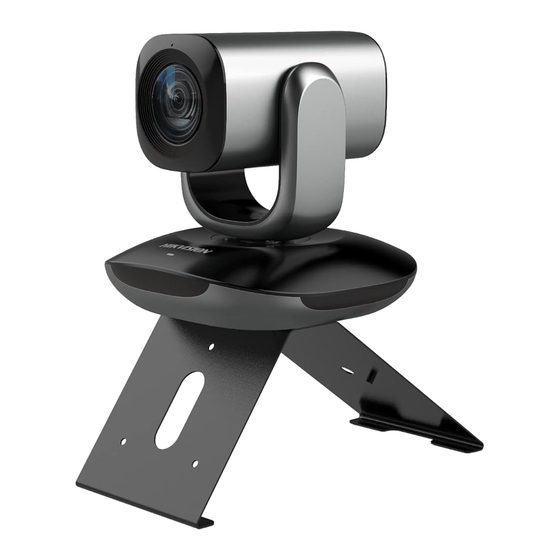
- Page 7 1.3 Overview 1.3.1 Appearance Figure 1-1 Appearance of Video Conference Camera Table 1-2 Description Description Description Microphone Audio In Indicator PS2 Interface IR Signal Receiving 1/4-20UNC Screw Module Hole Lashing Eye Kensington Lock Note: When the indicator turns to red, it means the device is standby.
- Page 8 Table 1-3 Description Description Description One-touch Focus Manual Focus One-touch Flip Mute Pan/Tilt Control Presets Zoom in/out One-touch Focus: It enables the device to focus automatically. One-touch Flip: It enables to rotate the image 180 ° when the device is installed upside down. Pan/Tilt Control: It enables to adjust the lens direction.
-
Page 9: Installation
2 Installation The package contains the mount. Table mounting and wall mounting share the same mount. The installation methods are not compulsory. You can just put the camera on the table, if this way meets your needs. 2.1 Table Mounting Steps: 1. -
Page 10: Wall Mounting
2.2 Wall Mounting Steps: 1. Drill three screw holes in the wall according to the holes of the mount. 2. Align the screw holes on the mount with that on the wall, and secure the mount with supplied screws. Figure 2-4 Fix the Mount in the Wall Figure 2-5 Secure the Camera with the Mount Repeat steps 3 to 5 of section 2.1 Table Mounting to finish the installation. - Page 11 3 FAQ For frequently asked questions of the device, visit http://enpinfodata.hikvision.com/analysisQR/showQR/35 d08787 Note that some frequently asked questions only apply to certain models. UD21533B-D...
Need help?
Do you have a question about the DS-U102 and is the answer not in the manual?
Questions and answers