Table of Contents
Advertisement
Quick Links
Advertisement
Table of Contents

Summary of Contents for Impex STEAM HERO
- Page 3 Foreword This user guide contains safety tips, relevant information and assistance when using Steam Hero. It offers support to familiarise with, maintain and care for the device. Follow this user manual to ensure a long service life and reliable operation of the device.
- Page 4 Feedback form In order to guarantee you a high level of user-friendliness, we are always working on our products and manuals. For this, we need your support. We would be very happy to receive your feedback. Simply copy or scan this page and send it to the contact details below. Feedback Assessment In general, how would you rate this manual?
-
Page 5: Table Of Contents
Product description ________________________________________________________ 6 1.1 Complete overview of the basic device _ ___________________________________________ 6 1.2 Technical Specifications ________________________________________________________ 6 1.3 Declaration of Conformity ______________________________________________________ 8 Security _________________________________________________________________ 9 2.1 Legend of warnings ___________________________________________________________ 9 2.2 Legend of symbols ___________________________________________________________ 10 2.3 Warnings _ __________________________________________________________________ 10 2.4 Operating conditions _________________________________________________________ 11 2.5 Storage conditions ___________________________________________________________ 11 2.6 Description of user and specialist _______________________________________________ 11 2.6.1 Personal protective equipment _ _____________________________________________________ 1 1 2.6.2 User ___________________________________________________________________________ 1 1 2.6.3 Specialist _______________________________________________________________________ 1 2 2.6.4 Operator _______________________________________________________________________ 1 2 2.6.5... - Page 6 3.4.4 Activate the steam function _ ________________________________________________________ 3 1 3.4.4.1 Deactivate the steam function ____________________________________________________ 3 2 3.4.5 Activate the hot water function _ _____________________________________________________ 3 3 3.4.5.1 Deactivate the hot water function _________________________________________________ 3 4 3.4.6 Activate the suction function _ _______________________________________________________ 3 4 3.4.6.1 Deactivate suction function _ ______________________________________________________ 3 5 3.5 Decommissioning ___________________________________________________________ 36 3.5.1 Prepare for decommissioning _______________________________________________________ 3 6 3.5.2 Clean attachments _ _______________________________________________________________ 3 6 3.5.2.1...
-
Page 7: Complete Overview Of The Basic Device
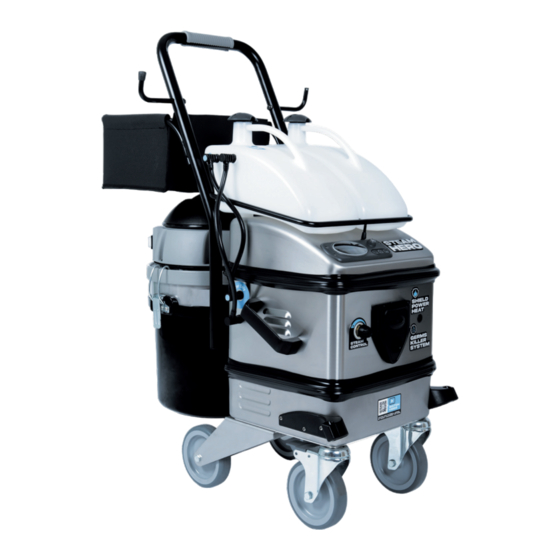
1 Product description 1.1 Complete overview of the basic device Figure 1.1-1 Complete overview of the basic device Handle Steam regulator Storage tank Suction unit Hot water module Parking brake front wheel (both sides) Display Main switch Hose connection Carrying handle (both sides) 1.2 Technical Specifications Name Unit... - Page 8 Unterdruck mm H2O 2100 Dirt container holding capacity Steam and suction hose Device length Device width Device height Device weight Table 2.6.1-1 Technical Specifications...
-
Page 9: Declaration Of Conformity
1.3 Declaration of Conformity Figure 1.3-1 Declaration of Conformity... -
Page 10: Security
2 Security 2.1 Legend of warnings This warning sign warns of possible dangers. To avoid death, injury and damage, follow all measures marked with this warning sign without exception. The level of danger differs as follows: DANGER Serious injuries or danger to life! The keyword “Danger”... -
Page 11: Legend Of Symbols
2.2 Legend of symbols Symbol Function Prerequisite for action Shows conditions for subsequent actions. Call to Action è Prompts the operator for an action Action result ð Shows the result of a previous action. Count − Structures several points of a list. Table 2.6.1-1 Legend of symbols INFO Displays useful and helpful information or tips and recommendations. -
Page 12: Operating Conditions
CAUTION Defective components! Injuries. è Check the device for proper condition before each use. If the device has defects: è Leave the status of the device unchanged. è Contact beam service centre. 2.4 Operating conditions Operate the device under the following conditions: Below normal ambient temperature −... -
Page 13: Specialist
Ensures that maintenance and care intervals are followed. − 2.6.5 Intended use The beam Steam Hero is used for environmentally friendly cleaning of a wide variety of materials and surfaces with clear water. To ensure proper use, comply with the following points: Follow the user manual −... -
Page 14: Service And Operation
3 Service and operation 3.1 Updates and Changes Update and change Chapter Link Declaration of Conformity Declaration of Conformity Table 2.6.7-1 Updates and changes 3.2 Prepare device CAUTION Improper lifting of the device! Injuries. è Make sure your back and spine are protected when lifting. è... -
Page 15: Assembling The Hot Water Module Holder And Storage Tank
Ensure that the following components are available: Screw holder 16 − Screws handle 17 − Handle 1 − Holder 15 − è If necessary, get a second person to help. è Bring handle 1 in position. ð Accessory box faces backwards. è... -
Page 16: Connecting The Hot Water Module And Storage Tank
3.2.3 Connecting the hot water module and storage tank INFO Related connections from container to device are marked in the same colour. Figure 3.2-4 Connecting the hot water module and storage tank Storage tank Storage tank hoses Hot water module Hot water module hoses Ensure that the following components are available: Storage tank 2... -
Page 17: Commissioning
3.3 Commissioning 3.3.1 Establish power supply Figure 3.3-1 Establish power supply Safety plug ATTENTION Faulty power supply! Property damage. è Make sure that the mains voltage of the socket corresponds to the nominal voltage of the device. è For detailed information see 1.2 Technical Specifications. è... -
Page 18: Fill The Storage Tank And Hot Water Module
3.3.2 Fill the storage tank and hot water module Figure 3.3-2 Filling the storage tank and hot water module Storage tank Fastener Hot water module Fastener 3.3.2.1 Fill storage tank ATTENTION Filling medium not allowed! Damage to device! è Only use tap water. è... -
Page 19: Suction Unit And Filter Tank
è Attach fastener 31 to hot water module 3 and close. 3.3.3 Suction unit and filter tank Figure 3.3-3 Suction unit and filter tank Suction unit Filter tank lock (both sides) Suction unit switch Filter tank Locking bracket (both sides) The intake volume of the filter tank 37 is made up as follows: Name Unit... -
Page 20: Remove Polyester Filter
3.3.3.2 Remove polyester filter Figure 3.3-4 Remove polyester filter Filter tank Star screw Polyester filter INFO If only liquid is sucked up: è Loosen and remove polyester filter 38 professionally. è Make sure that the polyester filter 38 is used correctly when the work process is finished. -
Page 21: Steam And Suction Hose
3.3.4 Steam and suction hose Figure 3.3-4 Steam and suction hose Hose connection Unlocking button Steam and suction hose Hand control unit Cover 3.3.4.1 Connect steam and suction hose è Open cover 51 and keep it open. è Insert steam and suction hose 50 into hose connection 5 and snap into place. è... -
Page 22: Accessories On Hand Control Unit
INFO Spare parts and accessories. è Order spare parts and accessories in the online shop. INFO Maintenance and Care. To ensure function and long service life, observe the following points: è Check accessories regularly to ensure they are in perfect condition. è... -
Page 23: Accessories On Extraction Nozzle Wide
Attachment Name Field of use Extraction nozzle wide − without attachment Mattresses − Carpets − Extraction nozzle Pad, − narrow without Mattresses − attachment Carpets − Car seats − Vehicle interior cleaning − Foot mats − Adapter for floor nozzle Connects hand control to floor nozzle or extension tube to floor nozzle è... - Page 24 Figure 3.3-6 Use attachment Bracket (both sides) Attach attachment: è Attach the attachment to the extraction nozzle as shown. è Make sure tabs 55 on extraction nozzle are snapped into place. Remove attachment: è Unlock tabs 55 and remove attachment. The following accessories can be attached directly to the extraction nozzle: Silicone lip with brush attachment −...
-
Page 25: Accessory On Extraction Nozzle Narrow
Table 3.3.5-2 Accessories on extraction nozzle wide 3.3.5.3 Accessory on extraction nozzle narrow Figure 3.3-7 Use attachment Bracket (both sides) Attach attachment: è Attach the attachment to the extraction nozzle as shown. è Make sure tabs 56 on extraction nozzle are snapped into place. Remove attachment: è... -
Page 26: Accessories On Floor Nozzle
Attachment Name Field of use Almost all surfaces such as: Rubber lip attachment Window frames, window sills − Room doors − Kitchen cabinets − Plastic parts − Pre-cleaning of heavily soiled surfaces Nylon brush attachment such as: Rubber floor mats −... - Page 27 è Insert adapter 58 into the floor nozzle properly. è Turn locking sleeve 59 90 degrees clockwise. ð Adapter 58 is locked. è Open lock: See Figure 3.3-8 Open and close the attachment. è Attach the attachment professionally. è Close lock: See Figure 3.3-8 Open and close the attachment. Remove adapter and attachment: è...
-
Page 28: Accessories On Point Jet Nozzle
Table 3.3.5-4 Accessories on floor nozzle 3.3.5.5 Accessories on point jet nozzle ATTENTION Sensitive surfaces! Damage. è Only use round brushes and corner brushes on non-sensitive materials. è Ensure that use on glass surfaces is excluded. Figure 3.3-10 Use attachment Attach attachment: è... -
Page 29: Operation
Attachment Name Field of use Round brush Improvement in cleaning of stubborn dirt − Corner brush Improvement in cleaning of stubborn dirt − Hard-to-reach corners − Crevice nozzle narrow Spot suction − with silicone attachment Vacuum dry − Table 3.3.5-5 Accessories on spot jet nozzle 3.4 Operation ATTENTION Sensitive materials! -
Page 30: Turn On The Device
3.4.1 Turn on the device Figure 3.4-1 Switch on the device Main switch Switch position ON Switch position OFF Ensure that the following requirements are met: Power supply is established. Steam and suction hose is connected. Suction unit switch 34 is switched on. è... -
Page 31: Overview Display
Display pressure Suction button Inactive icon Steam button Water shortage icon Hot water module icon Maintenance indicator Heating icon Control light Steam icon Extract button Status display INFO Factory setting. Display switches to energy-saving mode after 10 seconds of inactivity. Display shows status OFF. -
Page 32: Functions
3.4.3 Functions INFO Individual functions and function combinations The suction function can be used as an individual function. The steam function can be used as a single function. The hot water and steam functions can be used at the same time. The suction and steam functions can be used at the same time. -
Page 33: Deactivate The Steam Function
INFO Manufacturer’s recommendation. Drops of water escaping after the first heating-up phase. è Direct steam onto suitable collection medium until steam flow is even. Ensure that the following requirements are met: Storage tank 2 is full Device is switched on. Steam and suction hose 50 is plugged in. -
Page 34: Activate The Hot Water Function
3.4.5 Activate the hot water function Figure 3.4-5 Activate the hot water function Control panel Control light Safety button Hot water button Trigger lever ATTENTION Sensitive materials! Property damage. è Only use hot water on non-sensitive materials. INFO Heavy contamination. The flushing effect of the hot water with steam increases the cleaning performance. -
Page 35: Deactivate The Hot Water Function
The flow rate is shown on the display as follows: Figure 3.4-6 Set flow rate Small flow rate Large flow rate Medium flow rate 3.4.5.1 Deactivate the hot water function è Press the hot water button 126. ð Hot water outlet stops. ð... -
Page 36: Deactivate Suction Function
Ensure that the following requirements are met: Device is switched on. Polyester filter 38 is inserted. Filter tank 37 is inserted. Steam and suction hose 50 is plugged in. è Press the suction function button 127 on the hand control unit. ð... -
Page 37: Decommissioning
3.5 Decommissioning 3.5.1 Prepare for decommissioning INFO Storage. è Ensure filter cap 37 on filter tank 9 is removed. è Ensure that the storage location is frost-free and adequately ventilated. è Empty filter tank 37. è Insert the empty filter tank 37. 3.5.2 Clean attachments 3.5.2.1 Clean steam and suction hose and accessories... -
Page 38: Clean Filter Tank And Clean Polyester Filter
INFO Cleaning the steam and suction hose and accessories with detergent. è Use 2 litres of mildly alkaline detergent. INFO Cleaning the steam and suction hose and accessories with disinfectant. è Use VAH-listed surface disinfectants based on peroxides. è Follow the exposure times specified by the manufacturer. è... -
Page 39: Malfunctions
3.6 Malfunctions 3.6.1 Error codes on display Figure 3.6-1 Error codes on display Error code display Error code 130 display shows the error code that has occurred. è Check error code according to table. See 3.6.1.1 Error codes. è Follow table instructions. If error message is still active after troubleshooting: 3.6.1.1 Error codes... -
Page 40: Malfunctions
Flushing process is active. è Wait until the rinsing process is finished. Rinsing process is è Prepare for commissioning finished. after descaling. è See 4.3.2.4 Commissioning after decalcification. Table 3.6.1-1 Error Codes 3.6.2 Malfunctions Error image Possible Cause Troubleshooting Unit produces little or no steam. Hot water module 3 is calcified. -
Page 41: Maintenance
Situation when the device is Safety precaution Remedial action active The following safety Steam and suction hose 50 è Plug in the steam and − precautions are active: is removed. suction hose 50 properly. Contact switch is Steam and suction hose 50 −... -
Page 42: Document Maintenance
RECOMMENDATION Yearly maintenance Recommends annual maintenance in the beam service centre. è Contribute to the ongoing reliability of your device. è Send the device to the service centre once a year. ð Receive a 5% discount on all maintenance-related spare parts. 4.1 Document maintenance Activity Date... -
Page 43: Rinse The Hot Water Module
4.2 Hot water module INFO Calcification caused by use. è Prevent operational disruptions caused by limescale deposits: Descale the hot water module regularly. 4.2.1 Rinse the hot water module CAUTION Improper use of descaler! injuries and property damage. è Ensure that the manufacturer’s safety instructions are followed. è... -
Page 44: Boiler
INFO Recommends: durgol descaling agent è Order descaler in the online shop. Ensure that the following requirements are met: Power supply is disconnected. Measuring cup ready. A suitable collection container is available. Vinegar essence or descaler is ready. Steam and suction hose 50 is connected. è... -
Page 45: Empty Storage Tank
4.3.1.1 Empty storage tank CAUTION Hot water! Scalds and injuries. è Ensure the boiler has cooled down to below 50°C before descaling. Figure 4.3-1 Empty storage tank Storage tank Fastener Ensure that the following requirements are met: Boiler temperature is below 50°C Power supply is disconnected. -
Page 46: Start Cleaning The Boiler
Figure 4.3-2 Fill in descaler Storage tank Fastener INFO Recommends: durgol descaling agent è Order 1 litre of descaler in the online shop. 4.3.2.1 Start cleaning the boiler CAUTION Cancellation of the cleaning programme! injuries and property damage. è Ensure that the power supply is permanently available during the cleaning process. -
Page 47: Empty The Boiler
Figure 4.3-3 Start the descaling programme Main switch Extract button Switch position OFF Suction button Switch position ON Steam button è Make sure that the main switch 11 is in the OFF 60 position. è Establish power supply. è Press and hold buttons 105, 106, 107 simultaneously. è... -
Page 48: Rinse The Boiler
Fastener Ensure that the following requirements are met: Boiler has cooled down Device is switched on. A suitable collection container is available A suitable tool for drain plug boiler 152 is available è Ensure that the device is permanently switched on during the descaling programme. è... -
Page 49: Commissioning After Decalcification
4.3.2.4 Commissioning after decalcification To reset counters, perform the following procedure: è Ensure the steam and suction hoses are removed. è Press steam button 107 on the display. è Press steam button 107 on the display again and keep it pressed for 5 seconds. ð... -
Page 50: Maintenance Of O-Rings
è Unscrew star screw 39 professionally. è Remove polyester filter 38. è Rinse polyester filter 38 under clean water. è Make sure polyester filter 38 and filter tank 37 are completely dry before reinstalling. 4.4.2 Maintenance of O-rings INFO Spare parts and accessories. è... -
Page 51: Change The O-Rings On The Suction And Steam Hose
4.4.2.2 Change the O-rings on the suction and steam hose Figure 4.4-3 Change the O-rings on the suction and steam hose O-rings nozzle tube (2x) O-ring suction tube è Perform visual inspection. è If necessary, replace O-rings on nozzle tube 175. è... - Page 52 © Copyright by...
Need help?
Do you have a question about the STEAM HERO and is the answer not in the manual?
Questions and answers