Table of Contents
Advertisement
Quick Links
Advertisement
Table of Contents

Related Manuals for ANYKIT AP001

Summary of Contents for ANYKIT AP001
- Page 1 High Pressure Washer Model No.: AP001...
- Page 2 (1)Safety Guidelines (2)Quick Start Guide (3)User Manual It is recommended to watch all tutorial videos on the official Anykit website and read the safety guidelines before use. Prepare by reviewing the quick start guide and refer to this user manual for more information.
- Page 3 Safety Instructions Danger • Never touch the plug or the socket with wet hands. • The appliance should not be used if the power cord or important parts of the appliance, e.g. high-pressure hoses, trigger gun, or safety devices are damaged. •...
- Page 4 Safety Instructions WARNING • The plug and the coupling of an extension cable must be watertight and must never lay in the water. • Unsuitable extension cables can be hazardous. Only use extension cables outdoors that have been approved for this purpose. •...
- Page 5 Safety Instructions CAUTION • In case of extended downtimes, switch the appliance off at the switch/appliance switch or remove the plug. • Do not operate the appliance at temperatures below 32 °F. • Observe a distance of at least 30 cm •...
-
Page 6: Table Of Contents
TABLE OF CONTENTS 1. ABOUT ANYKIT-----------------------------------1 2. SPECIFICATIONS--------------------------------- 2 3. KNOW YOUR PRODUCT----------------------------3 4. PRESSURE WASHER INSTALLATION INSTRUCTIONS-----4 ---------------------------------4 4.1. Handle Assembly- --------------------4 4.2. High-pressure Hose Holder Assembly --------------------------4 4.3. Trigger Gun Holder Assembly --------------------------4 4.4. Power Cord Holder Assembly 5. - Page 7 TABLE OF CONTENTS 7. ATTACH GARDEN HOSE TO WATER SUPPLY-----------10 8. OPERATION----------------------------------11-19 -------------------------------11-12 8.1 Before Operation ------------------------------------ 13 8.2 Water Supply ---------------------------14 8.3 Using the Pressure Washer ---------------------------------15-16 8.4 Using Nozzles --------------------------17-18 8.5 Working with Detergents -------------------------------19 8.6 Interrupting Operation ----------------------------------19 8.7 Finish Operation 9.
-
Page 8: About Anykit
ABOUT ANYKIT ANYKIT is passionate about designing tools to solve problems and make life easier. We focus on simplicity and ease of use, providing people with convenience in their everyday lives. To enable DIY enthusiasts to embrace creativity and convenience. -
Page 9: Specifications
SPECIFICATIONS Model AP001 Voltage: 120V Maximum Pressure: 2400 PSI Flow Rate: 1.2 GPM Load Power: 1600 W Load Current: 14 A Charging Cable Length: High-Pressure Hose Length: Nozzle Material: Metal 0°, 15°, 25°, 40° (4 nozzles) Nozzle Types: Spray Bottle Capacity... -
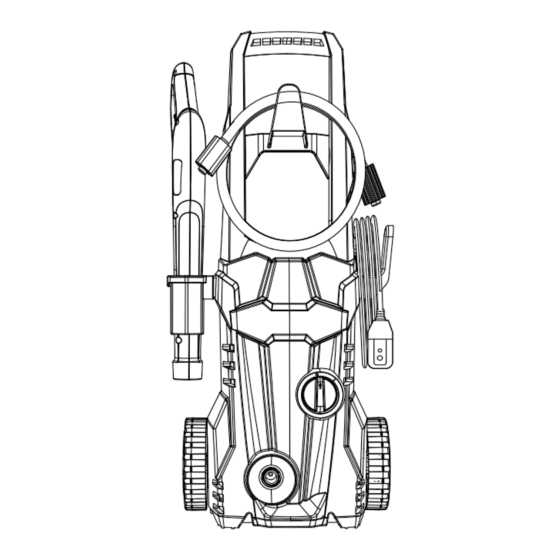
Page 10: Know Your Product
KNOW YOUR PRODUCT 1. Handle 2. Front hook 3. Gun hook 4. Delivery port 5. ON/OFF Switch 6. Power cord hook 7. Power cord Front side 8. Power cord plug 9. Nozzle 10. Metal extension pole 11. Water gun 12. Safety lock latch 13. -
Page 11: Pressure Washer Installation Instructions
PRESSURE WASHER INSTALLATION INSTRUCTIONS 4.1. Handle Assembly Attach the handle 1 to the designated position on the machine and secure it with screw 13 . 4.2. High-pressure Hose Holder Assembly Step 2: Install the front hook 2 onto the handle (as shown in the diagram). -
Page 12: Spray Gun Assembly Instructions
SPRAY GUN ASSEMBLY INSTRUCTIONS 5.1. Spray Wand Assembly Fit the spray wand into the trigger gun and rotate it until the two parts are completely locked. 5.2. Nozzles Assembly Fit the nozzle on the spray wand and press it until the two parts are completely locked. -
Page 13: Select The Right Nozzle For The Job
SPRAY GUN ASSEMBLY INSTRUCTIONS 5.5. Select The Right Nozzle For The Job! 0° 15° 25° 40° 高压 The 0º intense-jet nozzle (red) is a powerful nozzle that delivers a 148× high-pressure, pencil-point jet stream. It cuts heavy dirt deposits in a small, concentrated area. - Page 14 SPRAY GUN ASSEMBLY INSTRUCTIONS Use the 15º fan-tip nozzle (orange) for intense cleaning jobs on hard surfaces. Applications include stripping paint and removing oil stains, grease, heavy mildew stains, and rust from steel. This nozzle should only be used in areas that can withstand the high pressure from this nozzle.
-
Page 15: Install The Detergent Tank
SPRAY GUN ASSEMBLY INSTRUCTIONS 5.6. Install The Detergent Tank WARNING Do not use household detergents, acids, alkalines, bleaches, solvents, flammable material, or industrial grade solutions, in the detergent tank. WARNING Follow the instruction on the solution bottle to prepare the detergent. NOTE If necessary, use a funnel to fill the detergent tank and avoid spilling. -
Page 16: Connect The Garden Hose Adapter
It is recommended to replace it every six months. Please keep the replacement rubber ring that comes with the packaging in a safe place. If you need to purchase accessories, you can contact ANYKIT's customer service or visit anykit.com. - 9 -... -
Page 17: Attach Garden Hose To Water Supply
ATTACH GARDEN HOSE TO WATER SUPPLY Connect to water supply US standard 3/4 water pipe joint(male end) Garden hose Air bubbles NOTE: If the high-pressure water gun does not spray water or the pressure is uneven when the machine starts, there may be air bubbles in the water pipe, which can affect the water pressure. -
Page 18: Operation
OPERATION Before Operation 1. Before starting up, check whether there is any looseness in the screws and nuts of each part of the device. 2. Check whether there is any damage to the pipe joints or high-pres- sure hoses. If there is any damage, it needs to be replaced immediately to avoid the risk of explosion. - Page 19 OPERATION Danger The trigger gun is subjected to a recoil force when the water jet is discharged. Make sure that you have a firm footing and are also holding the trigger gun and sprayer firmly. When using a spray gun for cleaning, please pay attention to the following: 1.
-
Page 20: Water Supply
OPERATION Water Supply When it comes to selecting a water source for a high-pressure washer, there are two main options. One is to connect it directly to a faucet or a valve, where water automatically flows into the pump head. The other option is to use a water bucket or a reservoir for suction. -
Page 21: Using The Pressure Washer
OPERATION Using the Pressure Washer 1. Turn the water supply tap on completely. 2. Make sure the safety lock is down and in its original position, then press the trigger for a few seconds until the water flow is steady. This will allow air to escape and discharge any residual pressure in the hose(Fig. -
Page 22: Using Nozzles
OPERATION Using Nozzles Before beginning any cleaning task, determine the best nozzle for the job. Each of the nozzles has a different spray pattern. The nozzle patterns are 40˚ (for gentle cleaning), 25˚ (for all-purpose cleaning), 15˚ (for tough jobs), 0˚ (for spot cleaning or hard-to-reach areas), and the Soap nozzle (for detergent application). - Page 23 OPERATION Using Nozzles To disconnect a nozzle from the spray wand once the cleaning job is complete: 1. Turn off the pressure washer and shut off the water supply. Pull the trigger to release water pressure. 2. Engage the safety lock on the trigger handle by pushing up on the safety lock until it clicks into the slot.
-
Page 24: Working With Detergents
OPERATION Working with Detergents Adjust the detergent concentration by rotating the knob on top of the product. To rotate the nozzle of the product, you can adjust the angle of the spray pattern (a vertical ellipse can be adjusted to a parallel ellipse). CAUTION! Always test the detergent in an inconspicuous area before use. - Page 25 OPERATION Recommended cleaning agents that can be used in the detergent tank: For washing cars, we recommend using Meguiar's Super Concentrated Car Wash. This specially formulated detergent is designed to remove dirt and impurities from your car while restoring its shine.
-
Page 26: Interrupting Operation
OPERATION Interrupting operation Release the lever on the trigger gun. 1. Lock the lever on the trigger gun. 2. During longer breaks (more than 10 minutes), also turn the appliance off using the "0/OFF" switch. 3. Insert the trigger gun in its holder. Finish operation CAUTION!... -
Page 27: Storage
STORAGE CAUTION In order to prevent accidents or injuries, keep in mind the weight of the appliance when selecting a storage location for it (see Specifications). Storing the Appliance Before extended storage periods, as during the winter, also observe the instructions in the Care section. - Page 28 FROST PROTECTION If you must store your pressure washer in a location where the temperature falls below 32ºF (0ºC), you can minimize the chance of damage to your machine by utilizing the following procedure: • 1. Disconnect all water connections. •...
-
Page 29: Maintenance
Chemicals can damage, weaken, or destroy plastic which may result in serious personal injury. All parts should be replaced at an authorized service center by Anykit. To replace any accessories, please contact Anykit customer service at support@anykit.com. - Page 30 MAINTENANCE Please replace any aging or damaged accessories promptly and always use "ANYKIT" spare parts and accessories. Using any other accessories or parts may be dangerous and could result in equipment damage or personal injury. Accessory Accessories Accessory Accessories description...
- Page 31 MAINTENANCE High-pressure hose The high-pressure hose is specially constructed with reinforced walls to handle water pressure up to 34.5 MPa (5000 psi) - it can be damaged if it isn’t stored appropriately. • Do not kink. • Do not drive vehicles over the hose. •...
- Page 32 MAINTENANCE Maintenance of Garden Hose Adapter The sealing ring of the machine's water inlet should be replaced regularly, and the sealing ring should be checked for signs of aging. If the sealing ring is found to be aging, it should be replaced promptly to maintain the good sealing performance of the equipment.
-
Page 33: Troubleshooting
TROUBLESHOOTING PROBLEM POSSIBLE CAUSE SOLUTION The machine is not Plug the machine in plugged-in Faulty receptacle Try another receptacle The machine will not start Replace the fuse Unplug other appliances The fuse has blown Try without the extension cable Faulty extension cable The pump is drawing in Check that hoses and connections are airtight. - Page 34 TROUBLESHOOTING Replace it with a fuse with higher Fuse too small amp consumption than the washer. Fuse blown Increase in the Try without the extension cable amperage Air in inlet Allow machine to run with open trigger hose / pump until regular working pressure resumes.
-
Page 35: Warranty
We will give you a full refund if you are not 30-Day Guarantee satisfied with the product. We offer a limited warranty that commences One-Year Warranty from the date of purchase of the product. Visit anykit.com or scan the QR code for more details. - 28 - - 28 -... -
Page 36: Customer Support
CUSTOMER SUPPORT If you have any questions or concerns about your product, please contact our Customer Support Team 1-877-888-7979 Mon.-Fri. 8:00-5:00 PST(US) support@anykit.com www.anykit.com @anykit @anykit Facebook Messenger ANYKIT AP001 C1226 V1.0 3.06.16.001400 - 29 -... - Page 37 ---------------------------------4 ---------------------------14 It is recommended to watch all tutorial videos on the official Anykit 4.1. Handle Assembly- 8.3 Using the Pressure Washer • This appliance is not intended for use by persons with reduced by running over, pinching, dragging, or similar.
Need help?
Do you have a question about the AP001 and is the answer not in the manual?
Questions and answers