Table of Contents
Advertisement
Quick Links
Advertisement
Table of Contents

Subscribe to Our Youtube Channel
Summary of Contents for ANYKIT D55
- Page 1 Car Tire Inflator Model : D55...
- Page 3 (1)Safety Guidelines (2)Quick Start Guide (3)User Manual It is recommended to watch all tutorial videos on the official Anykit website and read the safety guidelines before using. Prepare for your first use by reviewing the quick start guide and refer to this user manual for more information.
- Page 4 SAFETY INSTRUCTIONS WARNING! • • The car tire inflator is only suitable for 12V vehicles and car tires with width below 12.4’’(315mm). • To prolong the lifespan of the inflator, it is recommended not to exceed 15 minutes of continuous inflation to prevent excessive wear on the components.
- Page 5 SAFETY INSTRUCTIONS • If there is an unusual noise or the temperature becomes very high during inflating, please turn off the inflator immediately. • Before setting the inflation pressure value, make sure the pressure unit is correctly selected. Mixing up psi and bar could lead to dangerous overinflation.
-
Page 6: Table Of Contents
TABLE OF CONTENTS ABOUT ANYKIT------------------------------- KNOW YOUR PRODUCT------------------------- SPECIFICATIONS------------------------------ BATTERY LEVEL INDICATOR & CHARGING------------ HOSE CONNECTION--------------------------- 12V DC POWER------------------------------ STARTUP SHUTDOWN-------------------------- MODE SWITCHING---------------------------- UNIT SWITCHING----------------------------- DEFAULT VALUES FOR VARIOUS TIRE PRESSURE MODES- AUTOMATIC SHUT OFF------------------------- LED LIGHT------------------------------ 10-11 THE CONNECTION METHOD & USAGE OF NOZZLES-----... -
Page 7: About Anykit
ABOUT ANYKIT Anykit is a contemporary and user-friendly tool brand with a strong commitment to simplicity and convenience. Our portable tire inflators, inspection cameras, and an array of automobile maintenance tools enable DIY enthusiasts, to offer both creativity and practicality in various aspects of life, whether you are at home or on the road. -
Page 8: Know Your Product
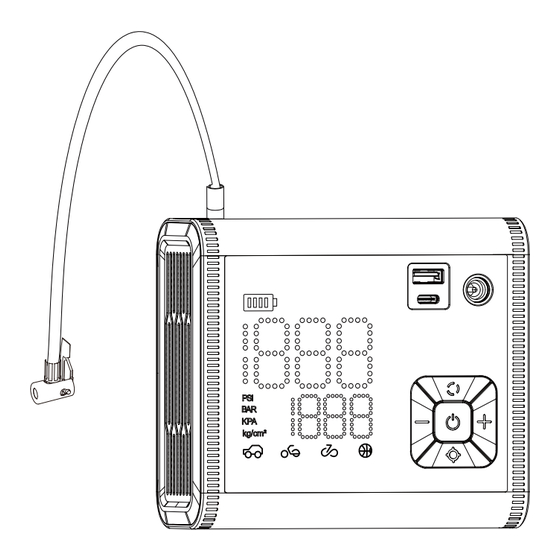
KNOW YOUR PRODUCT LED/SOS Light Hose Connector USB-A Port DC Port USB Type-C Port Air Release Valve Working Mode Power On/Off Inflation On/Off Preset Plus Unit Unit Switching Preset Pressure Value Preset Minus Mode Inf lation hose Car charging cable USB Type-C cable Storage bag Short adapter... -
Page 9: Specifications
SPECIFICATIONS Model Working Voltage DC 12V 44 L/Min No Load Flow Maximum Working Pressure 150 PSI Display Units PSI, BAR,KPA,KG/CM2 Battery Capacity 12000mAh Charging Time 3.5H(5V/3A)-5H(5V/2A) Continuous Working Time 15 Mins Working Noise Lower than 80dB within 1 meter 5V/3A Input Output 5V/2A... -
Page 10: Battery Level Indicator & Charging
BATTERY LEVEL INDICATOR & CHARGING Battery Level Indicator The battery level is shown by four bars, with each bar representing 25%. 1 bar = under 25% 2 bars = between 25% and 50% 3 bars = between 50% and 75% 4 bars = between 75% and 100% Note:The battery indicator will flash when the battery level is below 20%. -
Page 11: Hose Connection
HOSE CONNECTION High temperature zone American standard nozzle If the tire inflator's battery is running low, you can also use a car's 12V DC cigarette lighter to power your device. When inflating larger tires like those on pickup trucks, it is advisable to use a cigarette lighter DC 12V power supply as it will provide faster inflation speed. -
Page 12: 12V Dc Power
12V DC POWER 1. Locate the charging port on the air pump, plug one end of the charging cable into the charging port. 2. Locate the 12V DC cigarette lighter in your vehicle and insert the plug of the air pump's power cord into it. 3. -
Page 13: Startup Shutdown
STARTUP SHUTDOWN Press and hold the power button for three seconds to turn on the device. The screen will light up. While the device is turned on, press and hold the power button three seconds to turn off the device. The screen will go completely dark. -
Page 14: Mode Switching
MODE SWITCHING It's convenient for you to switch between the five modes - car, motorcycle, bicycle, ball, and custom. You can use the mode button to switch and select the desired mode, and the default air pressure value will automatically synchronize with the selected mode. -
Page 15: Default Values For Various Tire Pressure Modes
DEFAULT VALUES FOR VARIOUS TIRE PRESSURE MODES Car mode Motorcycle mode Bicycle mode Ball mode Custom mode 36 PSI 34 PSI 30 PSI 8 PSI (4-150 PSI) (4-65.2 PSI) (26-44 PSI) (4-150 PSI) (4-16 PSI) PRESET PRESSURE VALUE Short press +/- button: adjust the preset value +/- 0.1 PSI Long press +/- button: can quickly adjust the preset value NOTE: The default unit upon startup is PSI. -
Page 16: Led Light
NOTE: It's important to note that there is a delay of approximately 10 seconds before the inflation process stops after the pressure is displayed as reaching the preset value on the screen. Why doesn’t the inflation process stop immediately when the preset tire pressure is reached? Our tire inflator is designed to ensure accurate and stable tire pressure. - Page 17 This power bank is capable of providing a 5V/2A output power to charge products with low battery levels. NOTE: It's important to note that you should not connect a USB cable to the USB-A port of the tire inflator and the other end to the USB-C port of the tire inflator, as this may cause a short circuit.
-
Page 18: The Connection Method & Usage Of Nozzles
THE CONNECTION METHOD & USAGE OF NOZZLES How to install the adapter nozzle onto the air pump's nozzle. Push the adapter nozzle firmly into the air pump's nozzle until it fits securely. Presta standard nozzle - for high-pressure road style and some mountain bicycles. -
Page 19: Maintenance
MAINTENANCE Chemical Contact: Avoid any contact between plastic parts of the tool and substances like brake fluids, gasoline, petroleum-based products, penetrating oils, or any other chemicals. These chemicals can potentially damage, weaken, or even destroy plastic components, posing a serious risk of personal injury. Cleaning: Keep the tool clean to ensure its longevity and optimal performance. -
Page 20: Troubleshooting
TROUBLESHOOTING Problem Possible Reasons and Solutions • Check to see if the pre-programmed INFLATE RIGHT digital gauge is set to a lower PSI than your tire currently is reading (i.e., the digital gauge is set to 15psi but your tire is at 20psi; in this scenario, the inflator will not turn on) Refer to the digital gauge operating instructions and set the PSI to the correct tire pressure. - Page 21 TROUBLESHOOTING Problem Possible Reasons and Solutions • Check if the inflatable leaks • Check if all connecting parts are connected There is air leakage. tightly and ensure the nozzle is screwed tightly. Check if the pressure has reached the limit for this Unchangeable preset mode, change the inflation mode, and try again.
-
Page 22: Warranty
We will give you a full refund if you are not 30-Day Guarantee satisfied with the product. We offer a limited warranty that commences One-Year Warranty from the date of purchase of the product. Visit anykit.com or scan the QR code for more details. - 16 -... -
Page 23: Customer Support
CUSTOMER SUPPORT If you have any questions or concerns about your product, please contact our Customer Support Team 1-877-888-7979 Mon.-Fri. 8:00-5:00 PST(US) support@anykit.com www.anykit.com @anykit @anykit Facebook Messenger - 17 -... - Page 24 ANYKIT D55 C1209 V1.0 3.06.06.002000...
Need help?
Do you have a question about the D55 and is the answer not in the manual?
Questions and answers