Table of Contents
Advertisement
Quick Links
Advertisement
Table of Contents

Related Manuals for Vixen Wireless Unit

Summary of Contents for Vixen Wireless Unit
- Page 1 UG_WU_20220425 Instruction Manual Wireless Unit - PRELIMINARY -...
-
Page 2: Preface
Preface Thank you for your purchase of the Vixen Wireless Unit. The Wireless Unit is to radio-control a Vixen SX series of equatorial mounts, AXJ equatorial mount, and AXD2 via your smartphone or tablet (hereafter smartphone). Use this manual in conjunction with the manual provided for your equipment. -
Page 3: Safety Precautions
- Take care to avoid dropping the product, as it may cause a failure. - Vixen accepts no liability for damages to the camera and other equipment by contact with the product in use. -
Page 4: Handling And Storage
UG_WU_20220425 Handling and Storage - Do not leave the product inside a car in the scorching sun, or in front of any heated sources, particularly radiators of high temperature. - When cleaning, do not use organic solvents such as paint thinners or similar cleaners. - Prevent the product from being exposed to rain, water droplets, heavy dew, mud, or sands. -
Page 5: Table Of Contents
Ⅰ. Installing the App Ⅱ. Setting up the Telescope Ⅲ. Attaching the Wireless Unit Ⅳ. Wireless Connection to the Smartphone with the Wireless Unit Ⅴ. Starting up the App / Basic operation Guidance for Go-To Operation Ⅰ. Locating the Mount Ⅱ. -
Page 6: Before Use
Checking the Package Contents A package of the Wireless Unit contains the items below. Check if all the items are included. For usage of other products that are in conjunction with this unit, please refer to the manuals for those products. -
Page 7: Startup Procedure
Attach the wireless unit to the equatorial mount. ↓ 4. Radio Connection to the Smartphone with the Wireless Unit Connect between the wireless unit and the smartphone with a radio connection. To connect, refer to the instructions provided for the smartphone. ↓... -
Page 8: Ⅰ. Installing The App
Read the instruction manual provided for your telescope in addition to this manual. (1) Set up the telescope according to the instruction manual for your Vixen equatorial mount. If your equatorial mount comes with the STAR BOOK TEN or STAR BOOK ONE controller, the provided controller and STAR BOOK cable are... -
Page 9: Ⅲ. Attaching The Wireless Unit
At this stage, do not plug the power cord into the power port on the equatorial mount. Be sure to attach the Wireless Unit first before connecting the power cord. The Wireless Unit may break if you put on it while the equatorial mount is powered. -
Page 10: Ⅳ. Wireless Connection To The Smartphone With The Wireless Unit
Ⅲ. Attaching the Wireless Unit Use with the AXJ, AXD2, or AXD equatorial mount When you attach the Wireless Unit onto the AXJ, AXD2, or AXD mount, take care not to hit the Wireless Unit by the counterweight. (The counterweight bar rotates when you move the mount in the declination.) Make sure the counterweight is not close to the Wireless Unit to avoid interference. - Page 11 UG_WU_20220425 Ⅳ. Wireless Connection to the Smartphone with the Wireless Unit (2) Open the screen of the wireless LAN connection on the smartphone and choose SSID. Tap the Vixen Wireless Unit XXXX (XXXX are arbitrary numbers) on the screen. (3) Tapping the SSID will proceed to the screen of entering a password.
- Page 12 UG_WU_20220425 Ⅳ. Wireless Connection to the Smartphone with the Wireless Unit (4) When the connection is completed successfully, the wireless indicator on the Wireless Unit will turn to blue light. If the light remains in red, your connection is failed. Start the procedure from (2) again.
-
Page 13: Ⅴ. Starting Up The App / Basic Operation
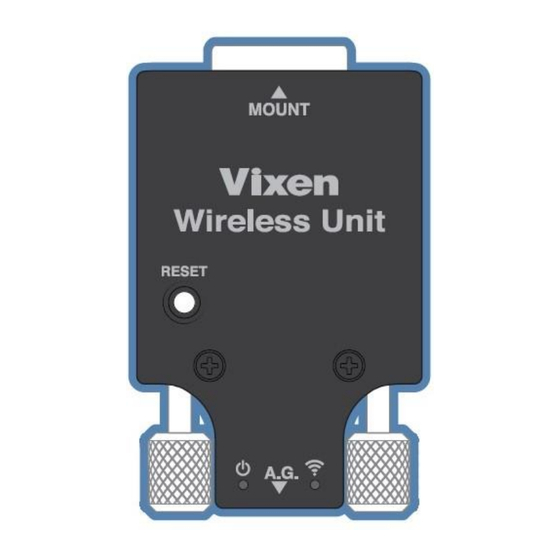
UG_WU_20220425 Ⅴ. Starting up the App Basic Operation 1 / Menus on the Screen (1) Wireless Unit Components Guide Connector to Mount Power Indicator This is a D-sub 9pin female If it lights red: Power ON connector for connecting the... - Page 14 You operate the telescope readily by tapping and swiping the screen with a finger. Note: The display and layout of the icons/menus shown are as of the time when Vixen produced this manual. It may change according to the update of the app. The contents may differ depending on the version you use.
- Page 15 UG_WU_20220425 Ⅴ. Starting up the App Basic Operation 2 / Moving the Telescope In the SCOPE MODE, swiping the star chart will move the telescope in the same direction according to the orientation of the star chart. You can zoom in and out the star map on the screen with the zoom slider bar.
- Page 16 UG_WU_20220425 Ⅴ. Starting up the App Basic Operation 2 / Moving the Telescope For the basic operation of the telescope (finder adjustment, focus alignment, etc.), refer to the instruction manual attached to the equatorial mount or the astronomical telescope set. We recommend that you use the instruction manual that comes with the equatorial mount and check the operation of the app and the equatorial mount while watching the ground scenery during the bright daytime.
- Page 17 UG_WU_20220425 Basic Operation 3 / Go-To Sewing The celestial go-to navigation system stores the coordinates of vast numbers of celestial objects as the database and it allows you to find your desired celestial object of interest automatically. The moon and bright planets are found readily in the night sky as you can locate their positions with ease.
-
Page 18: Guidance For Go-To Operation
UG_WU_20220425 Guidance for Go-To Operation Ⅰ. Locating the Mount Point the mount toward the north celestial pole in the northern hemisphere (the south in the southern hemisphere) so that the RA axis on the mount is parallel with the axis of the celestial sphere in your observing location. Ⅱ. -
Page 19: Ⅰ. Locating The Mount
UG_WU_20220425 Ⅰ. Locating the Mount After setting up the telescope, locate the mount so that its RA axis points toward the north celestial pole if you use the telescope in the northern hemisphere. Unless you intend to take lengthy astrophotography, you do not need to align the RA axis precisely to the celestial pole. -
Page 20: Ⅱ. Setting Home Position
UG_WU_20220425 Ⅱ. Setting Home Position Loosen the RA and DEC clamp levers on the mount and position the telescope’s optical tube by hand so that it points toward the west and is level. It is possible to slew the telescope utilizing the STAR BOOK Wireless app on a smartphone. The STAR BOOK Wireless app works to match the position at which the telescope points with the celestial coordinates memorized in the app based on information on the location, date, and time saved by the smartphone. -
Page 21: Ⅲ. Alignment
UG_WU_20220425 Ⅲ. Alignment The alignment is to match the information on the position acquired from the celestial coordinates with the location of stars you see actually on a one-on-one basis. As the first alignment obtained from the home position is not so much accurate, the automatic go-to slewing may not work precisely. - Page 22 UG_WU_20220425 Ⅲ. Alignment As you tapped on the Next button or the Use Last Mount Setting button, the Solar Warning notice would appear on the screen. Tap the Confirm button and choose on the screen to proceed to the star chart with the SCOPE mode. The star chart where the circles at the center of the screen are directed due west is displayed.
- Page 23 UG_WU_20220425 Ⅲ. Alignment (2) As the Types of Objects appear on the screen, choose an object you use for the acquisition of alignment. Selecting a fixed star is recommendable as the accuracy for the alignment becomes better than other celestial objects. The Fixed Star is chosen in the menu by way of an example here.
- Page 24 UG_WU_20220425 Ⅲ. Alignment (4) The dialog box appears to confirm if you are ready to slew the telescope to Altair. Then, tap on Go- To to start the automatic slewing. The telescope starts moving toward the target. Coordinates in RA and DEC of Altair are displayed on the bottom of the screen.
- Page 25 UG_WU_20220425 Ⅲ. Alignment (5)-1 The motion of the telescope links with the motion of a swipe on the screen’s star chart. While looking through the telescope, bring Altair into the center of the field of view. Magnifying the star chart with the zoom slider will slow the motion of the telescope and thus allows you to make fine adjustments for corrections.
-
Page 26: Ⅳ. Go-To Slewing
UG_WU_20220425 Ⅲ. Alignment (5)-3 After you enter Altair into the center of the field of view, tap the Align X (X is an arbitrary number) on the screen. The dialog box appears and confirms the alignment with Altair. Choose OK by tapping it. The first alignment has been completed. -
Page 27: Further Application
(1) Make sure that the smartphone is fully charged. Disconnecting during the update may result in failure. (2) Confirm that the power indicator on the Wireless Unit is lit in blue just after you turn ON the power of the equatorial mount. - Page 28 Pressing the reset button for one second or longer will make the power and wireless indicators blink two times simultaneously. The Wireless Unit will be in the initial state and complete the reset. If you used the Wireless Unit in the initial...
-
Page 29: Specifications
UG_WU_20220425 Specifications Type Wireless connection equatorial mount controller unit Applicable mounts SX2, SXD2-PFL, SXP, SXP-PFL, SXP2, AXJ (Not available for a mount with AXJ encoders), AXD, AXD2 Equipped CPU 32bit CISC Processor 120MHz Controller Cable Port D-SUB 9PIN Female Autoguider Port 6-pole 6-wired modular jack (for external autoguider) Wi-Fi Function With dedicated application software and use a smartphone as a user interface.
Need help?
Do you have a question about the Wireless Unit and is the answer not in the manual?
Questions and answers