Table of Contents
Advertisement
Quick Links
Advertisement
Table of Contents

Related Manuals for ARRI RCP-2

Summary of Contents for ARRI RCP-2
- Page 1 RCP-2 Remote Control Panel USER MANUAL March 2024 • 1.0 • English D4510008166...
-
Page 3: Disclaimer
In no event shall ARRI or its subsidiaries be liable for or have a remedy for recovery of any special, direct, indirect, incidental, or consequential damages, including, but not limited to lost... -
Page 4: Imprint
The information and intellectual property contained herein is confidential between ARRI and the client and remains the exclusive property of ARRI. If you find any problems in the documentation, please report them to us in writing. ARRI does not warrant that this document is flawless. -
Page 5: Table Of Contents
Assignment of Jog Wheels to Values....................23 Assignment of Jog Wheels to Programs ..................... 24 10 Programs..............................25 10.1 Custom Home ............................. 25 10.2 Advanced Settings ..........................26 10.3 Custom Roll............................26 10.4 Custom Program ..........................26 10.5 Follow..............................27 10.6 Limits..............................28 RCP-2 User Manual... - Page 6 13.7.2 Calibrate Zero ........................... 35 13.7.3 Restore Backup ........................35 13.8 User Profiles............................35 13.9 Widgets Setup............................. 35 13.10 Display setup............................35 13.11 Assigned Controllers ........................... 35 13.12 Controller Calibration .......................... 35 14 ARRI Service Contacts ..........................37 RCP-2 User Manual...
-
Page 7: About This Document
Our advanced service training courses are designed to transfer detailed knowledge about how to service and repair all types of ARRI products and give you permanent access to detailed service instructions, special tools and service parts. To learn more, please visit... -
Page 8: About This Product
Thanks to this uniform GUI for the 360 EVO and the TRINITY 2 system, wishes and suggestions from two entirely different application areas can be creatively implemented in this architecture. RCP-2 User Manual... -
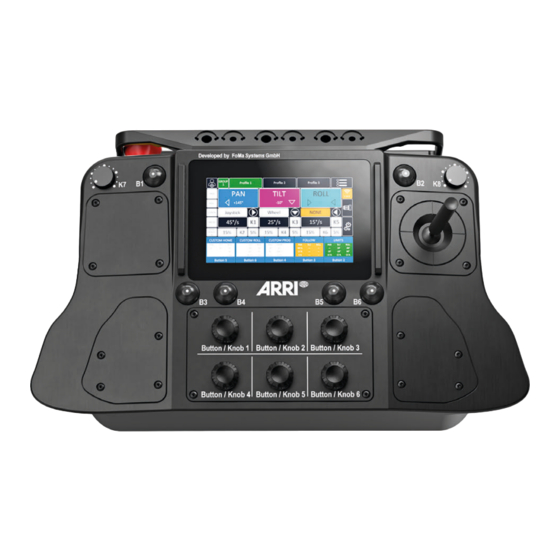
Page 9: Remote Control Panel
10.08 14.56 3.46 10.07 All dimensions given in inch. Width 370 mm / 14.56 in Depth 256 mm / 10.07 in Height 88 mm / 3.46 in (without joystick) Weight 3.1 kg / 6.83 lb (fully equipped) RCP-2 User Manual... - Page 10 5 AUX Power (2pin Lemo, 12 V , max. 3 A) 6 FS CAN Bus 7 Power IN (4pin XLR, 12 V) 8 Power ON/OFF Overview Sides 1 LBUS In (ARRI standard) 2 Mounting Rosette (ARRI standard) 1 Mounting rosette (ARRI standard) 2 LBUS In (ARRI standard) RCP-2 User Manual...
-
Page 11: Power Supply
4.3 Power Supply NOTICE Please follow the instructions regarding the power supply in the 360 EVO and TRINITY 2 operating manual. Only a power supply that meets the requirements can ensure the flawless operation of the remote control. RCP-2 User Manual... -
Page 12: To Initialize The Remote Control Panel And The System
When this message appears, an emergency stop switch is active. Please check the emergency stop switches both on the Remote Control Panel and on the CSS device. Position of the emergency stop switches: • Left: Stabilized Remote Head • Right: Remote Control Panel RCP-2 User Manual... -
Page 13: Head Position
Select UNDERSLUNG when the head is suspended from a crane, Spidercam, or hard- mount. NOTICE An incorrectly selected position can lead to reduced performance of the stabilized remote head and other undesirable effects. RCP-2 User Manual... -
Page 14: Home Screen
• Five freely programmable programs are available at the bottom of the home screen. 6.2 Color Scheme White areas with black lettering are for information purposes only. This means that functions and current values are displayed. The white areas do not react to touch! RCP-2 User Manual... - Page 15 The five user programmable fields at the bottom of the home screen are an exception: • Tap and hold the field for more than two seconds to open a sub menu to program a custom program. • Touch the field briefly to execute the previously programmed custom program. RCP-2 User Manual...
-
Page 16: Controllers
• Touch / move the desired controller, such as: JOYSTICK, WHEELS, ENCODER HEAD, PEDALS, KNOB, BUTTON. Set the ARRI Wheel DRW-1 to PAN and rotate it after pressing the ASSIGN button. The ARRI Wheel DRW-1 Pan is now automatically assigned to the PAN axis. -
Page 17: Controller Setup
7.5.1 Angle or Position Mode The controller generates precise position data in degrees and transmits it to the remote head. Controllers, such as the ARRI Wheels DRW-1, and digital encoder heads, such as the DEH-1 and DEH-2, operate on this principle. -
Page 18: Basic Controller Settings
1. Tap on the value in the black field to open a pop-up window. 2. Turn one of the top jog wheels on the RCP-2 EVO or the side jog wheels on the RCP-3 to increase or decrease the value. -
Page 19: Ratio
Tap this field to change the setting or feel of the controller in Speed mode. LOW gives the best "analog" feeling. NOTICE Different setting options are offered depending on whether the controllers are operating in Speed or Angle mode. RCP-2 User Manual... -
Page 20: Pid Settings
Tap the PID icon on the home screen to open the PID settings menu. You can choose between preset or manual settings for the PID settings. It is the quickest way to use the preset option first and then fine tune the PID values manually. RCP-2 User Manual... -
Page 21: Presets
A low value is recommended for slow applications such as dolly and studio crane, whereas a higher value is suitable for more dynamic applications such as rapid car movements. Tap the Clutch field to change the value. RCP-2 User Manual... -
Page 22: Drop
This function facilitates precise fine-tuning by utilizing a scale system that ranges from 0% (no adjustment) to 100% (maximum adjustment). The normal working range remains unaffected and is still ± 70° so that the function can be seamlessly integrated into the workflow. Tap the Drop field to change the value. RCP-2 User Manual... -
Page 23: Customizing
Press when you are happy with the choice of controller. When you want to assign another controller, press DELETE and repeat the procedure with another controller. NOTICE To cancel the assignment process, press RCP-2 User Manual... -
Page 24: Assignment Of Jog Wheels To Programs
Once the jog wheel is recognized, it will be assigned to the program. Press when you're happy with the choice of controller. When you want to assign another controller, press DELETE and repeat the procedure with another controller. NOTICE To cancel the assignment process, press RCP-2 User Manual... -
Page 25: Programs
SET button next to the position angle. The current HOME position has been set when DEL appears next to the position angle. Tap the wide blue controller bar to open a sub menu for the assignment. RCP-2 User Manual... -
Page 26: Advanced Settings
On the home screen, tap CUSTOM PROG for two seconds to call up the sub menu. See adjacent illustration. The entire CUSTOM PROG function is currently disabled. Tap the ON/OFF field for two seconds to initiate the desired axes. RCP-2 User Manual... -
Page 27: Follow
The Follow function ensures that the object always remains in focus and the camera follows it, even if it is moving. On the home screen, tap FOLLOW for two seconds to call up the sub menu. RCP-2 User Manual... -
Page 28: Limits
The Limits function can also help to ensure safety and prevent damage to equipment. On the home screen, tap LIMITS for two seconds to call up the sub menu. RCP-2 User Manual... - Page 29 Limits are set for Pan and Tilt. The camera will stop movement when reaching the limits. After achieving the desired head positions, press the SET buttons next to the positions. The current positions have been set when DEL appears next to the position angle. RCP-2 User Manual...
-
Page 30: Fiz (Focus, Iris, Zoom)
If you encounter issues with one of the connected LBUS components, please go to the Main Menu and select Software Status under the SYSTEM column. You can find the current software status of the respective LBUS component there. RCP-2 User Manual... -
Page 31: User Profiles
The CSS EVO GUI 2.0 provides the user with the ability to save six user profiles in three distinct groups. This implies that a total of 18 user profiles are currently available. The green highlighted fields indicate which group and which profile is currently in use. RCP-2 User Manual... -
Page 32: Main Menu
With the TRINITY 2 the CSS EVO GUI supports the • TRINITY 2 RF-2400 Radio Set (K0.0044373). 13.1.1 Working Without Radio / Hard-wired Please ensure that the radio system is deactivated, when you do not use a radio module and use the Remote Control Panel hard-wired. RCP-2 User Manual... -
Page 33: Working With Radio Modules
After a software update has been completed, please ensure that all components of the system have been updated properly. Also have the information ready when contacting ARRI Service. 13.4 Language As soon as alternative Languages are available, this function will be turned on. -
Page 34: Dynamic Mode
(the remote head was last used in a city, and now it is used in the mountains, for example). 1. Tap Calibrate Gyro to calibrate the camera gyros. 2. Follow the instructions displayed on the screen. RCP-2 User Manual... -
Page 35: Calibrate Zero
13.12 Controller Calibration The phenomenon of a certain drift in controllers that are first connected to the system is not uncommon. This is especially noticeable with so-called micro force joysticks. RCP-2 User Manual... - Page 36 13 | Main Menu NOTICE Before you attempt to compensate for a drift in the joystick by increasing the window or ramp values, you should rather recalibrate the controller. RCP-2 User Manual...
-
Page 37: Arri Service Contacts
ARRI Service Contacts | 14 14 ARRI Service Contacts Please see the current list of service partners at service contacts. Arnold & Richter Cine Technik GmbH & Co. ARRI CT Limited / London Betriebs KG 2 Highbridge, Oxford Road Herbert-Bayer-Str. 10... - Page 38 14 | ARRI Service Contacts ARRI China (Beijing) Co. Ltd. ARRI ASIA Limited Chaowai SOHO Tower C, 6/F, 0628/0656 41/F One Kowloon, 1 Wang Chaowai Dajie Yi 6 Yuen Street Kowloon Bay Beijing Hong Kong China P. R. China +86 10 5900 9680...
- Page 39 Notes RCP-2 User Manual...
Need help?
Do you have a question about the RCP-2 and is the answer not in the manual?
Questions and answers